STEP 1
Open a new image 650 x 500
Transparent background
RASTER BACKGROUND
PSPX - X2: Colour Depth = 8bits/channel
PSPX3: Colour Depth RGB = 8bits/channel
Flood fill with RED
(We will delete this layer later)
VIEW >>> RULERS
|
STEP 2
LAYERS >>> NEW RASTER LAYER
Choose your SELECTION TOOL then click on the CUSTOM SELECTION symbol
and enter these co-ordinates.
Flood fill with WHITE
DESELECT
|
|
STEP 3
In your MATERIALS PALETTE
Load BLACK in your background
LAYERS >>> NEW RASTER LAYER
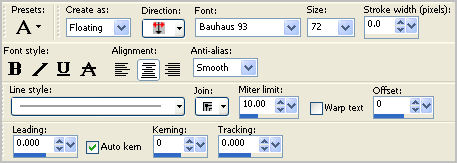
Select your TEXT tool
FONT: Bauhaus 93

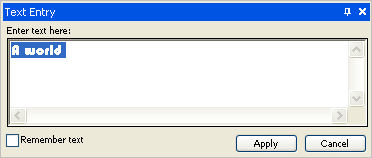
Enter " A world " in the text box

Click APPLY
DESELECT
|
STEP 4
PSP8 - PSP9:IMAGE >>> ROTATE >>> FREE ROTATE = LEFT 90
Ensure "All layers" is UNCHECKED
PSPX - PSPX3: IMAGE >>> FREE ROTATE = LEFT 90
Ensure "All layers" is UNCHECKED
Select your DEFORMATION tool
Mode = SCALE
use default settings
PSPX-X3:Select your PICK tool
Repositon and Adjust as shown
..
Make sure the base of the letters overlap the white area
The left centre node should be level with the
135 pixel mark on your top ruler
Click the RESET RECTANGLE arrow
|
|
STEP 5
LAYERS >>> NEW RASTER LAYER
Select your TEXT tool
Same settings
Enter " of colour " in the text box
Click APPLY
DESELECT
Select your DEFORMATION tool
Mode = SCALE
use default settings
PSPX-X3:Select your PICK tool
Repositon and Adjust as shown ..
The centre top node should be level with the
40 pixel mark on your left ruler
Make sure the base of the letters overlap the white area
Click the RESET RECTANGLE arrow
|
|
STEP 6
LAYERS >>> MERGE >>> MERGE DOWN
PSP8 - 9:
ADJUST >>> COLOUR BALANCE >>> NEGATIVE IMAGE
PSPX - X3: IMAGE >>> NEGATIVE IMAGE
LAYERS >>> MERGE >>> MERGE DOWN
|
|
STEP 7
With your MAGIC WAND
Mode = Replace
Match Mode = RGB Value
Tolerance = 0
Feather = 0
Antialias = Checked
Sample Merged = UNCHECKED
PSP9 - X3: Check CONTIGUOUS
PSPX - X3: There is no " Sample Merged"
PSPX - X3: Use all layers = UNChecked
PSP9 - X3: ANTIALIAS = Inside
Click inside the white area
SELECTIONS >>> MODIFY >>> CONTRACT = 3
EDIT >>> CLEAR
DESELECT
|
|
STEP 8
EFFECTS >>> 3D EFFECTS >>> INNER BEVEL |
|
STEP 9
ACTIVATE RASTER 1
Open up the background image in your PSP workspace
Right click on the Title Bar and select
COPY from the options
Right click on the Title Bar of your tag image
and select PASTE AS NEW LAYER from the options.
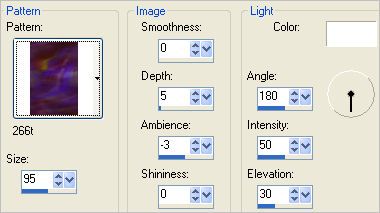
EFFECTS >>> TEXTURE EFFECTS >>> SCULPTURE
PATTERN = 266t

LAYERS >>> MERGE >>> MERGE DOWN
|
STEP 10
Open up the 2 Flower Australia_brad RUK image
in your PSP workspace
Right click on the Title Bar and select
COPY from the options
Right click on the Title Bar of your tag image
and select PASTE AS NEW LAYER from the options.
IMAGE >>> RESIZE = 50%
Ensure "Resize all layers" is UNCHECKED
Resample using WEIGHTED AVERAGE
ADJUST >>> SHARPNESS >>> SHARPEN
Reposition with your MOVER tool |
|
STEP 11
EFFECTS >>> PLUGINS >>> EYE CANDY 3 >>>
DROP SHADOW
|
|
STEP 12
LAYERS >>> DUPLICATE
IMAGE >>> RESIZE = 80%
Ensure "Resize all layers" is UNCHECKED
Resample using WEIGHTED AVERAGE
ADJUST >>> SHARPNESS >>> SHARPEN
Reposition with your MOVER tool |
|
STEP 13
LAYERS >>> DUPLICATE
IMAGE >>> RESIZE = 80%
Ensure "Resize all layers" is UNCHECKED
Resample using WEIGHTED AVERAGE
ADJUST >>> SHARPNESS >>> SHARPEN
Reposition with your MOVER tool |
|
STEP 14
Open up the worldofcolour image
in your PSP workspace
Right click on the Title Bar and select
COPY from the options
Right click on the Title Bar of your tag image
and select PASTE AS NEW LAYER from the options.
Reposition with your MOVER tool so the edges
overlap the "text" layer
|
|
STEP 15
LAYERS >>> ARRANGE >>> SEND TO BOTTOM
ACTIVATE RASTER 2
With your MAGIC WAND....
Same settings.
Click inside the "text" shape
SELECTIONS >>> MODIFY >>> EXPAND = 2
|
|
STEP 16
ACTIVATE RASTER 1
EDIT >>> CLEAR
DESELECT
|
|
STEP 17
ACTIVATE RASTER 2
EFFECTS >>> PLUGINS >>> EYE CANDY 3 >>>
DROP SHADOW
Same settings
EDIT >>> Repeat Drop Shadow..
change DIRECTION to 315
LAYERS >>> MERGE >>> MERGE VISIBLE
|
|
STEP 18
LAYERS >>> NEW RASTER LAYER
SELECTIONS >>> SELECT ALL
SELECTIONS >>> MODIFY >>> CONTRACT = 10
SELECTIONS >>> INVERT
Flood fill with RED #8b0a06
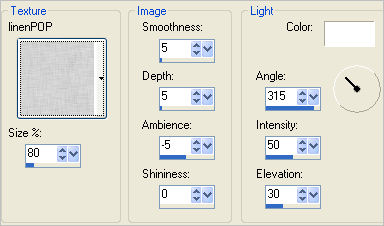
EFFECTS >>> TEXTURE EFFECTS >>> TEXTURE
TEXTURE = linenPOP

|
STEP 19
EFFECTS >>> 3D EFFECTS >>> DROP SHADOW
Vertical & Horizontal offsets = 1
Colour = WHITE
Opacity = 100
Blur = 0
Repeat Drop Shadow effect changing
Vertical & Horizontal Offsets to - ( minus ) 1
Click OK
SELECTIONS >>> INVERT
SELECTIONS >>> MODIFY >>> CONTRACT 10
Repeat both Drop Shadows as above
SELECTIONS >>> MODIFY >>> EXPAND 2
EFFECTS >>> PLUGINS >>> EYE CANDY 3 >>>
DROP SHADOW
Same settings
EDIT >>> Repeat Drop Shadow..
change DIRECTION to 135
DESELECT
|
|
STEP 20
Open up the Macaw in Flight Timber image
in your PSP workspace
Right click on the Title Bar and select COPY from the options
Right click on the Title Bar of your tag image
and select PASTE AS NEW LAYER from the options.
IMAGE >>> RESIZE = 30%
Ensure "Resize all layers" is UNCHECKED
Resample using WEIGHTED AVERAGE
ADJUST >>> SHARPNESS >>> SHARPEN
Reposition with your MOVER tool
|
|
STEP 21
Open up the blue-parrot image
in your PSP workspace
Right click on the Title Bar and select COPY from the options
Right click on the Title Bar of your tag image
and select PASTE AS NEW LAYER from the options.
IMAGE >>> RESIZE = 25%
Ensure "Resize all layers" is UNCHECKED
Resample using WEIGHTED AVERAGE
ADJUST >>> SHARPNESS >>> SHARPEN
EFFECTS >>> 3D EFFECTS >>> INNER BEVEL
|
|
STEP 22
EFFECTS >>> PLUGINS >>> EYE CANDY 3 >>> PERSPECTIVE SHADOW
|
|
STEP 23
Reposition with your MOVER tool |
|
STEP 24
LAYERS >>> DUPLICATE
IMAGE >>> RESIZE = 80%
Ensure "Resize all layers" is UNCHECKED
Resample using WEIGHTED AVERAGE
ADJUST >>> SHARPNESS >>> SHARPEN
Reposition with your MOVER tool
|
|
STEP 25
Add your name on a new layer
LAYERS >>> MERGE >>> MERGE ALL (Flatten)
Save as .jpg image
|
. |
. |