STEP 1
Open a new image 600 x 600
Transparent background
RASTER BACKGROUND
PSPX - X2: Colour Depth = 8bits/channel
PSPX3: Colour Depth RGB = 8bits/channel
|
STEP 2
Open up the arch image in your PSP workspace
Right click on the Title Bar and select
COPY from the options
Right click on the Title Bar of your tag image
and select PASTE AS NEW LAYER from the options.
EFFECTS >>> IMAGE EFFECTS >>> OFFSET |
|
STEP 3
LAYERS >>> DUPLICATE
IMAGE >>> RESIZE = 80%
Ensure "Resize all layers" is UNCHECKED
Resample using WEIGHTED AVERAGE
LAYERS >>> ARRANGE >>> MOVE DOWN
|
|
STEP 4
REPEAT STEP 3
until you have 5 arch layers
|
|
STEP 5
Choose your SELECTION TOOL
Selection Type = Rectangle
Mode = Replace
Feather = 0
Antialias = UNChecked
Select the area shown
|
|
STEP 6
In your MATERIALS PALETTE load
greybgd pattern in the foreground
using these settings |
|
STEP 7
ACTIVATE RASTER 1
Flood fill selection with pattern
DESELECT
|
|
STEP 8
ACTIVATE RASTER 2
EFFECTS >>> PLUGINS >>> EYE CANDY 3 >>>
DROP SHADOW
|
|
STEP 9
ACTIVATE Copy of Raster 2
EDIT >>> Repeat Drop Shadow.
ACTIVATE Copy of (2) Raster 2
EDIT >>> Repeat Drop Shadow.
ACTIVATE Copy of (3) Raster 2
EDIT >>> Repeat Drop Shadow.
ACTIVATE Copy of (4) Raster 2
EDIT >>> Repeat Drop Shadow.
LAYERS >>> MERGE >>> MERGE VISIBLE
|
|
STEP 10
LAYERS >>> NEW RASTER LAYER
Choose your SELECTION TOOL
then click on the CUSTOM SELECTION symbol
and enter these coordinates.
|
|
STEP 11
Open up the christian_wallpaper image
in your PSP workspace
Right click on the Title Bar and select
COPY from the options
Right click on the Title Bar of your tag image
and select PASTE INTO SELECTION from the options.
DESELECT
In your LAYER PALETTE change the OPACITY to 32%
|
|
STEP 12
ACTIVATE THE MERGED LAYER
With your MAGIC WAND
Mode = Replace
Match Mode = RGB Value
Tolerance = 0
Feather = 0
Antialias = Checked
Sample Merged = UNCHECKED
PSP9 - X3: Check CONTIGUOUS
PSPX - X3: There is no " Sample Merged"
PSPX - X3: Use all layers = UNChecked
PSP9 - X3: ANTIALIAS = Outside
Select the transparent area
SELECTIONS >>> MODIFY >>> EXPAND = 18
ACTIVATE Raster 1
EDIT >>> CLEAR
DESELECT
LAYERS >>> MERGE >>> MERGE VISIBLE
|
|
|
|
|
|
STEP 13
Open up the singlecolumn image in your PSP workspace
Right click on the Title Bar and select
COPY from the options
Right click on the Title Bar of your tag image
and select PASTE AS NEW LAYER from the options.
EFFECTS >>> IMAGE EFFECTS >>> OFFSET
|
|
STEP 14
LAYERS >>> DUPLICATE
IMAGE >>> MIRROR
EFFECTS >>> IMAGE EFFECTS >>> OFFSET
|
|
STEP 15
LAYERS >>> MERGE >>> MERGE DOWN |
|
STEP 16
LAYERS >>> DUPLICATE
IMAGE >>> RESIZE = 80%
Ensure "Resize all layers" is UNCHECKED
Resample using WEIGHTED AVERAGE
LAYERS >>> ARRANGE >>> MOVE DOWN
ADJUST >>> SHARPNESS >>> SHARPEN
|
|
STEP 17
REPEAT STEP 16
until you have 5 column layers
|
|
STEP 18
ACTIVATE RASTER 1
EFFECTS >>> PLUGINS >>> EYE CANDY 3 >>>
DROP SHADOW
Same settings
ACTIVATE Copy of Raster 1
EDIT >>> Repeat Drop Shadow.
ACTIVATE Copy of (2) Raster 1
EDIT >>> Repeat Drop Shadow.
ACTIVATE Copy of (3) Raster 1
EDIT >>> Repeat Drop Shadow.
ACTIVATE Copy of (4) Raster 1
EDIT >>> Repeat Drop Shadow.
LAYERS >>> MERGE >>> MERGE VISIBLE
|
|
STEP 19
In your MATERIALS PALETTE load
heckerb pattern in the background
using these settings |
|
STEP 20
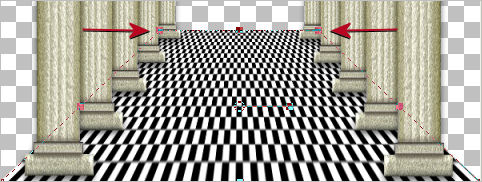
LAYERS >>> NEW RASTER LAYER
Choose your SELECTION TOOL
then click on the CUSTOM SELECTION symbol
and enter these coordinates.
|
|
STEP 21
Flood fill with heckerb pattern
DESELECT
LAYERS >>> ARRANGE >>> MOVE DOWN
Select your DEFORMATION tool
Mode = SCALE
use default settings
PSPX-X3:Select your PICK tool
Depress your SHIFT KEY
and drag the top left and top right nodes towards the centre as shown.

Click the RESET RECTANGLE arrow
Select the MOVER tool to disengage the DEFORMATION tool (PICK tool)
|
STEP 22
ACTIVATE THE MERGED LAYER
With your MAGIC WAND....
Same settings.
and while depressing your SHIFT KEY...
Select the transparent areas shown
|
|
STEP 23
SELECTIONS >>> MODIFY >>> EXPAND = 18
LAYERS >>> NEW RASTER LAYER
LAYERS >>> ARRANGE >>> MOVE DOWN
Flood fill with WHITE
EFFECTS >>> TEXTURE EFFECTS >>> SCULPTURE
PATTERN = PatternE~08_GxChic!

DESELECT
|
STEP 24
LAYERS >>> MERGE >>> MERGE VISIBLE |
|
STEP 25
LAYERS >>> NEW RASTER LAYER
Flood fill with WHITE
LAYERS >>> ARRANGE >>> MOVE DOWN
Open up the ~chains_of_love____by_mmebuterfly~Kirb image in your PSP workspace
Right click on the Title Bar and select
COPY from the options
Right click on the Title Bar of your tag image
and select PASTE AS NEW LAYER from the options.
IMAGE >>> RESIZE = 50%
Ensure "Resize all layers" is UNCHECKED
Resample using WEIGHTED AVERAGE
ADJUST >>> SHARPNESS >>> SHARPEN
|
|
STEP 26
LAYERS >>> MERGE >>> MERGE VISIBLE
Open up the Cross18 image in your PSP workspace
Right click on the Title Bar and select
COPY from the options
Right click on the Title Bar of your tag image
and select PASTE AS NEW LAYER from the options.
IMAGE >>> RESIZE = 25%
Ensure "Resize all layers" is UNCHECKED
Resample using WEIGHTED AVERAGE
ADJUST >>> SHARPNESS >>> SHARPEN
ADJUST >>> HUE & SATURATION >>> COLORIZE

Reposition with your MOVER tool
|
|
STEP 27
In your LAYER PALETTE change the OPACITY to 80%
LAYERS >>> DUPLICATE
IMAGE >>> MIRROR
LAYERS >>> MERGE >>> MERGE VISIBLE |
|
STEP 28
Open up the podium image in your PSP workspace
Right click on the Title Bar and select
COPY from the options
Right click on the Title Bar of your tag image
and select PASTE AS NEW LAYER from the options.
IMAGE >>> MIRROR
IMAGE >>> RESIZE = 80%
Ensure "Resize all layers" is UNCHECKED
Resample using WEIGHTED AVERAGE
ADJUST >>> SHARPNESS >>> SHARPEN
Reposition with your MOVER tool
|
|
STEP 29
Open up the KKK~KS~DianeKnott~Warmth0fH0me~10-09 image in your PSP workspace
Right click on the Title Bar and select
COPY from the options
Right click on the Title Bar of your tag image
and select PASTE AS NEW LAYER from the options.
IMAGE >>> RESIZE = 35%
Ensure "Resize all layers" is UNCHECKED
Resample using WEIGHTED AVERAGE
ADJUST >>> SHARPNESS >>> SHARPEN
Reposition with your MOVER tool |
|
STEP 30
Open up the 8.pspimage image in your PSP workspace
Right click on the Title Bar and select
COPY from the options
Right click on the Title Bar of your tag image
and select PASTE AS NEW LAYER from the options.
LAYERS >>> ARRANGE >>> MOVE DOWN
IMAGE >>> RESIZE = 45%
Ensure "Resize all layers" is UNCHECKED
Resample using WEIGHTED AVERAGE
ADJUST >>> SHARPNESS >>> SHARPEN
Reposition with your MOVER tool |
|
STEP 31
EFFECTS >>> PLUGINS >>> EYE CANDY 3 >>>
DROP SHADOW
Same settings.. BUT change OPACITY to 80%
ACTIVATE Raster 2
EDIT >>> Repeat Drop Shadow.
|
|
STEP 32
Open up the JF_R3 image in your PSP workspace
Right click on the Title Bar and select
COPY from the options
Right click on the Title Bar of your tag image
and select PASTE AS NEW LAYER from the options.
IMAGE >>> RESIZE = 65%
Ensure "Resize all layers" is UNCHECKED
Resample using WEIGHTED AVERAGE
ADJUST >>> SHARPNESS >>> SHARPEN
EFFECTS >>> PLUGINS >>> EYE CANDY 3 >>>
DROP SHADOW
Same settings.
Reposition with your MOVER tool |
|
STEP 33
Open up the Thankful_WA image in your PSP workspace
Right click on the Title Bar and select
COPY from the options
Right click on the Title Bar of your tag image
and select PASTE AS NEW LAYER from the options.
IMAGE >>> RESIZE = 80%
Ensure "Resize all layers" is UNCHECKED
Resample using WEIGHTED AVERAGE
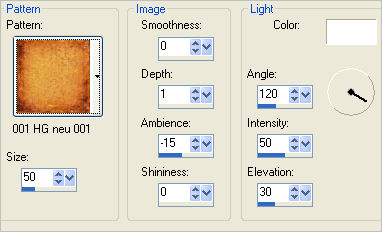
EFFECTS >>> TEXTURE EFFECTS >>> SCULPTURE
PATTERN = 001 HG neu 001 Kopie

|
STEP 34
EFFECTS >>> 3D EFFECTS >>> DROP SHADOW
Vertical & Horizontal offsets = 1
Colour = Black
Opacity = 100
Blur = 0
Reposition with your MOVER tool
|
|
STEP 35
Open up the FrameBorder image in your PSP workspace
Right click on the Title Bar and select
COPY from the options
Right click on the Title Bar of your tag image
and select PASTE AS NEW LAYER from the options.
EFFECTS >>> PLUGINS >>> EYE CANDY 3 >>>
DROP SHADOW
Same settings BUT.... change DIRECTION to 135
Add your Name
LAYERS >>> MERGE >>> MERGE ALL (Flatten)
Save as .jpg image
|
|
|
|
|
|
|