STEP 1
Open a new image 600 x 450
Transparent background
PSPX - X2: Colour Depth = 8bits/channel
PSPX3: Colour Depth RGB = 8bits/channel
Flood fill with WHITE
VIEW >>> RULERS
|
STEP 2
LAYERS >>> NEW RASTER LAYER
SELECTIONS >>> SELECT ALL
Open up the abstract-01 image in your PSP workspace
Right click on the Title Bar and select
COPY from the options
Right click on the Title Bar of your tag image
and select PASTE INTO SELECTION from the options.
DESELECT
|
STEP 3
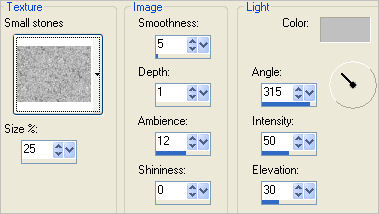
EFFECTS >>> TEXTURE EFFECTS >>> TEXTURE
Texture = Small stones
COLOUR = #c0c0c0
In your LAYER PALETTE change the
BLEND MODE to HARD LIGHT
|
STEP 4
Open up the
misted_KimJacobs03_SeasideSm_Gypsy2-foxleap
image
in your PSP workspace
Right click on the Title Bar and select
COPY from the options
Right click on the Title Bar of your tag image
and select PASTE AS NEW LAYER from the options. |
STEP 5
Select your DEFORMATION tool
Mode = SCALE
use default settings
PSPX-X3:Select your PICK tool
Drag the right centre side node out to the
590 pixel mark on your top ruler.
Drag the left centre side node out to the
40 pixel mark on your top ruler.
Click the RESET RECTANGLE arrow
Select the MOVER tool to disengage the
DEFORMATION tool (PICK tool) |
|
STEP 6
PSP8 - PSPX2:ADJUST >>> BRIGHTNESS and CONTRAST >>> CLARIFY
Strength of effect = 5
PSPX3: ADJUST >>> BRIGHTNESS and CONTRAST >>> LOCAL TONE
Mapping strength = 5
|
STEP 7
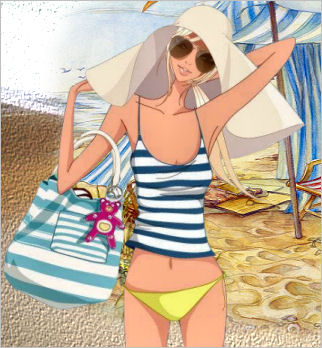
Open up the OIQ-BEACHGRL image
in your PSP workspace
Right click on the Title Bar and select
COPY from the options
Right click on the Title Bar of your tag image
and select PASTE AS NEW LAYER from the options.
IMAGE >>> RESIZE = 75%
Ensure "Resize all layers" is UNCHECKED
Resample using WEIGHTED AVERAGE
ADJUST >>> SHARPNESS >>> SHARPEN
Reposition with your MOVER tool |
|
STEP 8
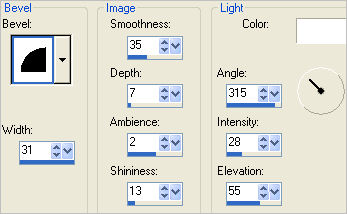
EFFECTS >>> 3D EFFECTS >>> INNER BEVEL |
|
STEP 9
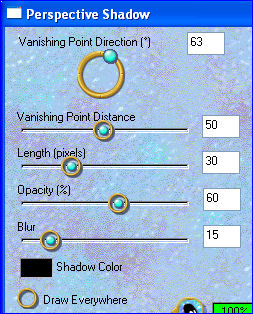
EFFECTS >>> PLUGINS >>> EYE CANDY 3 >>> PERSPECTIVE SHADOW |
|
STEP 10
Open up the MJB_honden-dobermanns-kerst image
in your PSP workspace
Right click on the Title Bar and select
COPY from the options
Right click on the Title Bar of your tag image
and select PASTE AS NEW LAYER from the options.
IMAGE >>> RESIZE = 40%
Ensure "Resize all layers" is UNCHECKED
Resample using WEIGHTED AVERAGE
ADJUST >>> SHARPNESS >>> SHARPEN
Reposition with your MOVER tool |
|
STEP 11
EFFECTS >>> 3D EFFECTS >>> INNER BEVEL
Same settings
EFFECTS >>> PLUGINS >>> EYE CANDY 3 >>> PERSPECTIVE SHADOW
Same settings
|
|
STEP 12
LAYERS >>> NEW RASTER LAYER
Flood fill with TAN #985131
SELECTIONS >>> SELECT ALL
SELECTIONS >>> MODIFY >>> CONTRACT = 5
EDIT >>> CLEAR
Flood fill with GREEN #777b47
SELECTIONS >>> MODIFY >>> CONTRACT = 5
EDIT >>> CLEAR
Flood fill with TAN #985131
SELECTIONS >>> MODIFY >>> CONTRACT = 5
EDIT >>> CLEAR
EFFECTS >>> 3D EFFECTS >>> DROP SHADOW
Vertical & Horizontal offsets = 1
Colour = Black
Opacity = 100
Blur = 0
Repeat Drop Shadow effect changing
Vertical & Horizontal Offsets to - ( minus ) 1
Click OK
|
|
STEP 13
SELECTIONS >>> INVERT
EFFECTS >>> 3D EFFECTS >>> INNER BEVEL |
|
STEP 14
EFFECTS >>> PLUGINS >>> EYE CANDY 3 >>>
DROP SHADOW
DESELECT
|
|
STEP 15
Open up the GoregeousSeashells_rbk image
in your PSP workspace
The shell selection has already been made for you
Right click on the Title Bar and select
COPY from the options
Right click on the Title Bar of your tag image
and select PASTE AS NEW LAYER from the options.
PSP8 - PSP9:IMAGE >>> ROTATE >>> FREE ROTATE = LEFT 90
Ensure "All layers" is UNCHECKED
PSPX - PSPX3: IMAGE >>> FREE ROTATE = LEFT 90
Ensure "All layers" is UNCHECKED
|
|
STEP 16
EFFECTS >>> PLUGINS >>> MuRa's Meister >>> Copies
Preset = *Line
Pay no attention to BG Color

ADJUST >>> SHARPNESS >>> SHARPEN
|
STEP 17
EFFECTS >>> 3D EFFECTS >>> INNER BEVEL |
|
STEP 18
EFFECTS >>> PLUGINS >>> EYE CANDY 3 >>>
DROP SHADOW
Same settings
EFFECTS >>> IMAGE EFFECTS >>> OFFSET
|
|
STEP 19
LAYERS >>> DUPLICATE
IMAGE >>> FLIP
LAYERS >>> MERGE >>> MERGE DOWN
Choose your SELECTION TOOL then click on the
CUSTOM SELECTION symbol
and enter these coordinates.
|
|
STEP 20
EDIT >>> CLEAR
DESELECT
Choose your SELECTION TOOL then click on the
CUSTOM SELECTION symbol
and enter these coordinates.
|
|
STEP 21
EDIT >>> CLEAR
DESELECT
|
|
STEP 22
Open up the Simplethingsbycjk image
in your PSP workspace
Right click on the Title Bar and select
COPY from the options
Right click on the Title Bar of your tag image
and select PASTE AS NEW LAYER from the options.
IMAGE >>> RESIZE = 85%
Ensure "Resize all layers" is UNCHECKED
Resample using WEIGHTED AVERAGE
EFFECTS >>> TEXTURE EFFECTS >>> SCULPTURE
PRESET = fabric_cornflower
|
STEP 23
ADJUST >>> SHARPNESS >>> SHARPEN
EFFECTS >>> 3D EFFECTS >>> DROP SHADOW
Vertical & Horizontal offsets = 1
Colour = Black
Opacity = 100
Blur = 0
Reposition with your MOVER tool
|
|
STEP 24
LAYERS >>> MERGE >>> MERGE ALL (Flatten)
Save as .jpg image
|
..
|
.. |