This is a nice easy tutorial for a change...
you should breeze through it... *S* |
STEP 1
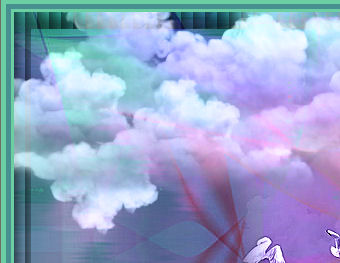
Open up the JF_Background image in your PSP workspace
WINDOW >>> DUPLICATE
Close the original Image
LAYERS >>> Promote background layer
|
STEP 2
LAYERS >>> NEW RASTER LAYER
SELECTIONS >>> SELECT ALL
Open up the 1600_110 image in your PSP workspace
Right click on the Title Bar and select COPY from the options
Right click on the Title Bar of your tag image
and select PASTE INTO SELECTION from the options
DESELECT
EFFECTS >>> EDGE EFFECTS >>> ENHANCE
In your LAYER PALETTE change the
BLEND MODE to MULTIPLY
|
STEP 3
LAYERS >>> DUPLICATE
IMAGE >>> FLIP
|
STEP 4
Open up the PJW-CLOUDS-46-T-64-E image
in your PSP workspace
Right click on the Title Bar and select COPY from the options
Right click on the Title Bar of your tag image
and select PASTE AS NEW LAYER from the options.
In your LAYER PALETTE change the
BLEND MODE to LUMINANCE (L)
Reposition with your MOVER tool to top left of your image

|
STEP 5
Open up the 1914 scenery 181 AR 711®Alejandra Rosales misted-25-1-07 image
in your PSP workspace
Right click on the Title Bar and select COPY from the options
Right click on the Title Bar of your tag image
and select PASTE AS NEW LAYER from the options.
Reposition with your MOVER tool to top right of your image

|
STEP 6
LAYERS >>> ARRANGE >>> MOVE DOWN
In your LAYER PALETTE change the
BLEND MODE to LUMINANCE (L)
ADJUST >>> SHARPNESS >>> SHARPEN MORE
|
|
STEP 7
ACTIVATE Copy of Raster 2
SELECTIONS >>> SELECT ALL
SELECTIONS >>> MODIFY >>> CONTRACT = 30
SELECTIONS >>> INVERT
EFFECTS >>> TEXTURE EFFECTS >>> BLINDS
|
|
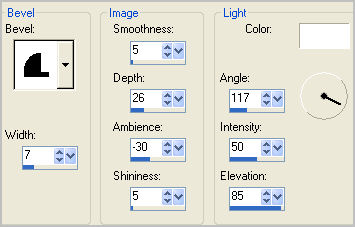
STEP 8
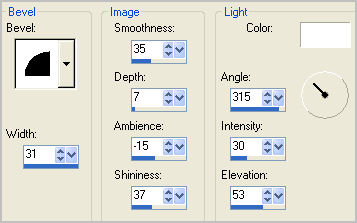
EFFECTS >>> 3D EFFECTS >>> INNER BEVEL
DESELECT
|
|
STEP 8b
Choose your SELECTION TOOL then click on the
CUSTOM SELECTION symbol
and enter these coordinates
IMAGE >>> CROP TO SELECTION
|
|
STEP 9
ACTIVATE RASTER 3
LAYERS >>> NEW RASTER LAYER
SELECTIONS >>> SELECT ALL
Flood fill with #6ccfa3
SELECTIONS >>> MODIFY >>> CONTRACT = 5
EDIT >>> CLEAR
Flood fill with #488f8f
SELECTIONS >>> MODIFY >>> CONTRACT = 5
EDIT >>> CLEAR
Flood fill with #6ccfa3
SELECTIONS >>> MODIFY >>> CONTRACT = 3
EDIT >>> CLEAR
DESELECT
|
|
STEP 10
With your MAGIC WAND
Mode = Replace
Match Mode = RGB Value
Tolerance = 0
Feather = 0
Antialias = UNchecked
Sample Merged = UNCHECKED
PSP9 - X3: Check CONTIGUOUS
PSPX - X3: There is no " Sample Merged"
PSPX - X3: Use all layers = UNChecked
Select the outer pale green part of the frame
|
|
STEP 11
EFFECTS >>> 3D EFFECTS >>> INNER BEVEL
DESELECT
|
|
STEP 12
With your MAGIC WAND....
Same settings.
Select the dark green part of the frame
EFFECTS >>> 3D EFFECTS >>> INNER BEVEL
DESELECT
|
|
STEP 13
With your MAGIC WAND.... Same settings.
Select the inner pale green part of the frame
EFFECTS >>> 3D EFFECTS >>> INNER BEVEL
DESELECT |
|
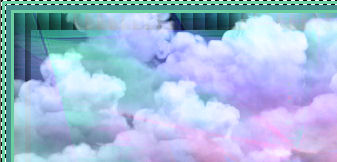
Your frame should look like this
|
|
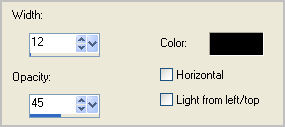
STEP 14
EFFECTS >>> PLUGINS >>> EYE CANDY 3 >>>
DROP SHADOW |
|
STEP 15
Open up the kikirou1131_theberge_couple image
in your PSP workspace
Right click on the Title Bar and select COPY from the options
Right click on the Title Bar of your tag image
and select PASTE AS NEW LAYER from the options.
IMAGE >>> MIRROR
IMAGE >>> RESIZE = 70%
Ensure "Resize all layers" is UNCHECKED
Resample using WEIGHTED AVERAGE
ADJUST >>> SHARPNESS >>> SHARPEN
LAYERS >>> ARRANGE >>> MOVE DOWN
Reposition with your MOVER tool to bottom left of your image
|
|
STEP 16
EFFECTS >>> PLUGINS >>> EYE CANDY 3 >>>
PERSPECTIVE SHADOW |
|
STEP 17
Open up the kz_each day_wa image
in your PSP workspace
Right click on the Title Bar and select COPY from the options
Right click on the Title Bar of your tag image
and select PASTE AS NEW LAYER from the options.
IMAGE >>> RESIZE = 50%
Ensure "Resize all layers" is UNCHECKED
Resample using WEIGHTED AVERAGE
EFFECTS >>> 3D EFFECTS >>> DROP SHADOW
|
|
STEP 18
Reposition with your MOVER tool
to bottom right of your image |
|
STEP 19
LAYERS >>> MERGE >>> MERGE ALL (Flatten)
Save as .jpg image
|
.. |
.. |