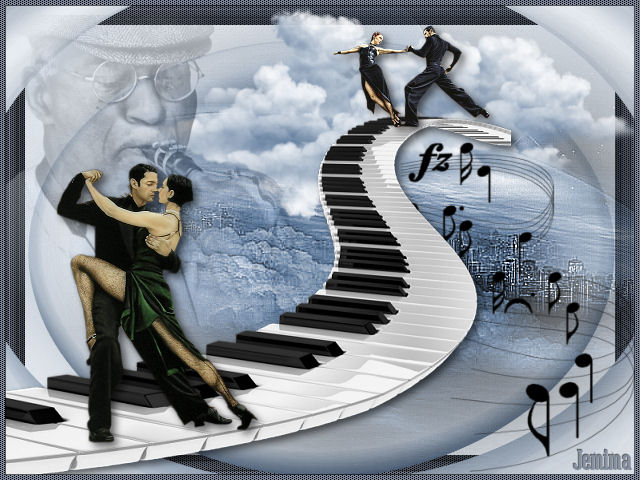
STEP 1
Open a new image 640 x 480
Transparent background
PSPX - X2: Colour Depth = 8bits/channel
PSPX3: Colour Depth RGB = 8bits/channel
SELECTIONS >>> SELECT ALL
|
STEP 2
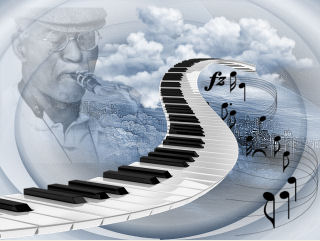
Open up the Paysage 21.10.04 tubes & mists corinne.vicaire image in your PSP workspace
ACTIVATE the Amere-plan layer
Right click on the Title Bar and select COPY from the options
Right click on the Title Bar of your tag image
and select PASTE INTO SELECTION from the options.
DESELECT
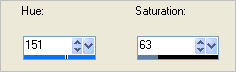
ADJUST >>> HUE & SATURATION >>> COLORIZE
|
STEP 3
LAYERS >>> DUPLICATE
EFFECTS>>> GEOMETRIC EFFECTS >>>
Perspective Horizontal
|
|
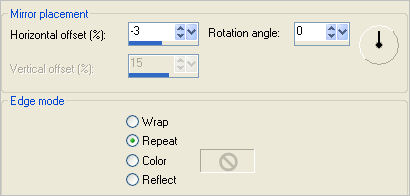
STEP 4
IMAGE >>> MIRROR
EFFECTS >>> REFLECTION EFFECTS >>> Rotating Mirror
PSP9 - PSPX2:ADJUST >>> BRIGHTNESS and CONTRAST >>> CLARIFY
Strength of effect = 5
PSPX3: ADJUST >>> BRIGHTNESS and CONTRAST >>> LOCAL TONE
Mapping strength = 5
PSPX6: Block size 8
EDIT >>> Repeat CLarify
OR
EDIT >>> Repeat Local Tone
|
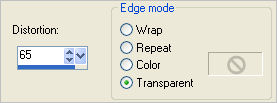
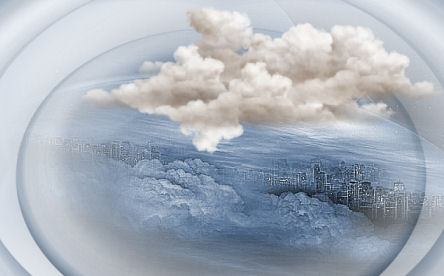
STEP 5
EFFECTS >>> DISTORTION EFFECTS >>>
POLAR COORDINATES |
|
STEP 6
IMAGE >>> FLIP |
|
STEP 7
Open up the Paysage 21.10.04 tubes & mists corinne.vicaire image in your PSP workspace
ACTIVATE Raster 1 layer
Right click on the Title Bar and select COPY from the options
Right click on the Title Bar of your tag image
and select PASTE AS NEW LAYER from the options.
IMAGE >>> MIRROR
IMAGE >>> RESIZE = 80%
Ensure "Resize all layers" is UNCHECKED
Resample using WEIGHTED AVERAGE
EFFECTS >>> EDGE EFFECTS >>> ENHANCE MORE
|
STEP 8
EFFECTS >>> IMAGE EFFECTS >>> OFFSET |
|
STEP 9
ADJUST >>> HUE & SATURATION >>> COLORIZE
Same settings
Open up the PJW-CLOUDS-46-T-64-E image
in your PSP workspace
Right click on the Title Bar and select COPY from the options
Right click on the Title Bar of your tag image
and select PASTE AS NEW LAYER from the options.
IMAGE >>> RESIZE = 85%
Ensure "Resize all layers" is UNCHECKED
Resample using WEIGHTED AVERAGE
Reposition with your MOVER tool
|
STEP 10
ADJUST >>> HUE & SATURATION >>> COLORIZE
Same settings
Open up the kikirou528_saxo image
in your PSP workspace
Right click on the Title Bar and select
COPY from the options
Right click on the Title Bar of your tag image
and select PASTE AS NEW LAYER from the options.
IMAGE >>> MIRROR
IMAGE >>> RESIZE = 55%
Ensure "Resize all layers" is UNCHECKED
Resample using WEIGHTED AVERAGE
Reposition with your MOVER tool |
|
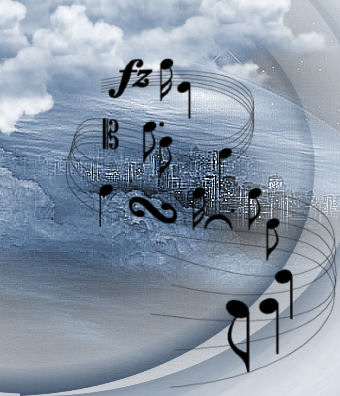
STEP 11
ADJUST >>> HUE & SATURATION >>> COLORIZE
Same settings
In your LAYER PALETTE change the OPACITY to 45%
Change the BLEND MODE to LUMINANCE (L)
Open up the Music Notes image
in your PSP workspace
Right click on the Title Bar and select
COPY from the options
Right click on the Title Bar of your tag image
and select PASTE AS NEW LAYER from the options.
IMAGE >>> RESIZE = 90%
Ensure "Resize all layers" is UNCHECKED
Resample using WEIGHTED AVERAGE
Reposition to bottom right with your MOVER tool
|
|
STEP 12
Open up the pianokeys_003 image
in your PSP workspace
Right click on the Title Bar and select
COPY from the options
Right click on the Title Bar of your tag image
and select PASTE AS NEW LAYER from the options.
IMAGE >>> RESIZE = 80%
Ensure "Resize all layers" is UNCHECKED
Resample using WEIGHTED AVERAGE
ADJUST >>> SHARPNESS >>> SHARPEN
Reposition to bottom left with your MOVER tool |
|
STEP 13
EFFECTS >>> PLUGINS >>> EYE CANDY 3 >>>
DROP SHADOW |
|
STEP 14
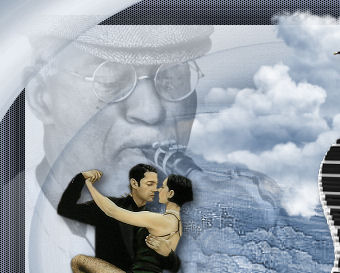
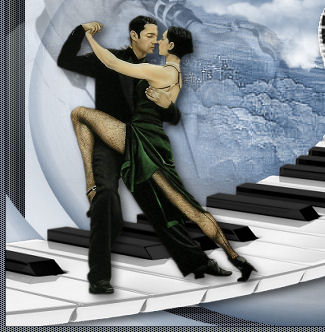
Open up the richard_young_dancers image
in your PSP workspace
Right click on the Title Bar and select
COPY from the options
Right click on the Title Bar of your tag image
and select PASTE AS NEW LAYER from the options.
IMAGE >>> RESIZE = 30%
Ensure "Resize all layers" is UNCHECKED
Resample using WEIGHTED AVERAGE
ADJUST >>> SHARPNESS >>> SHARPEN
EFFECTS >>> PLUGINS >>> EYE CANDY 3 >>>
DROP SHADOW
Same settings
Reposition with your MOVER tool |
|
STEP 15
Open up the CJ_Dancers 1 image
in your PSP workspace
Right click on the Title Bar and select
COPY from the options
Right click on the Title Bar of your tag image
and select PASTE AS NEW LAYER from the options.
IMAGE >>> MIRROR
IMAGE >>> RESIZE = 50%
Ensure "Resize all layers" is UNCHECKED
Resample using WEIGHTED AVERAGE
ADJUST >>> SHARPNESS >>> SHARPEN
EFFECTS >>> PLUGINS >>> EYE CANDY 3 >>>
DROP SHADOW
Same settings
Reposition with your MOVER tool |
|
STEP 16
LAYERS >>> NEW RASTER LAYER
Flood fill with #7d8897
SELECTIONS >>> SELECT ALL
SELECTIONS >>> MODIFY >>> CONTRACT = 25
EDIT >>> CLEAR
DESELECT
EFFECTS >>> PLUGINS >>> CYBIA >>> SCREENWORKS >>> Dot Screen

|
STEP 17
SELECTIONS >>> SELECT ALL
SELECTIONS >>> MODIFY >>> CONTRACT = 10
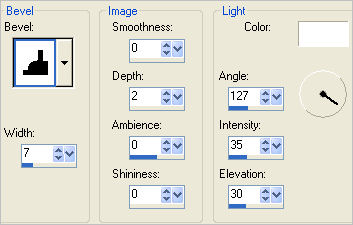
EFFECTS >>> 3D EFFECTS >>> OUTER BEVEL
|
|
STEP 18
SELECTIONS >>> MODIFY >>> CONTRACT = 10
EFFECTS >>> 3D EFFECTS >>> OUTER BEVEL
Same settings
DESELECT
|
|
STEP 19
In your LAYER PALETTE drag this layer
below the
Copy of Raster 1 layer
|
|
STEP 20
ACTIVATE the TOP layer
LAYERS >>> NEW RASTER LAYER
Flood fill with #7d8897
SELECTIONS >>> SELECT ALL
SELECTIONS >>> MODIFY >>> CONTRACT = 5
EDIT >>> CLEAR
DESELECT
EFFECTS >>> PLUGINS >>> CYBIA >>>
SCREENWORKS >>> Dot Screen
Same settings
EFFECTS >>> 3D EFFECTS >>> DROP SHADOW
Vertical & Horizontal offsets = 1
Colour = Black
Opacity = 60
Blur = 0
Repeat Drop Shadow effect changing
Vertical & Horizontal Offsets to - ( minus ) 1
Click OK
|
STEP 21
ADD your NAME
LAYERS >>> MERGE >>> MERGE ALL (Flatten)
Save as .jpg image |
|
|
|
|
|
|