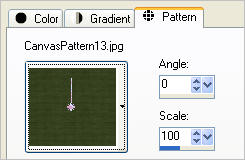
In your MATERIALS PALETTE load
CanvasPattern13 pattern in the foreground
using these settings
|
|
VIEW >>> RULERS
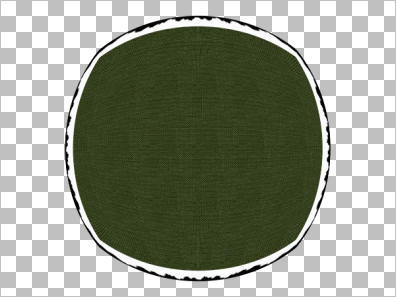
Open a new image 600 x 450
Transparent background
PSPX - X2: Colour Depth = 8bits/channel
PSPX3: Colour Depth RGB = 8bits/channel
Flood fill with the pattern
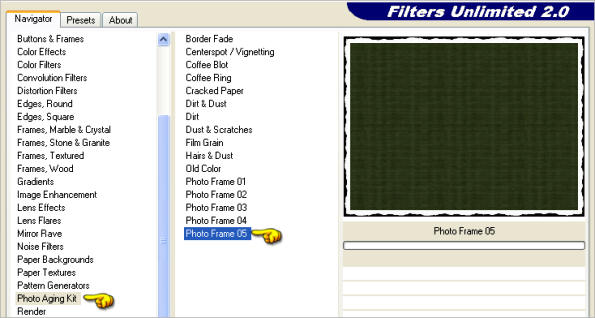
EFFECTS >>> PLUGINS >>> <I.C.NET Software> Filters Unlimited 2
Photo Aging Kit >>> Photo Frame 05
|
IMAGE >>> RESIZE = 90%
Ensure "Resize all layers" is UNCHECKED
Resample using WEIGHTED AVERAGE
EFFECTS>>> GEOMETRIC EFFECTS >>> CIRCLE
EDGE MODE = Transparent |
|
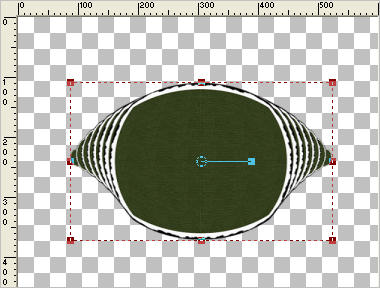
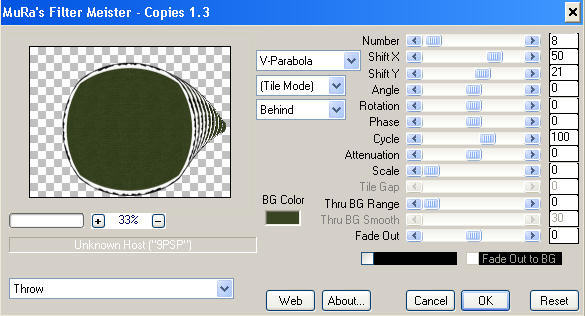
EFFECTS >>> PLUGINS >>> MuRas Meister >>> Copies >>> Throw
|
IMAGE >>> RESIZE = 65%
Ensure "Resize all layers" is UNCHECKED
Resample using WEIGHTED AVERAGE
LAYERS >>> DUPLICATE
IMAGE >>> MIRROR
LAYERS >>> MERGE >>> MERGE VISIBLE
ADJUST >>> SHARPNESS >>> SHARPEN
Select your DEFORMATION tool
Mode = SCALE
use default settings
PSPX-X3:Select your PICK tool
Drag the centre left node to the 85 pixel mark on top ruler
and the centre right node to the 525
pixel mark on top ruler
|
|
Click the RESET RECTANGLE arrow
Select the MOVER tool to disengage the DEFORMATION tool (PICK tool)
ADJUST >>> SHARPNESS >>> SHARPEN
|
CLOSE THE MERGED LAYER
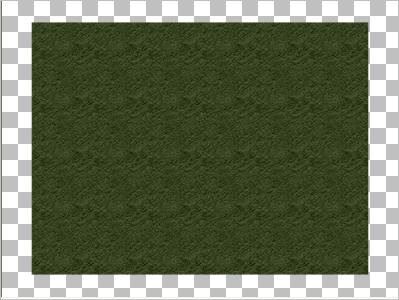
LAYERS >>> NEW RASTER LAYER
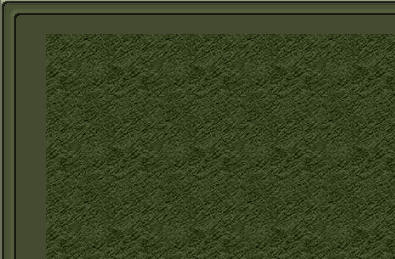
Flood fill with GREEN #394422
.
LAYERS >>> ARRANGE >>> MOVE DOWN
EFFECTS >>> PLUGINS >>> <I.C.NET Software> Filters Unlimited 2
Paper Textures >>> Filter Paper
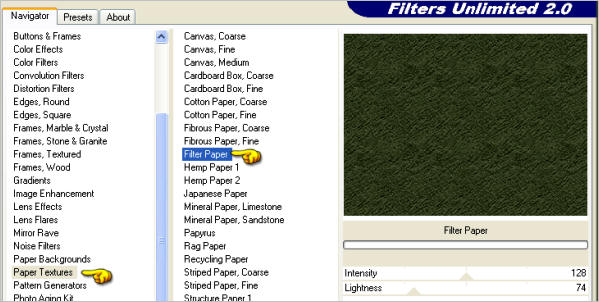 |
IMAGE >>> RESIZE = 85%
Ensure "Resize all layers" is UNCHECKED
Resample using WEIGHTED AVERAGE |
|
LAYERS >>> NEW RASTER LAYER
LAYERS >>> ARRANGE >>> MOVE DOWN
Flood fill with LIGHT GREEN #4e5739
SELECTIONS >>> SELECT ALL
SELECTIONS >>> MODIFY >>> CONTRACT = 5
SELECTIONS >>> INVERT
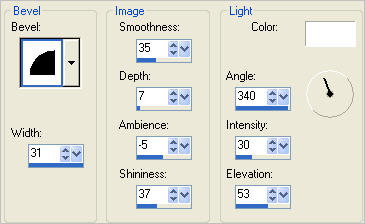
EFFECTS >>> 3D EFFECTS >>> INNER BEVEL
|
|
SELECTIONS >>> INVERT
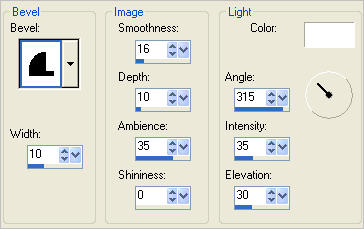
EFFECTS >>> 3D EFFECTS >>> OUTER BEVEL |
|
SELECTIONS >>> MODIFY >>> CONTRACT = 12
EFFECTS >>> 3D EFFECTS >>> OUTER BEVEL
Same settings
DESELECT
|
|
ACTIVATE RASTER 1
LAYERS >>> NEW RASTER LAYER
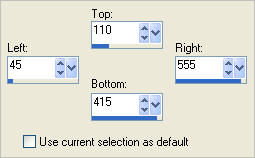
Choose your SELECTION TOOL then click on the CUSTOM SELECTION symbol
and enter these coordinates.
|
|
Open up the AH_67_2301_10[1] image in your PSP workspace
Right click on the Title Bar and select COPY from the options
Right click on the Title Bar of your tag image
and select PASTE INTO SELECTION from the options.
DESELECT
EFFECTS >>> EDGE EFFECTS >>> ENHANCE
|
|
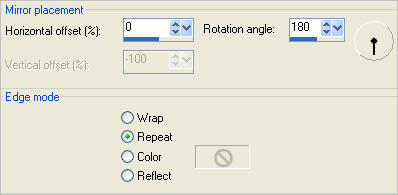
EFFECTS >>> REFLECTION EFFECTS >>> ROTATING MIRROR
|
|
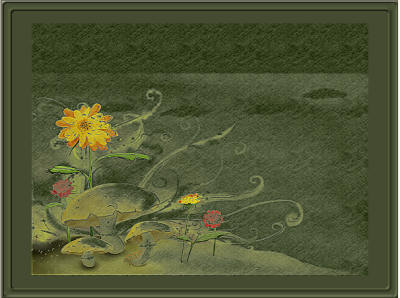
ACTIVATE RASTER 1
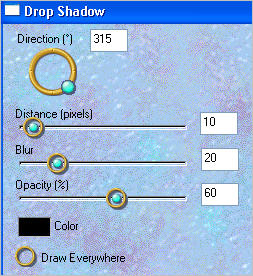
EFFECTS >>> PLUGINS >>> EYE CANDY 3 >>> DROP SHADOW
EDIT >>> Repeat Drop Shadow.. change DIRECTION to 135 |
|
..  |
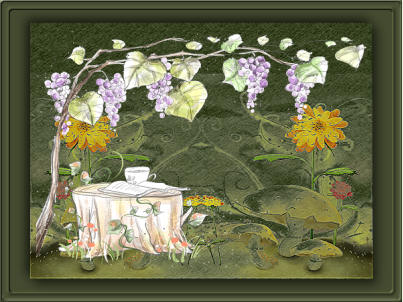
Open up the 282_01-024 image in your PSP workspace
Right click on the Title Bar and select COPY from the options
Right click on the Title Bar of your tag image
and select PASTE AS NEW LAYER from the options.
IMAGE >>> RESIZE = 55%
Ensure "Resize all layers" is UNCHECKED
Resample using WEIGHTED AVERAGE
ADJUST >>> SHARPNESS >>> SHARPEN
LAYERS >>> ARRANGE >>> MOVE UP
|
|
OPEN & ACTIVATE THE MERGED LAYER
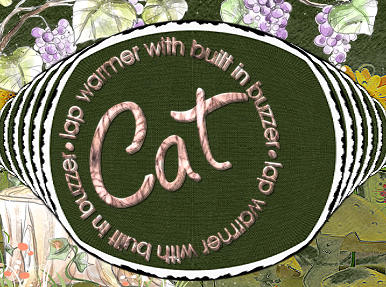
Open up the CatLapWarmer_TlcCreations image
in your PSP workspace
Right click on the Title Bar and select COPY from the options
Right click on the Title Bar of your tag image
and select PASTE AS NEW LAYER from the options.
IMAGE >>> RESIZE = 15%
Ensure "Resize all layers" is UNCHECKED
Resample using WEIGHTED AVERAGE
ADJUST >>> COLOUR BALANCE >>> NEGATIVE IMAGE
PSPX - X3: IMAGE >>> NEGATIVE IMAGE
Reposition with your MOVER tool
|
|
EFFECTS >>> 3D EFFECTS >>> DROP SHADOW
Vertical & Horizontal offsets = 1
Colour = WHITE
Opacity = 85
Blur = 0
REPEAT the Drop Shadow twice
|
|
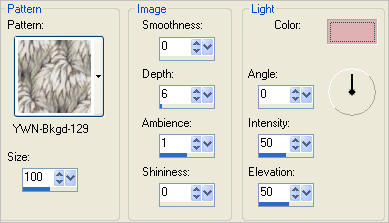
EFFECTS >>> TEXTURE EFFECTS >>> SCULPTURE
PATTERN = YWN-Bkgd-129
COLOUR = #deb2b2
|
|
EFFECTS >>> 3D EFFECTS >>> DROP SHADOW
Vertical & Horizontal offsets = 1
Colour = BLACK
Opacity = 85
Blur = 0 |
|
Open up the mtfp_tube_137 image in your PSP workspace
Right click on the Title Bar and select COPY from the options
Right click on the Title Bar of your tag image
and select PASTE AS NEW LAYER from the options.
IMAGE >>> MIRROR
IMAGE >>> RESIZE = 55%
Ensure "Resize all layers" is UNCHECKED
Resample using WEIGHTED AVERAGE
ADJUST >>> SHARPNESS >>> SHARPEN
Reposition with your MOVER tool
|
|
EFFECTS >>> PLUGINS >>> EYE CANDY 3 >>> DROP SHADOW
Same settings
ACTIVATE THE MERGED LAYER
EFFECTS >>> PLUGINS >>> EYE CANDY 3 >>> DROP SHADOW
Same settings
EDIT >>> Repeat Drop Shadow.. change DIRECTION to 315
LAYERS >>> MERGE >>> MERGE ALL (Flatten)
Save as .jpg image
|
|
|