STEP 1
Open a new image 650 x 500
Transparent background
PSPX - X2: Colour Depth = 8bits/channel
PSPX3: Colour Depth RGB = 8bits/channel
Flood fill with BLUE #41516f |
STEP 2
LAYERS >>> NEW RASTER LAYER
SELECTIONS >>> SELECT ALL
Open up the Sorensen_Designs Mist Jan 104-11 image
in your PSP workspace
Select Raster 1
Right click on the Title Bar and
select COPY from the options
Right click on the Title Bar of your tag image
and select PASTE INTO SELECTION from the options.
In your LAYER PALETTE change the BLEND MODE to LUMINANCE (L)
DESELECT
|
STEP 3
LAYERS >>> DUPLICATE (2 times)
Close
Copy (2) of Raster 2
ACTIVATE
Copy of Raster 2
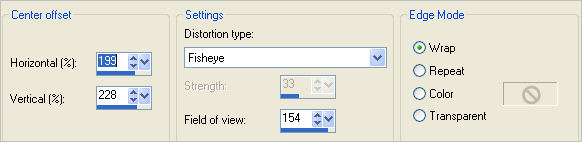
EFFECTS >>> DISTORTION EFFECTS >>> LENS DISTORTION
In your LAYER PALETTE change the OPACITY to 74%
Change the BLEND MODE to MULTIPLY
|
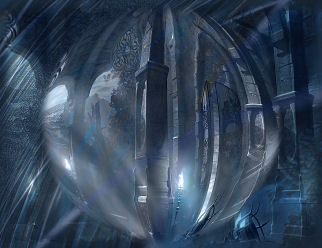
STEP 4
ACTIVATE Copy (2) of Raster 2
EFFECTS>>> GEOMETRIC EFFECTS >>> CIRCLE
EDGE MODE = Transparent
|
|
STEP 5
IMAGE >>> RESIZE = 85%
Ensure "Resize all layers" is UNCHECKED
Resample using WEIGHTED AVERAGE
LAYERS >>> DUPLICATE
IMAGE >>> MIRROR
In your LAYER PALETTE change the OPACITY to 74%
ACTIVATE Copy (2) of Raster 2
EFFECTS >>> EDGE EFFECTS >>> ENHANCE MORE
|
|
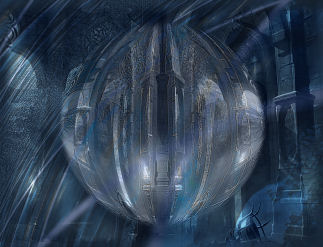
STEP 6
ACTIVATE Copy (3) of Raster 2
EFFECTS>>> GEOMETRIC EFFECTS >>> CIRCLE
EDGE MODE = Transparent
ADJUST >>> SHARPNESS >>> SHARPEN MORE
|
|
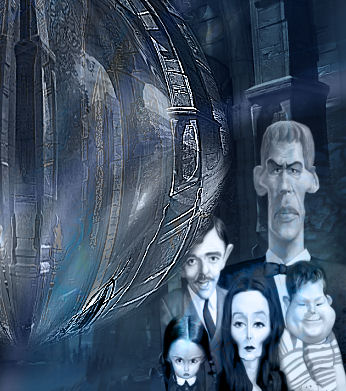
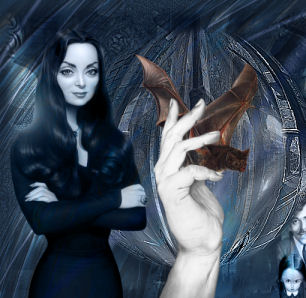
STEP 7
Open up the JFAddamsFamily image
in your PSP workspace
Right click on the Title Bar and
select COPY from the options
Right click on the Title Bar of your tag image
and select PASTE AS NEW LAYER from the options.
IMAGE >>> RESIZE = 50%
Ensure "Resize all layers" is UNCHECKED
Resample using WEIGHTED AVERAGE
Reposition with your MOVER tool to bottom right corner
In your LAYER PALETTE
drag this layer below
Copy (2) of Raster 2
Change the BLEND MODE to LUMINANCE (L)
|
|
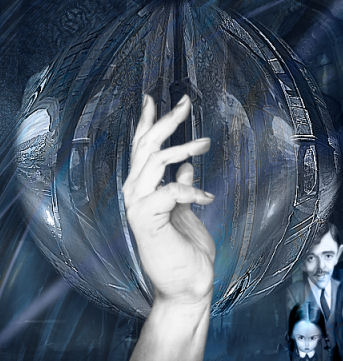
STEP 8
ACTIVATE the top layer
Open up the JF_Thing image
in your PSP workspace
Right click on the Title Bar and
select COPY from the options
Right click on the Title Bar of your tag image
and select PASTE AS NEW LAYER from the options.
IMAGE >>> RESIZE = 75%
Ensure "Resize all layers" is UNCHECKED
Resample using WEIGHTED AVERAGE
Reposition with your MOVER tool
|
|
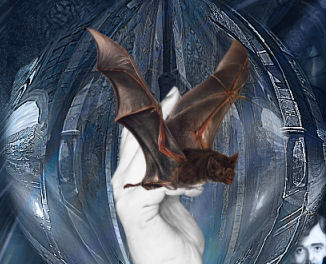
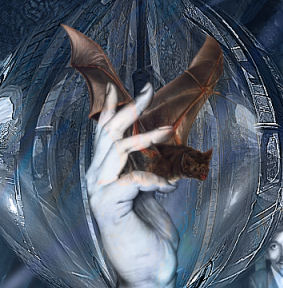
STEP 9
Open up the JF_VampireBat image
in your PSP workspace
Right click on the Title Bar and
select COPY from the options
Right click on the Title Bar of your tag image
and select PASTE AS NEW LAYER from the options.
IMAGE >>> RESIZE = 50%
Ensure "Resize all layers" is UNCHECKED
Resample using WEIGHTED AVERAGE
Reposition with your MOVER tool |
|
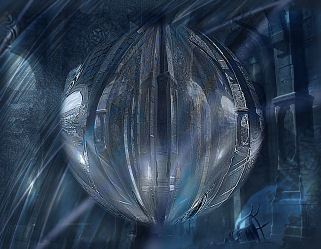
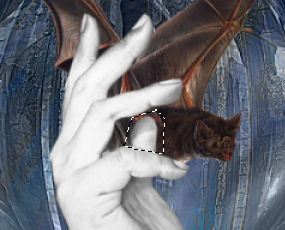
STEP 10
LAYERS >>> ARRANGE >>> MOVE DOWN
Choose your FREEHAND SELECTION TOOL
Selection Type = Point to Point
Mode = Replace
Feather = 1
Antialias = Checked
ACTIVATE RASTER 4
Select the area shown
|
|
STEP 11
Hit your DELETE key
DESELECT
In your LAYER PALETTE
Change the BLEND MODE to LUMINANCE (L)
LAYERS >>> DUPLICATE
In your LAYER PALETTE
Change the BLEND MODE to MULTIPLY
|
|
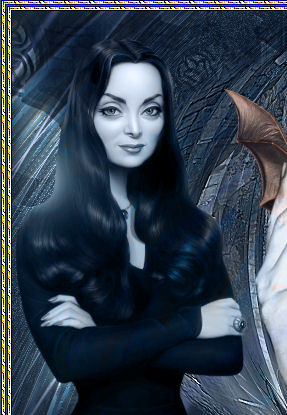
STEP 12
Open up the libellulegraphisme_morticia_by_papaninja image
in your PSP workspace
Right click on the Title Bar and
select COPY from the options
Right click on the Title Bar of your tag image
and select PASTE AS NEW LAYER from the options.
IMAGE >>> MIRROR
IMAGE >>> RESIZE = 50%
Ensure "Resize all layers" is UNCHECKED
Resample using WEIGHTED AVERAGE
Reposition with your MOVER tool
In your LAYER PALETTE
Change the BLEND MODE to LUMINANCE (L)
|
|
STEP 13
Open up the ccsfrightnight image in your PSP workspace
Right click on the Title Bar and
select COPY from the options
Right click on the Title Bar of your tag image
and select PASTE AS NEW LAYER from the options.
IMAGE >>> RESIZE = 50%
Ensure "Resize all layers" is UNCHECKED
Resample using WEIGHTED AVERAGE
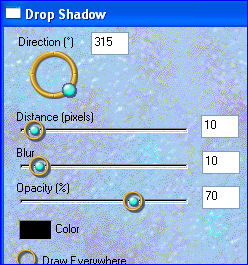
EFFECTS >>> 3D EFFECTS >>> DROP SHADOW
Vertical & Horizontal offsets = 2
Colour = WHITE
Opacity = 100
Blur = 0
Reposition with your MOVER tool
|
|
STEP 14
LAYERS >>> MERGE >>> MERGE VISIBLE
In your MATERIALS PALETTE load
goldpattern pattern in the foreground
LAYERS >>> NEW RASTER LAYER
Flood fill with BLUE #41516f
|
|
STEP 15
SELECTIONS >>> SELECT ALL
SELECTIONS >>> MODIFY >>> CONTRACT = 3
EDIT >>> CLEAR
Flood fill with the goldpattern
EFFECTS >>> EDGE EFFECTS >>> ENHANCE MORE
SELECTIONS >>> MODIFY >>> CONTRACT = 3
EDIT >>> CLEAR
Flood fill with BLUE #41516f
SELECTIONS >>> MODIFY >>> CONTRACT = 3
EDIT >>> CLEAR
Flood fill with the goldpattern
EFFECTS >>> EDGE EFFECTS >>> ENHANCE MORE
SELECTIONS >>> MODIFY >>> CONTRACT = 3
EDIT >>> CLEAR
EFFECTS >>> 3D EFFECTS >>> DROP SHADOW
Vertical & Horizontal offsets = 1
Colour = Black
Opacity = 100
Blur = 0
Repeat Drop Shadow effect changing
Vertical & Horizontal Offsets to - ( minus ) 1
Click OK
DESELECT
|
|
STEP 16
EFFECTS >>> PLUGINS >>> EYE CANDY 3 >>>
DROP SHADOW
EDIT >>> Repeat Drop Shadow..
change DIRECTION to 135
|
|
STEP 17
ADJUST >>> SHARPNESS >>> SHARPEN MORE
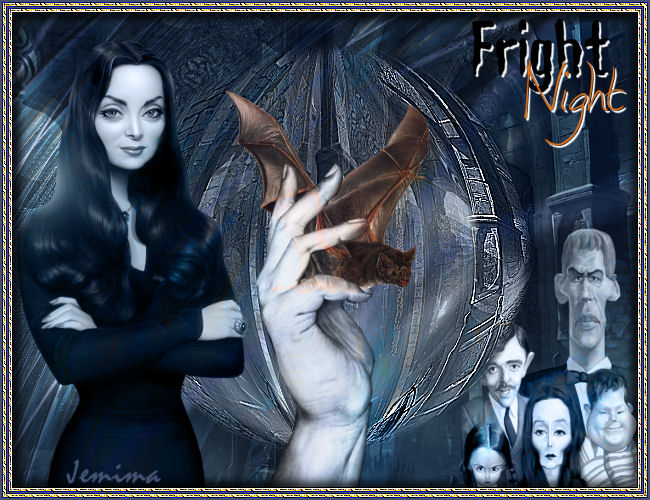
Add your name
LAYERS >>> MERGE >>> MERGE ALL (Flatten)
Save as .jpg image
|
|
|