STEP 1
In your MATERIALS PALETTE
Load the ' 265t ' pattern in your foreground
using these settings
|
|
STEP 2
Open a new image 600 x 600
Transparent background
RASTER BACKGROUND
PSPX - X2: Colour Depth = 8bits/channel
PSPX3: Colour Depth RGB = 8bits/channel
VIEW >>> RULERS
Flood fill with pattern
IMAGE >>> RESIZE = 85%
Ensure "Resize all layers" is UNCHECKED
Resample using WEIGHTED AVERAGE
|
|
STEP 3
Select your DEFORMATION tool
Mode = SHEAR(Shift)
use default settings
PSPX-X3:Select your PICK tool
Drag the top left node down to the 200 pixel mark
on the left ruler.
Drag the bottom right node UP to the 350
pixel mark
on the left ruler.
|
|
STEP 4
Click the RESET RECTANGLE arrow
Select the MOVER tool to disengage the
DEFORMATION tool (PICK tool)
EFFECTS>>> GEOMETRIC EFFECTS >>> CIRCLE
Edge Mode = Transparent
EDIT >>> Repeat Circle (3 times)
EFFECTS >>> 3D EFFECTS >>> DROP SHADOW
Vertical & Horizontal offsets = 1
Colour = Black
Opacity = 100
Blur = 0
Repeat Drop Shadow effect changing
Vertical & Horizontal Offsets to - ( minus ) 1
Click OK
|
|
STEP 5
EFFECTS >>> PLUGINS >>> EYE CANDY 3 >>>
DROP SHADOW
EDIT >>> Repeat Drop Shadow..
change DIRECTION to 135
|
|
STEP 6
IMAGE >>> RESIZE = 85%
Ensure "Resize all layers" is UNCHECKED
Resample using WEIGHTED AVERAGE
ADJUST >>> SHARPNESS >>> SHARPEN MORE
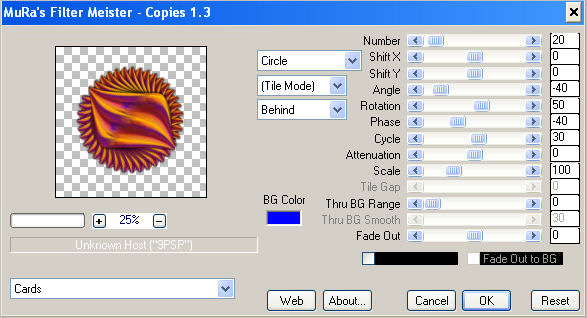
EFFECTS >>> PLUGINS >>> MuRa's Meister >>> Copies
PRESET =
Cards
(Pay no attention to "BG Color")

|
STEP 7
ADJUST >>> HUE & SATURATION >>> COLORIZE |
|
STEP 8
IMAGE >>> RESIZE = 73%
Ensure "Resize all layers" is UNCHECKED
Resample using WEIGHTED AVERAGE
EFFECTS >>> DISTORTION EFFECTS >>> WAVE

|
STEP 9
LAYERS >>> DUPLICATE
PSP8 - PSP9:IMAGE >>> ROTATE >>> FREE ROTATE = LEFT 90
Ensure "All layers" is UNCHECKED
PSPX - PSPX3: IMAGE >>> FREE ROTATE = LEFT 90
Ensure "All layers" is UNCHECKED
Reposition with your MOVER tool
|
|
STEP 10
EFFECTS >>> REFLECTION EFFECTS >>> ROTATING MIRROR

|
STEP 11
Reposition DOWN with your MOVER tool

|
STEP 12
ACTIVATE RASTER 1
EFFECTS >>> REFLECTION EFFECTS >>>
ROTATING MIRROR
Same settings
Reposition UP with your MOVER tool
ADJUST >>> SHARPNESS >>> SHARPEN
ACTIVATE Copy of Raster 1
EDIT >>> Repeat Sharpen
|
|
NOTE:
Personally.... I would "WINDOWS >>> Duplicate" this tag as is so far and save the shapes
...
maybe to play around with in future creations of your own. |
STEP 13
ACTIVATE RASTER 1
pen up the wallpaper101 image in your PSP workspace
Right click on the Title Bar and select COPY from the options
Right click on the Title Bar of your tag image
and select PASTE AS NEW LAYER from the options.
LAYERS >>> ARRANGE >>> MOVE DOWN
EFFECTS >>> REFLECTION EFFECTS >>>
ROTATING MIRROR
Same settings
|
|
STEP 14
Select your DEFORMATION tool
Mode = SCALE
use default settings
PSPX-X3:Select your PICK tool
Drag the centre top node up to the 0 pixel mark
on the left ruler.
Drag the centre bottom node down
to the 600 pixel mark
on the left ruler.
Select the MOVER tool to disengage the
DEFORMATION tool (PICK tool)
|
|
STEP 15
ACTIVATE RASTER 1
EFFECTS >>> PLUGINS >>> EYE CANDY 3 >>>
DROP SHADOW
ACTIVATE Copy of Raster 1
EDIT >>> Repeat Drop Shadow
|
|
STEP 16
EDIT >>> Repeat Drop Shadow..
change DIRECTION to 135
ACTIVATE RASTER 1
EDIT >>> Repeat Drop Shadow
|
|
STEP 17
ACTIVATE Copy of Raster 1
LAYERS >>> NEW RASTER LAYER
Flood fill with PURPLE #3c3351
SELECTIONS >>> SELECT ALL
SELECTIONS >>> MODIFY >>> CONTRACT = 3
EDIT >>> CLEAR
Flood fill with LILAC #9a8fb7
SELECTIONS >>> MODIFY >>> CONTRACT = 3
EDIT >>> CLEAR
Flood fill with PURPLE #3c3351
SELECTIONS >>> MODIFY >>> CONTRACT = 1
EDIT >>> CLEAR
DESELECT
|
|
STEP 18
EFFECTS >>> 3D EFFECTS >>> INNER BEVEL
|
|
STEP 19
Open up the lut tube 67 13102009 image
in your PSP workspace
Right click on the Title Bar and select
COPY from the options
Right click on the Title Bar of your tag image
and select PASTE AS NEW LAYER from the options.
IMAGE >>> RESIZE = 80%
Ensure "Resize all layers" is UNCHECKED
Resample using WEIGHTED AVERAGE
ADJUST >>> SHARPNESS >>> SHARPEN
EFFECTS >>> PLUGINS >>> EYE CANDY 3 >>> PERSPECTIVE SHADOW
|
|
STEP 20
LAYERS >>> MERGE >>> MERGE ALL (Flatten)
Save as .jpg image |
.. |
.. |