STEP 1
In your MATERIALS PALETTE
Load CREAM ' #ece9d8 ' in your foreground
Load GRAY ' #4d4e63 ' in your background
Open a new image 500 x 600
Transparent background
PSPX - X2: Colour Depth = 8bits/channel
PSPX3: Colour Depth RGB = 8bits/channel
VIEW >>> RULERS
|
STEP 2
Select your TEXT tool
FONT = Vibro

Place your cursor 250 pixels across and around 580 pixels down
Enter the NUMBER " 0 " in the text box
Click APPLY
SELECTIONS >>> SELECT NONE
Now... to centre the image....
Right click on the Title Bar and select COPY from the options
Right click on the Title Bar of your frame image
and select PASTE AS NEW LAYER from the options.
ACTIVATE Raster 1
Hit your DELETE key to clear the layer
|
STEP 3
ACTIVATE Raster 2
With your MAGIC WAND
Mode = ADD (Shift)
Match Mode = RGB Value
Tolerance = 0
Feather = 0
Antialias = UNchecked
Sample Merged = UNCHECKED
PSP9 - X3: Check CONTIGUOUS
PSPX - X3: There is no " Sample Merged"
PSPX - X3: Use all layers = UNChecked
Select the 2 centre sections as shown
Hit your DELETE key
|
|
STEP 4
DESELECT
LAYERS >>> DUPLICATE
PSP8 - PSP9: IMAGE >>> ROTATE >>> FREE ROTATE = RIGHT 90
Ensure "All layers" is UNCHECKED
PSPX - PSPX3: IMAGE >>> FREE ROTATE = RIGHT 90
Ensure "All layers" is UNCHECKED
|
|
STEP 5
With your MAGIC WAND.... Same settings.
Select the CENTRE transparent area
SELECTIONS >>> MODIFY >>> EXPAND = 5
ACTIVATE Raster 2
EDIT >>> CLEAR
DESELECT
|
|
STEP 6
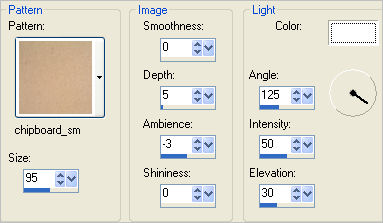
EFFECTS >>> TEXTURE EFFECTS >>> SCULPTURE
PATTERN = chipboard_sm

|
STEP 7
ACTIVATE Copy of Raster 2
EDIT >>> Repeat Sculpture
EFFECTS >>> 3D EFFECTS >>> INNER BEVEL
|
|
STEP 8
ACTIVATE Raster 2
EDIT >>> Repeat Inner Bevel
|
|
STEP 9
ACTIVATE Copy of Raster 2
LAYERS >>> MERGE >>> MERGE DOWN
LAYERS >>> NEW RASTER LAYER
Flood fill with CREAM
EFFECTS >>> TEXTURE EFFECTS >>> SCULPTURE
Same settings.
SELECTIONS >>> SELECT ALL
SELECTIONS >>> MODIFY >>> CONTRACT = 25
EDIT >>> CLEAR
DESELECT
|
|
STEP 10
EFFECTS >>> 3D EFFECTS >>> INNER BEVEL |
|
STEP 11
Choose your SELECTION TOOL then click on the
CUSTOM SELECTION symbol
and enter these coordinates.
|
|
STEP 12
EDIT >>> CLEAR
EFFECTS >>> 3D EFFECTS >>> DROP SHADOW
Vertical & Horizontal offsets = 1
Colour = Black
Opacity = 80
Blur = 0
Repeat Drop Shadow effect changing
Vertical & Horizontal Offsets to - ( minus ) 1
Click OK
DESELECT
|
|
STEP 13
ACTIVATE Raster 2
With your MAGIC WAND.... Same settings.
Select the areas shown
|
|
STEP 14
SELECTIONS >>> MODIFY >>> EXPAND = 5
ACTIVATE Raster 1
Flood fill with CREAM
EFFECTS >>> TEXTURE EFFECTS >>> BLINDS
COLOUR = #404040
|
|
STEP 15
ADJUST >>> HUE & SATURATION >>> COLORIZE

ADJUST >>> SHARPNESS >>> SHARPEN MORE
DESELECT
ACTIVATE Raster 2
With your MAGIC WAND.... Same settings.
Select the areas shown
|
|
STEP 16
SELECTIONS >>> MODIFY >>> EXPAND = 5
ACTIVATE Raster 1
LAYERS >>> NEW RASTER LAYER
Flood fill with CREAM
EFFECTS >>> TEXTURE EFFECTS >>> BLINDS
Same settings BUT check HORIZONTAL this time
ADJUST >>> HUE & SATURATION >>> COLORIZE
Same settings
EFFECTS >>> TEXTURE EFFECTS >>> MOSAIC ANTIQUE
Use these settings
|
|
STEP 17
EFFECTS >>> 3D EFFECTS >>> INNER BEVEL |
|
STEP 18
ADJUST >>> BRIGHTNESS and CONTRAST >>> BRIGHTNESS/CONTRAST

ADJUST >>> SHARPNESS >>> SHARPEN MORE
DESELECT
|
|
STEP 19
ACTIVATE Raster 2
With your MAGIC WAND.... Same settings.
Select the areas shown
|
|
STEP 20
SELECTIONS >>> MODIFY >>> EXPAND = 5
LAYERS >>> NEW RASTER LAYER
LAYERS >>> ARRANGE >>> MOVE DOWN
Flood fill with CREAM
EFFECTS >>> TEXTURE EFFECTS >>> BLINDS
Same settings BUT UNcheck HORIZONTAL this time
ADJUST >>> HUE & SATURATION >>> COLORIZE
Same settings
EFFECTS >>> 3D EFFECTS >>> INNER BEVEL
Same settings
EFFECTS >>> TEXTURE EFFECTS >>> FINE LEATHER
Use these settings
COLOUR =
#745d65
|
|
STEP 21
ADJUST >>> BRIGHTNESS and CONTRAST >>> BRIGHTNESS/CONTRAST
Same settings
DESELECT
|
|
STEP 22
ACTIVATE Raster 2
EFFECTS >>> PLUGINS >>> EYE CANDY 3 >>>
DROP SHADOW |
|
STEP 23
EDIT >>> Repeat Drop Shadow.. change DIRECTION to 135
Activate Raster 3
EDIT >>> Repeat Drop Shadow
EDIT >>> Repeat Drop Shadow.. change DIRECTION to 315
LAYERS >>> MERGE >>> MERGE VISIBLE
Save as .pspimage image |
|
STEP 24
LAYERS >>> NEW RASTER LAYER
Flood fill with BLUE #c8dbe9
LAYERS >>> ARRANGE >>> MOVE DOWN
Open up the JC_Chez Michele image in your PSP workspace
Right click on the Title Bar and select COPY from the options
Right click on the Title Bar of your frame image
and select PASTE AS NEW LAYER from the options.
Select your RASTER DEFORM tool
Mode = SCALE
use default settings
PSPX - X3:Select your PICK tool
Adjust centre top and bottom nodes as shown
|
|
STEP 25
Click the RESET RECTANGLE arrow
Select another tool to disengage the
DEFORMATION / PICK TOOL
LAYERS >>> MERGE >>> MERGE VISIBLE
Open up the Kicked Back_LR-08-06-09 image
in your PSP workspace
Right click on the Title Bar and select COPY from the options
Right click on the Title Bar of your frame image
and select PASTE AS NEW LAYER from the options.
IMAGE >>> RESIZE = 50%
Ensure "Resize all layers" is UNCHECKED
Resample using WEIGHTED AVERAGE
Reposition with your MOVER tool
|
|
STEP 26
EFFECTS >>> PLUGINS >>> EYE CANDY 3 >>> DROP SHADOW
Same settings
LAYERS >>> MERGE >>> MERGE ALL (Flatten)
Add your name.
IMAGE >>> ADD BORDERS = SYMMETRIC 1
COLOUR = #393943
Save as .jpg image
|
|
|