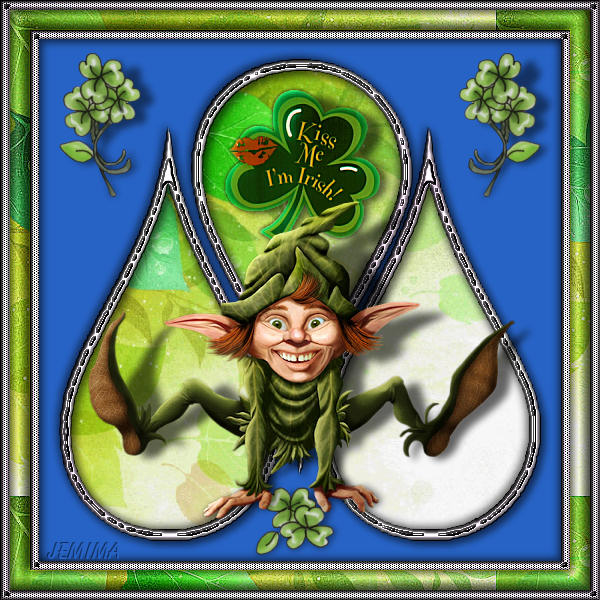
There are a couple of ways to finish off this frame
Option #1 is shown above
Option #2 is shown at the end of the tutorial
|
STEP 1
In your MATERIALS PALETTE
Load the ' lyndiegradient027 ' gradient in your foreground
using these settings |
|
STEP 2
Load the BLUE #2763c5 in your background |
|
STEP 3
Open a new image 600 x 600
Transparent background
PSPX - X2: Colour Depth = 8bits/channel
PSPX3: Colour Depth RGB = 8bits/channel
Flood fill with BLUE
LAYERS >>> NEW RASTER LAYER
Flood fill with gradient
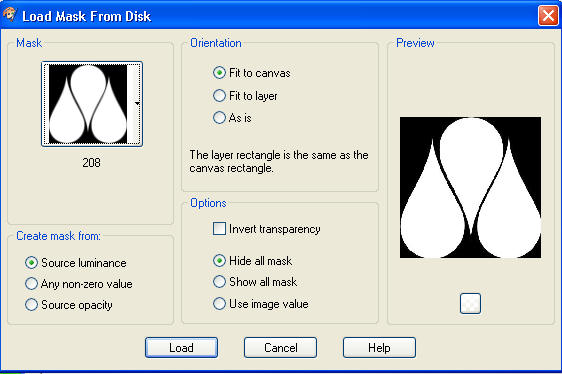
LAYERS >>> LOAD/SAVE MASK >>> LOAD MASK FROM DISK
MASK = 208

|
STEP 4
LAYERS >>> MERGE >>> MERGE GROUP
IMAGE >>> RESIZE = 80%
Ensure "Resize all layers" is UNCHECKED
Resample using WEIGHTED AVERAGE
LAYERS >>> DUPLICATE
LAYERS >>> MERGE >>> MERGE DOWN
SELECTIONS >>> SELECT ALL
SELECTIONS >>> FLOAT
SELECTIONS >>> DEFLOAT
SELECTIONS >>> INVERT
|
|
STEP 5
Hit your DELETE key... 4 TIMES
DESELECT
SELECTIONS >>> SELECT ALL
SELECTIONS >>> FLOAT
SELECTIONS >>> DEFLOAT
SELECTIONS >>> MODIFY >>> CONTRACT = 10
|
|
STEP 6
Hit your DELETE key
DESELECT
EFFECTS >>> 3D EFFECTS >>> INNER BEVEL
|
|
STEP 7
EFFECTS >>> 3D EFFECTS >>> DROP SHADOW
Vertical & Horizontal offsets = 1
Colour = Black
Opacity = 100
Blur = 0
Repeat Drop Shadow effect changing
Vertical & Horizontal Offsets to - ( minus ) 1
Click OK |
|
STEP 8
LAYERS >>> NEW RASTER LAYER
SELECTIONS >>> SELECT ALL
Open up the d-031511 image in your PSP workspace
Right click on the Title Bar and select COPY from the options
Right click on the Title Bar of your frame image
and select PASTE INTO SELECTION from the options.
DESELECT
LAYERS >>> ARRANGE >>> MOVE DOWN
Minimize the
d-031511 image
|
|
STEP 9
IMAGE >>> RESIZE = 78%
Ensure "Resize all layers" is UNCHECKED
Resample using WEIGHTED AVERAGE
ACTIVATE Group Raster 2
With your MAGIC WAND
Mode = Replace
Match Mode = RGB Value
Tolerance = 0
Feather = 0
Antialias = UNchecked
Sample Merged = UNCHECKED
PSP9 - X3: Check CONTIGUOUS
PSPX - X3: There is no " Sample Merged"
PSPX - X3: Use all layers = UNChecked
and while depressing your SHIFT KEY...
Select the interior of all 3 teardrops
|
|
STEP 10
SELECTIONS >>> MODIFY >>> EXPAND = 5
SELECTIONS >>> INVERT
ACTIVATE RASTER 2
Hit your DELETE key
DESELECT |
|
STEP 11
ACTIVATE Group Raster 2
EFFECTS >>> PLUGINS >>> EYE CANDY 3 >>> DROP SHADOW
|
|
STEP 12
EDIT >>> Repeat Drop Shadow.. change DIRECTION to 135
|
|
STEP 13
LAYERS >>> NEW RASTER LAYER
Flood fill with the gradient
SELECTIONS >>> SELECT ALL
SELECTIONS >>> MODIFY >>> CONTRACT = 10
EDIT >>> CLEAR
DESELECT
EFFECTS >>> 3D EFFECTS >>> INNER BEVEL
Same settings
|
|
STEP 14
EFFECTS >>> PLUGINS >>> Cybia >> SCREENWORKS >> Dot Screen
ADJUST >>> SHARPNESS >>> SHARPEN
LAYERS >>> DUPLICATE
IMAGE >>> RESIZE = 90%
Ensure "Resize all layers" is UNCHECKED
Resample using WEIGHTED AVERAGE
ADJUST >>> SHARPNESS >>> SHARPEN MORE
LAYERS >>> MERGE >>> MERGE DOWN
|
|
STEP 15
In your MATERIALS PALETTE load
d-031511 pattern in the background
using these settings
|
|
STEP 16
With your MAGIC WAND.... Same settings
Select the area between the 2 borders
ACTIVATE Raster 1
Flood fill the selected area
EFFECTS >>> EDGE EFFECTS >>> ENHANCE
EFFECTS >>> 3D EFFECTS >>> INNER BEVEL
|
|
STEP 17
SELECTIONS >>> INVERT
EFFECTS >>> PLUGINS >>> EYE CANDY 3 >>> DROP SHADOW
Same settings
EDIT >>> Repeat Drop Shadow.. change DIRECTION to 315
DESELECT
|
|
STEP 18
ACTIVATE RASTER 3
Open up the Mira_stpat2007_04_pcc image
in your PSP workspace
Choose your SELECTION TOOL
Selection Type = Rectangle
Mode = Replace
Feather = 0
Antialias = UNChecked
Select the centre image (shamrock)
Right click on the Title Bar and select COPY from the options
Right click on the Title Bar of your frame image
and select PASTE AS NEW LAYER from the options.
Reposition with your MOVER tool
|
|
STEP 19
LAYERS >>> DUPLICATE
IMAGE >>> MIRROR
EFFECTS >>> PLUGINS >>> EYE CANDY 3 >>> PERSPECTIVE SHADOW
ACTIVATE RASTER 4
EDIT >>> Repeat Perspective Shadow.
ACTIVATE Copy of Raster 4
LAYERS >>> MERGE >>> MERGE DOWN
|
|
STEP 20
Open up the Mira_stpat2007_04_pcc image
in your PSP workspace
Choose your FREEHAND SELECTION TOOL
Selection Type = Point to Point
Mode = Replace
Feather = 0
Antialias = UNChecked
Select the shamrock on the left - WITHOUT THE DOTS
Right click on the Title Bar of your frame image
and select PASTE AS NEW LAYER from the options.
Reposition with your MOVER tool
|
|
STEP 21
EFFECTS >>> PLUGINS >>> EYE CANDY 3 >>> PERSPECTIVE SHADOW
Same settings
ACTIVATE RASTER 3
With your MAGIC WAND ... same settings
Select the CENTRE of your image
SELECTIONS >>> INVERT
EFFECTS >>> PLUGINS >>> EYE CANDY 3 >>> DROP SHADOW
Same settings
EDIT >>> Repeat Drop Shadow.. change DIRECTION to 135
DESELECT
|
|
STEP 22
CLOSE the 3 bottom layers
ACTIVATE RASTER 3
|
|
STEP 23
LAYERS >>> MERGE >>> MERGE VISIBLE
OPEN ALL LAYERS
Save as .pspimage image
Now... you can add "Irish" images in each of the 3 tears
OR
just add the
"leaping elf" on top.
I'll do both options.
|
STEP 24
OPTION #1
ACTIVATE RASTER 2
Open up the stpat1 image in your PSP workspace
Right click on the Title Bar and select COPY from the options
Right click on the Title Bar of your frame image
and select PASTE AS NEW LAYER from the options
Reposition with your MOVER tool
|
|
STEP 25
Open up the TYA-Lep3 image in your PSP workspace
Right click on the Title Bar and select COPY from the options
Right click on the Title Bar of your frame image
and select PASTE AS NEW LAYER from the options
IMAGE >>> MIRROR
IMAGE >>> RESIZE = 50%
Ensure "Resize all layers" is UNCHECKED
Resample using WEIGHTED AVERAGE
ADJUST >>> SHARPNESS >>> SHARPEN
Reposition with your MOVER tool
|
|
STEP 26
Open up the kikirou1738 - lutin image in your PSP workspace
Right click on the Title Bar and select COPY from the options
Right click on the Title Bar of your frame image
and select PASTE AS NEW LAYER from the options
IMAGE >>> MIRROR
IMAGE >>> RESIZE = 45%
Ensure "Resize all layers" is UNCHECKED
Resample using WEIGHTED AVERAGE
ADJUST >>> SHARPNESS >>> SHARPEN
Reposition with your MOVER tool |
|
STEP 27
EFFECTS >>> PLUGINS >>> EYE CANDY 3 >>> PERSPECTIVE SHADOW
ACTIVATE RASTER 4
EDIT >>> Repeat Perspective Shadow.
ACTIVATE RASTER 3
EDIT >>> Repeat Perspective Shadow.
|
|
STEP 28
If this is your final choice....
LAYERS >>> MERGE >>> MERGE ALL (Flatten)
Save as .jpg image
|
STEP 29
OR.... OPTION #2
Close Raster 4
Close Raster 5
ACTIVATE the TOP layer
Open up the ajgv-Leaping©MB-300612 image in your PSP workspace
Activate Raster 1
Right click on the Title Bar and select COPY from the options
Right click on the Title Bar of your frame image
and select PASTE AS NEW LAYER from the options
IMAGE >>> RESIZE = 75%
Ensure "Resize all layers" is UNCHECKED
Resample using WEIGHTED AVERAGE
ADJUST >>> SHARPNESS >>> SHARPEN
Reposition with your MOVER tool
|
|
STEP 30
EFFECTS >>> PLUGINS >>> EYE CANDY 3 >>> PERSPECTIVE SHADOW
Same settings
LAYERS >>> MERGE >>> MERGE ALL (Flatten)
Save as .jpg image

|
.. |