STEP 1
In your MATERIALS PALETTE
Load WHITE ' #ffffff ' in your foreground
Load the ' Mah_Chrome ' gradient in your background
using these settings |
|
STEP 2
Open a new image 500 x 600
Transparent background
PSPX - X2: Colour Depth = 8bits/channel
PSPX3: Colour Depth RGB = 8bits/channel
SELECTIONS >>> SELECT ALL
SELECTIONS >>> MODIFY >>> CONTRACT = 20
SELECTIONS >>> INVERT
Flood fill with the gradient
EFFECTS >>> 3D EFFECTS >>> INNER BEVEL
|
|
STEP 3
SELECTIONS >>> INVERT
EFFECTS >>> 3D EFFECTS >>> OUTER BEVEL
|
|
STEP 4
EFFECTS >>> 3D EFFECTS >>> DROP SHADOW
Vertical & Horizontal offsets = 1
Colour = Black
Opacity = 70
Blur = 0
Repeat Drop Shadow effect changing
Vertical & Horizontal Offsets to - ( minus ) 1
Click OK
|
|
STEP 5
SELECTIONS >>> INVERT
ADJUST >>> SHARPNESS >>> SHARPEN MORE
SELECTIONS >>> INVERT
LAYERS >>> NEW RASTER LAYER
Flood fill with the gradient
IMAGE >>> MIRROR
SELECTIONS >>> DEFLOAT
SELECTIONS >>> MODIFY >>> CONTRACT = 20
EDIT >>> CLEAR
DESELECT
EFFECTS >>> 3D EFFECTS >>> INNER BEVEL
Same settings
|
|
STEP 6
EFFECTS >>> Plugins >>> Dragonfly >>> SinedotsII
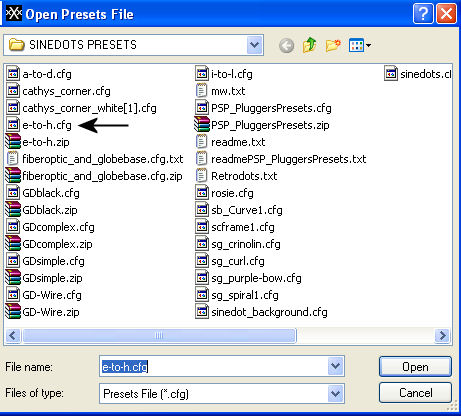
Click on the OPEN button at the bottom of the settings box

Locate the folder containing your SINEDOT PRESETS
Select " e-to-h.cfg"
Click on OPEN
 |
STEP 7
The PRESET window will close
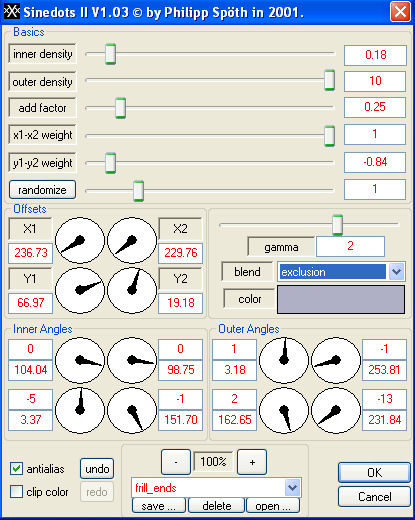
NOW... click on the ARROW above the OPEN button
and scroll to locate "frill_ends"
Use these settings
Change the COLOUR to #B0B0C5
Change the BLEND to EXCLUSION

|
STEP 8
SELECTIONS >>> SELECT ALL
SELECTIONS >>> MODIFY >>> CONTRACT = 40
EDIT >>> CLEAR
DESELECT
ADJUST >>> SHARPNESS >>> SHARPEN MORE
|
|
STEP 9
EFFECTS >>> 3D EFFECTS >>> DROP SHADOW
Vertical & Horizontal offsets = 1
Colour = Black
Opacity = 70
Blur = 0
Repeat Drop Shadow effect changing
Vertical & Horizontal Offsets to - ( minus ) 1
Click OK
With your MAGIC WAND
Mode = Replace
Match Mode = RGB Value
Tolerance = 0
Feather = 0
Antialias = UNchecked
Sample Merged = UNCHECKED
PSP9 - X3: Check CONTIGUOUS
PSPX - X3: There is no " Sample Merged"
PSPX - X3: Use all layers = UNChecked
Select the CENTRE transparent area
|
STEP 10
LAYERS >>> NEW RASTER LAYER
Flood fill with the gradient
SELECTIONS >>> MODIFY >>> CONTRACT = 15
EDIT >>> CLEAR
DESELECT
EFFECTS >>> 3D EFFECTS >>> INNER BEVEL
Same settings
EFFECTS >>> 3D EFFECTS >>> DROP SHADOW
Vertical & Horizontal offsets = 1
Colour = Black
Opacity = 70
Blur = 0
Repeat Drop Shadow effect changing
Vertical & Horizontal Offsets to - ( minus ) 1
Click OK
|
|
STEP 11
With your MAGIC WAND
Same settings
Select the CENTRE transparent area
LAYERS >>> NEW RASTER LAYER
Flood fill with the gradient
SELECTIONS >>> MODIFY >>> CONTRACT = 10
EDIT >>> CLEAR
DESELECT
EFFECTS >>> 3D EFFECTS >>> INNER BEVEL
Same settings
IMAGE >>> FLIP
EFFECTS >>> Plugins >>> Dragonfly >>> SinedotsII
Same settings
|
|
STEP 12
SELECTIONS >>> SELECT ALL
SELECTIONS >>> MODIFY >>> CONTRACT = 67
EDIT >>> CLEAR
EFFECTS >>> 3D EFFECTS >>> DROP SHADOW
Vertical & Horizontal offsets = 1
Colour = Black
Opacity = 70
Blur = 0
Repeat Drop Shadow effect changing
Vertical & Horizontal Offsets to - ( minus ) 1
Click OK
DESELECT |
|
STEP 13
EFFECTS >>> PLUGINS >>> EYE CANDY 3 >>>
DROP SHADOW |
|
STEP 14
EDIT >>> Repeat Drop Shadow.. change DIRECTION to 135
ADJUST >>> SHARPNESS >>> SHARPEN
Save as .pspimage
|
|
NOTE:
From here you can change the colour of the frame if you wish
... using
ADJUST >>> HUE & SATURATION >>> COLORIZE
|
STEP 15
ACTIVATE Raster 1
LAYERS >>> NEW RASTER LAYER
LAYERS >>> ARRANGE >>> MOVE DOWN
Flood fill with #baccce
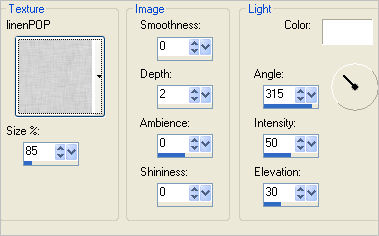
EFFECTS >>> TEXTURE EFFECTS >>> TEXTURE
TEXTURE = linenPOP

|
STEP 16
Open up the _Little Ballerina_Misted by Kathy_Kms image
in your PSP workspace
Right click on the Title Bar and select COPY from the options
Right click on the Title Bar of your tag image
and select PASTE AS NEW LAYER from the options.
EFFECTS >>> TEXTURE EFFECTS >>> TEXTURE
Same settings
BUT
change DEPTH to 1
|
|
STEP 17
LAYERS >>> MERGE >>> MERGE ALL (Flatten)
IMAGE >>> ADD BORDERS = SYMMETRIC 2
COLOUR = #808080
Save as .jpg image
|
|
|
|
|
|
|