This is an easy, non time consuming exercise...
You just have to pay attention to the "contract" sizes.... so use the hand to keep your place.
You should be able to 'whizz'
through it. *S*
|
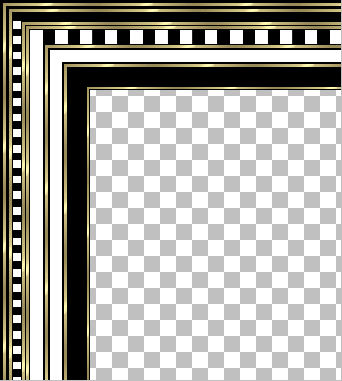
STEP 1
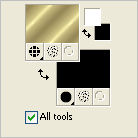
In your MATERIALS PALETTE
Load WHITE ' #ffffff ' in your foreground
Load BLACK ' #000000 ' in your background
THEN
Load the ' goldpattern ' pattern in your foreground
ANGLE = 0
SCALE = 100
|
|
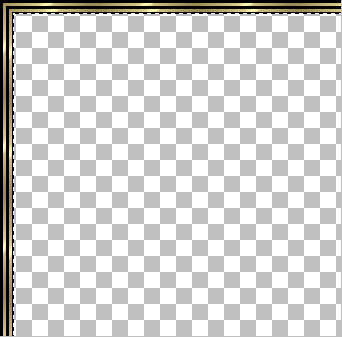
STEP 2
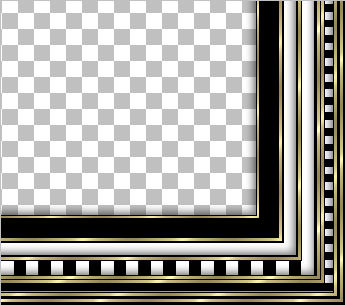
Open a new image 600 x 500
Transparent background
PSPX - X2: Colour Depth = 8bits/channel
PSPX3: Colour Depth RGB = 8bits/channel
Flood fill with BLACK
SELECTIONS >>> SELECT ALL
SELECTIONS >>> MODIFY >>> CONTRACT = 3
EDIT >>> CLEAR
Flood fill with goldpattern
SELECTIONS >>> MODIFY >>> CONTRACT = 3
EDIT >>> CLEAR
Flood fill with BLACK
SELECTIONS >>> MODIFY >>> CONTRACT = 3
EDIT >>> CLEAR
Flood fill with goldpattern
SELECTIONS >>> MODIFY >>> CONTRACT = 3
EDIT >>> CLEAR
Flood fill with BLACK
SELECTIONS >>> MODIFY >>> CONTRACT = 1
EDIT >>> CLEAR
|
|
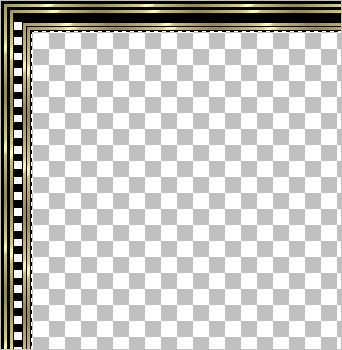
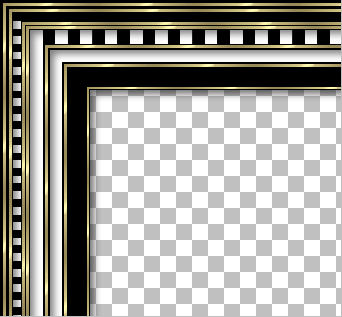
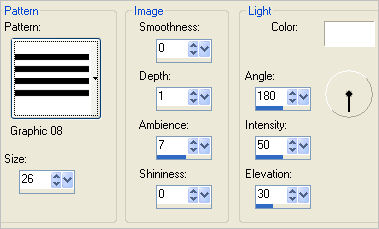
STEP 3
LAYERS >>> NEW RASTER LAYER
Flood fill with WHITE
EFFECTS >>> TEXTURE EFFECTS >>> SCULPTURE
PATTERN = Graphic 08
|
STEP 4
SELECTIONS >>> MODIFY >>> CONTRACT = 8
EDIT >>> CLEAR
Flood fill with BLACK
SELECTIONS >>> MODIFY >>> CONTRACT = 1
EDIT >>> CLEAR
Flood fill with goldpattern
SELECTIONS >>> MODIFY >>> CONTRACT = 3
EDIT >>> CLEAR
Flood fill with BLACK
SELECTIONS >>> MODIFY >>> CONTRACT = 1
EDIT >>> CLEAR
Flood fill with goldpattern
SELECTIONS >>> MODIFY >>> CONTRACT = 3
EDIT >>> CLEAR
Flood fill with BLACK
SELECTIONS >>> MODIFY >>> CONTRACT = 1
EDIT >>> CLEAR
|
|
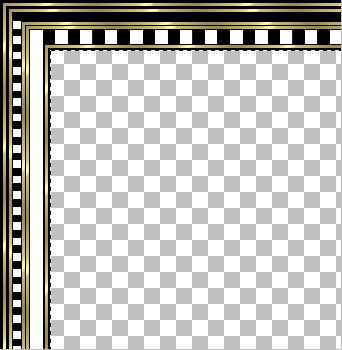
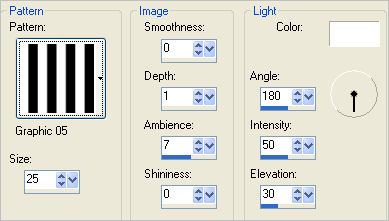
STEP 5
LAYERS >>> NEW RASTER LAYER
Flood fill with WHITE
EFFECTS >>> TEXTURE EFFECTS >>> SCULPTURE
PATTERN = Graphic 05
|
STEP 6
SELECTIONS >>> MODIFY >>> CONTRACT = 14
EDIT >>> CLEAR
Flood fill with BLACK
SELECTIONS >>> MODIFY >>> CONTRACT = 1
EDIT >>> CLEAR
Flood fill with goldpattern
SELECTIONS >>> MODIFY >>> CONTRACT = 3
EDIT >>> CLEAR
Flood fill with BLACK
SELECTIONS >>> MODIFY >>> CONTRACT = 2
EDIT >>> CLEAR
|
|
STEP 7
LAYERS >>> NEW RASTER LAYER
Flood fill with WHITE
SELECTIONS >>> MODIFY >>> CONTRACT = 12
EDIT >>> CLEAR
Flood fill with BLACK
SELECTIONS >>> MODIFY >>> CONTRACT = 2
EDIT >>> CLEAR
Flood fill with goldpattern
SELECTIONS >>> MODIFY >>> CONTRACT = 3
EDIT >>> CLEAR
Flood fill with BLACK
SELECTIONS >>> MODIFY >>> CONTRACT = 20
EDIT >>> CLEAR
Flood fill with goldpattern
SELECTIONS >>> MODIFY >>> CONTRACT = 2
EDIT >>> CLEAR
Flood fill with BLACK
SELECTIONS >>> MODIFY >>> CONTRACT = 1
EDIT >>> CLEAR
DESELECT
|
|
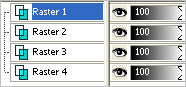
STEP 8
In your LAYER PALETTE
rearrange the layers as shown
and
ACTIVATE Raster 1
|
|
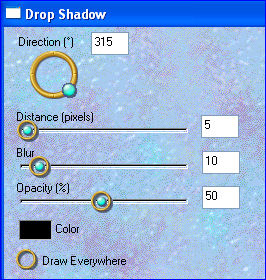
STEP 9
EFFECTS >>> PLUGINS >>> EYE CANDY 3 >>> DROP SHADOW
|
|
STEP 10
ACTIVATE Raster 2
EDIT >>> Repeat Drop Shadow
ACTIVATE Raster 3
EDIT >>> Repeat Drop Shadow
ACTIVATE Raster 4
EDIT >>> Repeat Drop Shadow
EDIT >>> Repeat Drop Shadow.. change DIRECTION to 135
|
|
STEP 11
ACTIVATE Raster 3
EDIT >>> Repeat Drop Shadow
ACTIVATE Raster 2
EDIT >>> Repeat Drop Shadow
ACTIVATE Raster 1
EDIT >>> Repeat Drop Shadow
LAYERS >>> MERGE >>> MERGE VISIBLE
Save as .pspimage image
|
|
STEP 12
LAYERS >>> NEW RASTER LAYER
Flood fill with WHITE
LAYERS >>> ARRANGE >>> MOVE DOWN
Open up the Cindy Grundsten43 edle_mist 2012 image
in your PSP workspace
Right click on the Title Bar and select COPY from the options
Right click on the Title Bar of your frame image
and select PASTE AS NEW LAYER from the options.
IMAGE >>> RESIZE = 70 %
Ensure "Resize all layers" is UNCHECKED
Resample using WEIGHTED AVERAGE
Sharpen if you wish.
|
|
STEP 13
ADD your name
LAYERS >>> MERGE >>> MERGE ALL (Flatten)
Save as .jpg image
|
|
|
|
|
|
|