STEP 1
Open a new image 600 x 600
Transparent background
PSPX - X2: Colour Depth = 8bits/channel
PSPX3: Colour Depth RGB = 8bits/channel
VIEW >>> RULERS
|
STEP 2
In your MATERIALS PALETTE
Load GREEN ' #667c48 ' in your foreground
Load LIGHT GREEN ' #a1b060 ' in your background
LAYERS >>> NEW RASTER LAYER
Select your PAINT BRUSH tool
BRUSH = dblcircleJF
 Place your cursor at 340 pixels across 310 pixels down
and left click 3 times without moving
|
STEP 3
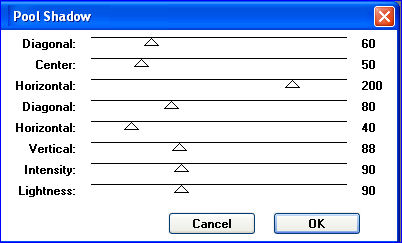
EFFECTS >>> PLUGINS >>> GREG'S FACTORY OUTPUT VOL2 >>> POOL SHADOW
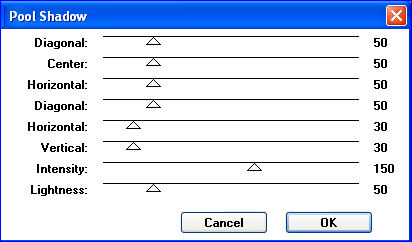
|
STEP 4
EFFECTS >>> 3D EFFECTS >>> INNER BEVEL |
|
STEP 5
With your MAGIC WAND
Mode = Replace
Match Mode = RGB Value
Tolerance = 0
Feather = 0
Antialias = UNchecked
Sample Merged = UNCHECKED
PSP9 - X3: Check CONTIGUOUS
PSPX - X3: There is no " Sample Merged"
PSPX - X3: Use all layers = UNChecked
Select the CENTRE transparent area
SELECTIONS >>> MODIFY >>> EXPAND = 8
|
|
STEP 6
SELECTIONS >>> INVERT
ACTIVATE RASTER 1
Flood fill with GREEN (foreground colour)
DESELECT
ACTIVATE RASTER 2
With your MAGIC WAND.... Same settings.
Select the area outside the outer circle
|
|
STEP 7
SELECTIONS >>> MODIFY >>> EXPAND = 8
ACTIVATE RASTER 1
EFFECTS >>> TEXTURE EFFECTS >>> BLINDS
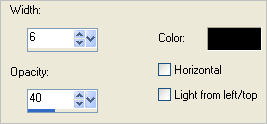 DESELECT
|
|
STEP 8
SELECTIONS >>> SELECT ALL
SELECTIONS >>> MODIFY >>> CONTRACT = 10
SELECTIONS >>> INVERT
EFFECTS >>> 3D EFFECTS >>> INNER BEVEL
|
|
STEP 9
Right click on the Title Bar and select
COPY from the options
DESELECT
Right click on the Title Bar of your tag image
and select PASTE AS NEW LAYER from the options.
EFFECTS >>> 3D EFFECTS >>> DROP SHADOW
Vertical & Horizontal offsets = 1
Colour = Black
Opacity = 70
Blur = 0
Repeat Drop Shadow effect changing
Vertical & Horizontal Offsets to - ( minus ) 1
Click OK
ADJUST >>> SHARPNESS >>> SHARPEN MORE
|
|
STEP 10
LAYERS >>> DUPLICATE
IMAGE >>> RESIZE = 90%
Ensure "Resize all layers" is UNCHECKED
Resample using WEIGHTED AVERAGE
LAYERS >>> MERGE >>> MERGE DOWN
|
|
STEP 11
With your MAGIC WAND.... Same settings.
Select the area between the frames
LAYERS >>> NEW RASTER LAYER
Flood fill with GREEN (foreground)
EFFECTS >>> TEXTURE EFFECTS >>> BLINDS
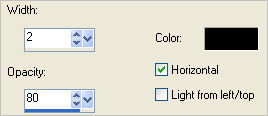
Repeat Texture effect but UNCHECK Horizontal
DESELECT
|
|
STEP 12
Activate the top layer
Open up the SMALLCIRCLEimage
in your PSP workspace
Right click on the Title Bar and select
COPY from the options
Right click on the Title Bar of your tag image
and select PASTE AS NEW LAYER from the options.
EFFECTS >>> TEXTURE EFFECTS >>> BLINDS
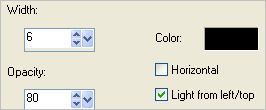 Repeat Texture effect but CHECK Horizontal
ADJUST >>> BRIGHTNESS and CONTRAST >>> BRIGHTNESS/CONTRAST

|
|
STEP 13
EFFECTS >>> 3D EFFECTS >>> INNER BEVEL |
|
STEP 14
EFFECTS >>> PLUGINS >>> EYE CANDY 3 >>>
DROP SHADOW |
|
STEP 15
In your LAYER PALETTE move this layer
under Raster 3
Reposition with your MOVER tool
to top right corner
|
|
STEP 16
LAYERS >>> DUPLICATE
IMAGE >>> FLIP
IMAGE >>> MIRROR
LAYERS >>> DUPLICATE
IMAGE >>> RESIZE = 90%
Ensure "Resize all layers" is UNCHECKED
Resample using WEIGHTED AVERAGE
Reposition with your MOVER tool
|
|
STEP 17
LAYERS >>> DUPLICATE
IMAGE >>> FLIP
IMAGE >>> MIRROR
ACTIVATE RASTER 2
EFFECTS >>> PLUGINS >>> EYE CANDY 3 >>>
DROP SHADOW
Same settings
EDIT >>> Repeat Drop Shadow..
change DIRECTION to 135
|
|
STEP 18
ACTIVATE RASTER 1
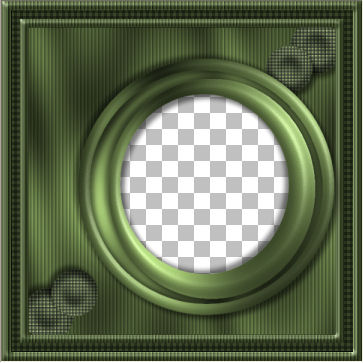
EFFECTS >>> PLUGINS >>> GREG'S FACTORY OUTPUT VOL2 >>> POOL SHADOW
|
STEP 19
Activate the top layer
Open up the k 052811image
in your PSP workspace
Right click on the Title Bar and select
COPY from the options
Right click on the Title Bar of your tag image
and select PASTE AS NEW LAYER from the options
IMAGE >>> MIRROR
IMAGE >>> RESIZE = 45%
Ensure "Resize all layers" is UNCHECKED
Resample using WEIGHTED AVERAGE
Reposition with your MOVER tool
Choose your SELECTION TOOL
Selection Type = Rectangle
Mode = Replace
Feather = 0
Antialias = UNChecked
Select the name
|
|
STEP 20
Hit your DELETE key
DESELECT
LAYERS >>> DUPLICATE
Move to the centre of your tag
Choose your FREEHAND SELECTION TOOL
Selection Type = Point to Point
Mode = Replace
Feather = 0
Antialias = UNChecked
Select the flower shown
|
|
STEP 21
EDIT >>> CUT
DESELECT
Right click on the Title Bar of your tag image
and select PASTE AS NEW LAYER from the options
IMAGE >>> MIRROR
Reposition with your MOVER tool
|
|
STEP 22
ACTIVATE Copy of Raster 6
LAYERS >>> ARRANGE >>> MOVE UP
Reposition FLOWER with your MOVER tool
|
|
STEP 23
EFFECTS >>> PLUGINS >>> EYE CANDY 3 >>>
DROP SHADOW |
|
STEP 24
ACTIVATE RASTER 7
EDIT >>> Repeat Drop Shadow
ACTIVATE RASTER 6
EDIT >>> Repeat Drop Shadow
Activate the top layer
Open up the Saphiere_Insect_A3 image
in your PSP workspace
Right click on the Title Bar and select
COPY from the options
IMAGE >>> MIRROR
IMAGE >>> RESIZE = 40%
Ensure "Resize all layers" is UNCHECKED
Resample using WEIGHTED AVERAGE
ADJUST >>> SHARPNESS >>> SHARPEN
|
STEP 25
PSP8 - PSP9:IMAGE >>> ROTATE >>> FREE ROTATE = RIGHT 30
Ensure "All layers" is UNCHECKED
PSPX - PSPX3: IMAGE >>> FREE ROTATE = RIGHT 30
Ensure "All layers" is UNCHECKED
ADJUST >>> SHARPNESS >>> SHARPEN
Reposition with your MOVER tool
|
|
STEP 26
LAYERS >>> MERGE >>> MERGE VISIBLE
Save as .psp image
|
STEP 27
LAYERS >>> NEW RASTER LAYER
Flood fill with LIGHT GREEN (background colour)
LAYERS >>> ARRANGE >>> MOVE DOWN
|
STEP 28
Open up the Yoka-MISTED-Faces-Child-04062012 image in your PSP workspace
Right click on the Title Bar and select COPY from the options
Right click on the Title Bar of your tag image
and select PASTE AS NEW LAYER from the options.
ADJUST >>> SHARPNESS >>> SHARPEN MORE
Reposition with your MOVER tool

|
STEP 29
LAYERS >>> MERGE >>> MERGE ALL (Flatten)
Save as .jpg image
|
|
|