STEP 1
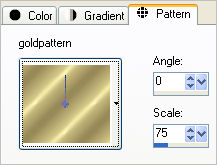
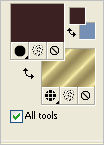
In your MATERIALS PALETTE load
goldpattern pattern in the background using these settings
Load BROWN " #3b2122" in your foreground
|
 . .  |
STEP 2
Open a new image 600 x 600
Transparent background
PSPX - X2: Colour Depth = 8bits/channel
PSPX3: Colour Depth RGB = 8bits/channel
VIEW >>> RULERS
|
STEP 3
Open up the circled_spots image in your PSP workspace
Right click on the Title Bar and select COPY from the options
Right click on the Title Bar of your frame image
and select PASTE AS NEW LAYER from the options.
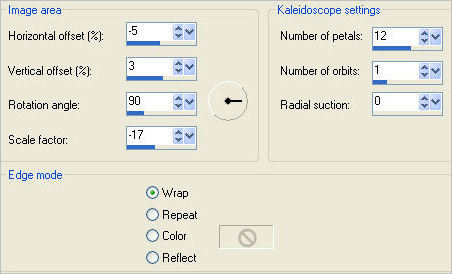
EFFECTS >>> REFLECTION EFFECTS >>> KALEIDOSCOPE

|
STEP 4
Choose your SELECTION TOOL
Selection Type = Circle
Mode = Replace
Feather = 0
Antialias = UNChecked
Select the circle in the centre..
EDIT >>> CLEAR
DESELECT |
|
STEP 5
LAYERS >>> DUPLICATE
IMAGE >>> RESIZE = 90%
Ensure "Resize all layers" is UNCHECKED
Resample using WEIGHTED AVERAGE
LAYERS >>> MERGE >>> MERGE DOWN
|
|
STEP 6
With your MAGIC WAND
Mode = ADD (Shift)
Match Mode = RGB Value
Tolerance = 0
Feather = 0
Antialias = UNchecked
Sample Merged = UNCHECKED
PSP9 - X3: Check CONTIGUOUS
PSPX - X3: There is no " Sample Merged"
PSPX - X3: Use all layers = UNChecked
Select the areas shown
|
|
STEP 7
SELECTIONS >>> MODIFY >>> EXPAND = 3
ACTIVATE Raster 1
Flood fill the outer selection with BROWN
and
The inner selection with the goldpattern.
DESELECT
|
|
STEP 8
ACTIVATE RASTER 2
EFFECTS >>> PLUGINS >>> EYE CANDY 3 >>>
DROP SHADOW
EDIT >>> Repeat Drop Shadow.. change DIRECTION to 135
LAYERS >>> MERGE >>> MERGE DOWN
|
|
STEP 9
LAYERS >>> DUPLICATE
IMAGE >>> RESIZE = 80%
Ensure "Resize all layers" is UNCHECKED
Resample using WEIGHTED AVERAGE
LAYERS >>> DUPLICATE
IMAGE >>> RESIZE = 40%
Ensure "Resize all layers" is UNCHECKED
Resample using WEIGHTED AVERAGE
ADJUST >>> SHARPNESS >>> SHARPEN
EFFECTS >>> IMAGE EFFECTS >>> OFFSET
|
|
Your image should look like this now.
|
|
STEP 10
EFFECTS >>> DISTORTION EFFECTS >>> PINCH
Strength = 70%
EFFECTS >>> PLUGINS >>> SIMPLE >>> TOP LEFT MIRROR
ADJUST >>> SHARPNESS >>> SHARPEN
|
|
STEP 11
LAYERS >>> ARRANGE >>> MOVE DOWN
LAYERS >>> DUPLICATE
PSP9: IMAGE >>> ROTATE >>> FREE ROTATE = LEFT 45
Ensure "All layers" is UNCHECKED
PSPX - PSPX3: IMAGE >>> FREE ROTATE = LEFT 45
Ensure "All layers" is UNCHECKED
EFFECTS >>> DISTORTION EFFECTS >>> PINCH
Strength = 85%
|
|
STEP 12
IMAGE >>> RESIZE = 85%
Ensure "Resize all layers" is UNCHECKED
Resample using WEIGHTED AVERAGE
EFFECTS >>> 3D EFFECTS >>> DROP SHADOW
Vertical & Horizontal offsets = 1
Colour = Black
Opacity = 100
Blur = 0
Repeat Drop Shadow effect changing
Vertical & Horizontal Offsets to - ( minus ) 1
Click OK
LAYERS >>> DUPLICATE
PSP9: IMAGE >>> ROTATE >>> FREE ROTATE = LEFT 45
Ensure "All layers" is UNCHECKED
PSPX - PSPX3: IMAGE >>> FREE ROTATE = LEFT 45
Ensure "All layers" is UNCHECKED
|
|
STEP 13
ACTIVATE Copy of Raster 1
With your MAGIC WAND
Mode = Replace
Match Mode = RGB Value
Tolerance = 0
Feather = 0
Antialias = UNchecked
Sample Merged = UNCHECKED
PSP9 - X3: Check CONTIGUOUS
PSPX - X3: There is no " Sample Merged"
PSPX - X3: Use all layers = UNChecked
Select the centre of your image
SELECTIONS >>> MODIFY >>> EXPAND = 8
|
|
STEP 14
ACTIVATE Copy (4) of Raster 1
EDIT >>> CLEAR
ACTIVATE Copy (3) of Raster 1
EDIT >>> CLEAR
LAYERS >>> NEW RASTER LAYER
LAYERS >>> ARRANGE >>> SEND TO BOTTOM
SELECTIONS >>> INVERT
Flood fill with WHITE
DESELECT
|
|
STEP 15
LAYERS >>> NEW RASTER LAYER
Flood fill with BROWN
SELECTIONS >>> SELECT ALL
SELECTIONS >>> MODIFY >>> CONTRACT = 8
EDIT >>> CLEAR
Flood fill with gold pattern
SELECTIONS >>> MODIFY >>> CONTRACT = 4
EDIT >>> CLEAR
Flood fill with BROWN
SELECTIONS >>> MODIFY >>> CONTRACT = 4
EDIT >>> CLEAR
EFFECTS >>> 3D EFFECTS >>> DROP SHADOW
Vertical & Horizontal offsets = 1
Colour = Black
Opacity = 100
Blur = 0
Repeat Drop Shadow effect changing
Vertical & Horizontal Offsets to - ( minus ) 1
Click OK
DESELECT
|
|
STEP 16
ACTIVATE Raster 2
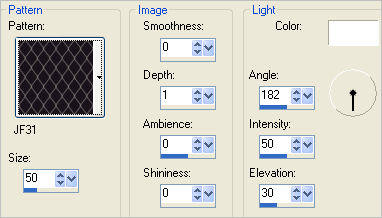
EFFECTS >>> TEXTURE EFFECTS >>> SCULPTURE
PATTERN = JF31

ADJUST >>> SHARPNESS >>> SHARPEN MORE
|
STEP 17
ACTIVATE RASTER 3
EFFECTS >>> PLUGINS >>> EYE CANDY 3 >>>
DROP SHADOW
EDIT >>> Repeat Drop Shadow.. change DIRECTION to 135 |
|
STEP 18
LAYERS >>> MERGE >>> MERGE VISIBLE
Save as .pspimage image
This is your frame
|
STEP 19
LAYERS >>> NEW RASTER LAYER
Flood fill with BLUE #7590b4
LAYERS >>> ARRANGE >>> MOVE DOWN
Open up the TReagen_2750 image in your PSP workspace
Right click on the Title Bar and select COPY from the options
Right click on the Title Bar of your frame image
and select PASTE AS NEW LAYER from the options.
IMAGE >>> RESIZE = 60%
Ensure "Resize all layers" is UNCHECKED
Resample using WEIGHTED AVERAGE
ADJUST >>> SHARPNESS >>> SHARPEN
Reposition to the left with your MOVER tool
|
|
STEP 20
ACTIVATE THE MERGED LAYER
Open up the 140 man at work image in your PSP workspace
Right click on the Title Bar and select COPY from the options
Right click on the Title Bar of your frame image
and select PASTE AS NEW LAYER from the options.
IMAGE >>> RESIZE = 55%
Ensure "Resize all layers" is UNCHECKED
Resample using WEIGHTED AVERAGE
ADJUST >>> SHARPNESS >>> SHARPEN
Reposition with your MOVER tool |
|
STEP 21
ADD your name
LAYERS >>> MERGE >>> MERGE ALL (Flatten)
Save as .jpg image
|
|
|
|
|
|
|