STEP 1
Open a new image 600 x 600
Transparent background
PSPX - X2: Colour Depth = 8bits/channel
PSPX3: Colour Depth RGB = 8bits/channel
VIEW >>> RULERS
|
STEP 2
Open up the PIT_lace67 image in your PSP workspace
Activate Raster 3
Right click on the Title Bar and select COPY from the options
Right click on the Title Bar of your frame image
and select PASTE AS NEW LAYER from the options.
IMAGE >>> RESIZE = 65%
Ensure "Resize all layers" is UNCHECKED
Resample using WEIGHTED AVERAGE
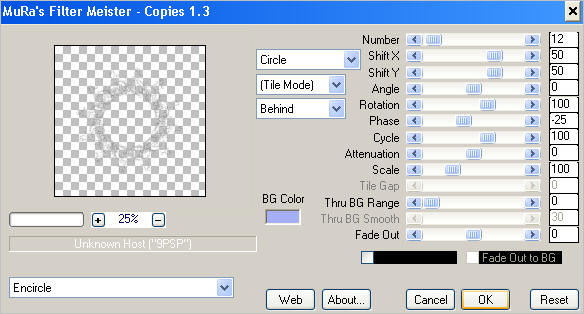
EFFECTS >>> PLUGINS >>> MuRa's Meister >>> Copies >>> Encircle
(BG Color is not important)

|
STEP 3
IMAGE >>> RESIZE = 125%
Ensure "Resize all layers" is UNCHECKED
Resample using WEIGHTED AVERAGE
ADJUST >>> SHARPNESS >>> SHARPEN MORE
|
|
STEP 4
Open up the PIT_lace67 image in your PSP workspace
Still on Raster 3
Right click on the Title Bar and select COPY from the options
Right click on the Title Bar of your frame image
and select PASTE AS NEW LAYER from the options.
IMAGE >>> RESIZE = 70%
Ensure "Resize all layers" is UNCHECKED
Resample using WEIGHTED AVERAGE
ADJUST >>> SHARPNESS >>> SHARPEN MORE
IMAGE >>> FLIP
Reposition with your MOVER tool to top left corner
|
|
STEP 5
EFFECTS >>> PLUGINS >>> SIMPLE >>> TOP LEFT MIRROR
ACTIVATE RASTER 1
Flood fill with PALE GREEN #b5dfc8
ACTIVATE RASTER 2
With your MAGIC WAND
Mode = Replace
Match Mode = RGB Value
Tolerance = 0
Feather = 0
Antialias = UNchecked
Sample Merged = UNCHECKED
PSP9 - X3: Check CONTIGUOUS
PSPX - X3: There is no " Sample Merged"
PSPX - X3: Use all layers = UNChecked
Select the CENTRE of your image
SELECTIONS >>> MODIFY >>> EXPAND = 2
|
|
STEP 6
ACTIVATE RASTER 1
EDIT >>> CLEAR
DESELECT
ACTIVATE RASTER 2
With your MAGIC WAND ... same settings
Select the area outside the lacy circle
SELECTIONS >>> MODIFY >>> EXPAND = 2
|
|
STEP 7
ACTIVATE RASTER 1
EDIT >>> CLEAR
DESELECT |
|
STEP 8
ACTIVATE RASTER 2
LAYERS >>> MERGE >>> MERGE DOWN
EFFECTS >>> 3D EFFECTS >>> INNER BEVEL
|
|
STEP 9
LAYERS >>> NEW RASTER LAYER
LAYERS >>> ARRANGE >>> MOVE DOWN
Flood fill with PALE GREEN
|
|
STEP 10
ACTIVATE RASTER 1
With your MAGIC WAND ... same settings
Select the area inside the lacy circle
SELECTIONS >>> MODIFY >>> EXPAND = 2
ACTIVATE RASTER 2
EDIT >>> CLEAR
DESELECT
Choose your FREEHAND SELECTION TOOL
Selection Type = Point to Point
Mode = Replace
Feather = 0
Antialias = Checked
Starting at 250 pixels across go to 150 pixels down
UP to 0 pixels across and 0 pixels down and release
|
|
STEP 11
SELECTIONS >>> INVERT
EDIT >>> CLEAR
SELECTIONS >>> INVERT
EFFECTS >>> 3D EFFECTS >>> INNER BEVEL
Same settings
DESELECT
EFFECTS >>> PLUGINS >>> SIMPLE >>> TOP LEFT MIRROR
|
|
STEP 12
With your MAGIC WAND ... same settings
Select the area outside the lacy circle
SELECTIONS >>> MODIFY >>> EXPAND = 2
LAYERS >>> NEW RASTER LAYER
LAYERS >>> ARRANGE >>> MOVE DOWN
Flood fill with PALE GREEN
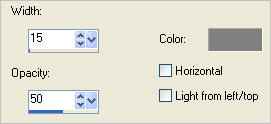
EFFECTS >>> TEXTURE EFFECTS >>> BLINDS
COLOUR = #808080
 |
|
STEP 13
SELECTIONS >>> INVERT
EFFECTS >>> PLUGINS >>> EYE CANDY 3 >>> DROP SHADOW
|
|
STEP 14
EDIT >>> Repeat Drop Shadow.. change DIRECTION to 135
DESELECT
|
|
STEP 15
ACTIVATE RASTER 1
With your MAGIC WAND ... same settings
Select the area inside the lacy circle
SELECTIONS >>> MODIFY >>> EXPAND = 2
ACTIVATE RASTER 4
EDIT >>> CLEAR
DESELECT
|
|
STEP 16
ACTIVATE RASTER 1
EFFECTS >>> PLUGINS >>> EYE CANDY 3 >>> DROP SHADOW
|
|
STEP 17
EDIT >>> Repeat Drop Shadow.. change DIRECTION to 315 |
|
STEP 18
ACTIVATE RASTER 3
LAYERS >>> NEW RASTER LAYER
SELECTIONS >>> SELECT ALL
Flood fill with PALE GREEN
SELECTIONS >>> MODIFY >>> CONTRACT = 10
EDIT >>> CLEAR
SELECTIONS >>> INVERT
EFFECTS >>> TEXTURE EFFECTS >>> BLINDS
COLOUR = #808080
|
|
STEP 19
EFFECTS >>> TEXTURE EFFECTS >>> BLINDS
This time check 'Horizontal'
ADJUST >>> SHARPNESS >>> SHARPEN MORE
ADJUST >>> BRIGHTNESS and CONTRAST >>> BRIGHTNESS/CONTRAST

EFFECTS >>> 3D EFFECTS >>> DROP SHADOW
Vertical & Horizontal offsets = 1
Colour = Black
Opacity = 50
Blur = 0
Repeat Drop Shadow effect changing
Vertical & Horizontal Offsets to - ( minus ) 1
Click OK
|
|
STEP 20
EFFECTS >>> PLUGINS >>> EYE CANDY 3 >>> DROP SHADOW
Same settings
EDIT >>> Repeat Drop Shadow.. change DIRECTION to 135
DESELECT
Save as .pspimage image
|
|
STEP 21
ACTIVATE RASTER 4
ADJUST >>> SHARPNESS >>> SHARPEN MORE
LAYERS >>> NEW RASTER LAYER
LAYERS >>> ARRANGE >>> SEND TO BOTTOM
Flood fill with #d3e7dc
ACTIVATE RASTER 5
Open up the Lady11sm image in your PSP workspace
Right click on the Title Bar and select COPY from the options
Right click on the Title Bar of your frame image
and select PASTE AS NEW LAYER from the options.
IMAGE >>> RESIZE = 75%
Ensure "Resize all layers" is UNCHECKED
Resample using WEIGHTED AVERAGE
ADJUST >>> SHARPNESS >>> SHARPEN
|
|
STEP 22
LAYERS >>> DUPLICATE
In your LAYER PALETTE
drag the duplicated layer
beneath Raster 2
|
|
STEP 23
ACTIVATE RASTER 7
Choose your SELECTION TOOL
Selection Type = Rectangle
Mode = Replace
Feather = 0
Antialias = UNChecked
Select the area shown
|
|
STEP 24
EDIT >>> CLEAR
DESELECT
ACTIVATE
Copy of Raster 7
EFFECTS >>> PLUGINS >>> EYE CANDY 3 >>> DROP SHADOW
Same settings
ACTIVATE RASTER 7
EFFECTS >>> PLUGINS >>> EYE CANDY 3 >>> DROP SHADOW
Same settings.. BUT Change Opacity to 40
Choose your SELECTION TOOL
Same settings
Select the 'shadowed' area shown
|
|
STEP 25
EDIT >>> CLEAR
DESELECT
LAYERS >>> MERGE >>> MERGE ALL (Flatten)
IMAGE >>> ADD BORDERS = SYMMETRIC 1
COLOUR = #7e9b8b
Save as .jpg image
|
... |