STEP 1
In your MATERIALS PALETTE
Load the ' Gold-diz ' gradient in your foreground
using these settings.
Load BROWN ' #3e3414 ' in your background
|
|
STEP 2
Open a new image 600 x 600
Transparent background
PSPX - X2: Colour Depth = 8bits/channel
PSPX3: Colour Depth RGB = 8bits/channel
Flood fill with the gradient |
STEP 3
IMAGE >>> RESIZE = 85%
Ensure "Resize all layers" is UNCHECKED
Resample using WEIGHTED AVERAGE
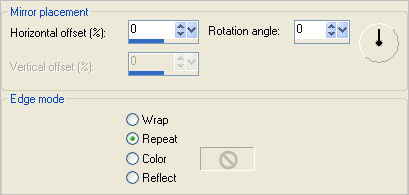
EFFECTS >>> REFLECTION EFFECTS >>> ROTATING MIRROR

|
STEP 4
PSP8 - PSP9: IMAGE >>> ROTATE >>> FREE ROTATE = LEFT 90
Ensure "All layers" is UNCHECKED
PSPX - PSPX3: IMAGE >>> FREE ROTATE = LEFT 90
Ensure "All layers" is UNCHECKED
EFFECTS >>> REFLECTION EFFECTS >>> ROTATING MIRROR
Same settings
|
STEP 5
EFFECTS>>> GEOMETRIC EFFECTS >>> SPHERIZE
 |
|
STEP 6
With your MAGIC WAND
Mode = Replace
Match Mode = RGB Value
Tolerance = 0
Feather = 0
Antialias = UNchecked
Sample Merged = UNCHECKED
PSP9 - X3: Check CONTIGUOUS
PSPX - X3: There is no " Sample Merged"
PSPX - X3: Use all layers = UNChecked
Select the OUTER transparent area
SELECTIONS >>> INVERT
SELECTIONS >>> MODIFY >>> CONTRACT = 2
SELECTIONS >>> INVERT
LAYERS >>> NEW RASTER LAYER
LAYERS >>> ARRANGE >>> MOVE DOWN
Flood fill with gradient
DESELECT
|
|
STEP 7
SELECTIONS >>> SELECT ALL
SELECTIONS >>> MODIFY >>> CONTRACT = 10
EFFECTS >>> 3D EFFECTS >>> OUTER BEVEL
COLOUR = #c0c0c0
|
STEP 8
EFFECTS >>> 3D EFFECTS >>> CHISEL
COLOUR = #c0c000
|
|
STEP 9
EFFECTS >>> 3D EFFECTS >>> DROP SHADOW
Vertical & Horizontal offsets = 1
Colour = Black
Opacity = 70
Blur = 0
Repeat Drop Shadow effect changing
Vertical & Horizontal Offsets to - ( minus ) 1
Click OK
SELECTIONS >>> MODIFY >>> CONTRACT = 15
|
|
STEP 10
EFFECTS >>> 3D EFFECTS >>> OUTER BEVEL
Same settings
EFFECTS >>> 3D EFFECTS >>> CHISEL
Same settings
Repeat both Drop Shadows
SELECTIONS >>> MODIFY >>> CONTRACT = 20
|
|
STEP 11
EFFECTS >>> 3D EFFECTS >>> OUTER BEVEL
Same settings
EFFECTS >>> 3D EFFECTS >>> CHISEL
Same settings
Repeat both Drop Shadows
SELECTIONS >>> MODIFY >>> CONTRACT = 30
|
|
STEP 12
LAYERS >>> MERGE >>> MERGE VISIBLE
EFFECTS >>> 3D EFFECTS >>> OUTER BEVEL
Same settings
EFFECTS >>> 3D EFFECTS >>> CHISEL
Same settings
Repeat both Drop Shadows
EDIT >>> CLEAR
DESELECT
|
|
STEP 13
With your MAGIC WAND
Mode = Replace
Match Mode = RGB Value
Tolerance = 45
Feather = 0
Antialias = UNchecked
Sample Merged = UNCHECKED
PSP9 - X3: Check CONTIGUOUS
PSPX - X3: There is no " Sample Merged"
PSPX - X3: Use all layers = UNChecked
and while depressing your SHIFT KEY..
Select the border shown
|
|
STEP 14
EFFECTS >>> EDGE EFFECTS >>> ENHANCE
DESELECT
|
|
STEP 15
LAYERS >>> DUPLICATE
IMAGE >>> RESIZE = 70%
Ensure "Resize all layers" is UNCHECKED
Resample using WEIGHTED AVERAGE
ADJUST >>> SHARPNESS >>> SHARPEN MORE
|
|
STEP 16
With your MAGIC WAND
Mode = Replace
Match Mode = RGB Value
Tolerance = 0
Feather = 0
Antialias = UNchecked
Sample Merged = UNCHECKED
PSP9 - X3: Check CONTIGUOUS
PSPX - X3: There is no " Sample Merged"
PSPX - X3: Use all layers = UNChecked
Select the transparent area shown.
|
|
STEP 17
LAYERS >>> NEW RASTER LAYER
LAYERS >>> ARRANGE >>> SEND TO BOTTOM
Flood fill with BROWN
DESELECT
|
|
STEP 18
ACTIVATE Copy of Merged
EFFECTS >>> PLUGINS >>> EYE CANDY 3 >>> DROP SHADOW
|
|
STEP 19
EDIT >>> Repeat Drop Shadow.. change DIRECTION to 135
LAYERS >>> MERGE >>> MERGE VISIBLE
Save as .pspimage image
|
|
STEP 20
Open up the father-and-son-lewis-a-ramsey image
in your PSP workspace
Right click on the Title Bar and select COPY from the options
Right click on the Title Bar of your frame image
and select PASTE AS NEW LAYER from the options.
IMAGE >>> RESIZE = 40%
Ensure "Resize all layers" is UNCHECKED
Resample using WEIGHTED AVERAGE
LAYERS >>> ARRANGE >>> MOVE DOWN
Select your RASTER DEFORM tool
Mode = SCALE
use default settings
PSPX - X3:Select your PICK tool
Adjust nodes as shown
|
|
STEP 21
Click the RESET RECTANGLE arrow
Select another tool to disengage the DEFORMATION / PICK TOOL
LAYERS >>> MERGE >>> MERGE ALL (Flatten)
IMAGE >>> ADD BORDERS = SYMMETRIC 1
COLOUR = BROWN ' #3e3414 '
Save as .jpg image
|
| .
|
. |