NOTE
As you go through this tutorial there will be different settings in some steps for PSPX, PSPX2 and PSPX3.
I don't have PSPX1 so if you are using this you may have to 'fiddle' with some of the settings.
I'm at a loss to understand why TEXT settings would be so different depending
on the version of PSP used.
|
STEP 1
Open a new image 600 x 600
Transparent background
PSPX - X2: Colour Depth = 8bits/channel
PSPX3: Colour Depth RGB = 8bits/channel
VIEW >>> RULERS
In your MATERIALS PALETTE
Load BLACK in your foreground
Load CREAM " #ece9d8" in your background
|
STEP 2
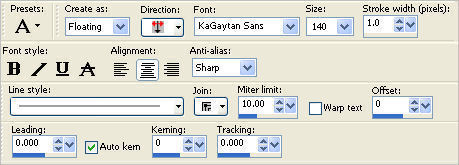
Select your TEXT tool
FONT = KaGaytan Sans
Line Style = + Solid
PSP9

PSPX
FONT: KaGaytan Sans
SIZE: 140
UNITS:
Pixels
Everything else is the same as above
PSPX2-X3
SIZE = 120
Everything else is the same as above
|
Place your cursor at 300 pixels across and 300 pixels down.
Enter capital "A" in the text box
Click OK
SELECTIONS >>> SELECT NONE
|
STEP 3 - PSP9
IMAGE >>> RESIZE = 70%
Ensure "Resize all layers" is UNCHECKED
Resample using WEIGHTED AVERAGE
LAYERS >>> DUPLICATE
LAYERS >>> MERGE >>> MERGE DOWN
IMAGE >>> FLIP
EFFECTS >>> IMAGE EFFECTS >>> OFFSET
|
|
STEP 3- PSPX
IMAGE >>> RESIZE = 80%
Ensure "Resize all layers" is UNCHECKED
Resample using WEIGHTED AVERAGE
LAYERS >>> DUPLICATE
LAYERS >>> MERGE >>> MERGE DOWN
IMAGE >>> FLIP
EFFECTS >>> IMAGE EFFECTS >>> OFFSET |
|
STEP 3- PSPX2- PSPX3
LAYERS >>> DUPLICATE
LAYERS >>> MERGE >>> MERGE DOWN
IMAGE >>> FLIP
EFFECTS >>> IMAGE EFFECTS >>> OFFSET |
|
STEP 4
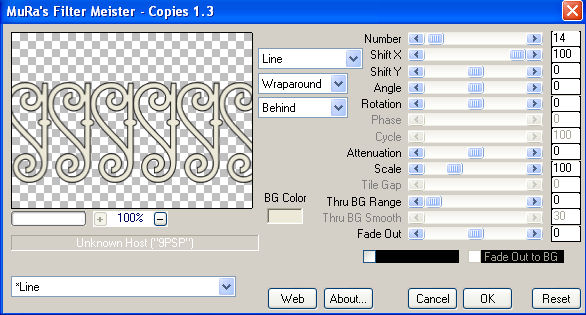
EFFECTS >>> PLUGINS >>> MuRa's Meister >>> Copies >>> *Line
PRESET = *Line
PSP9

PSPX - PSPX2
NUMBER = 16
PSPX3
NUMBER = 14
All other settings same as above
|
|
STEP 5
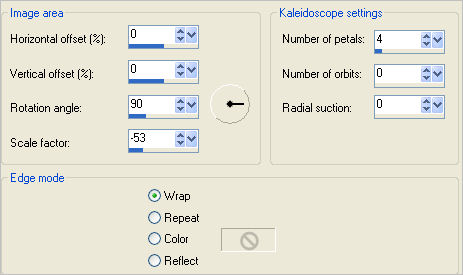
EFFECTS >>> REFLECTION EFFECTS >>> KALEIDOSCOPE
PSP9

PSPX - PSPX2 - PSPX3
All settings are the same
|
|
STEP 6
LAYERS >>> DUPLICATE
LAYERS >>> MERGE >>> MERGE DOWN
EFFECTS >>> 3D EFFECTS >>> DROP SHADOW
|
|
STEP 7
Choose your SELECTION TOOL
Selection Type = Rectangle
Mode = Replace
Feather = 0
Antialias = UNChecked
Select the image in the centre of your frame
(This will look a little different in PSPX to PSPX3)
Hit your DELETE key
DESELECT
|
|
STEP 8
LAYERS >>> DUPLICATE
IMAGE >>> RESIZE = 80%
Ensure "Resize all layers" is UNCHECKED
Resample using WEIGHTED AVERAGE
ADJUST >>> SHARPNESS >>> SHARPEN
LAYERS >>> DUPLICATE
LAYERS >>> MERGE >>> MERGE DOWN
(The corners will look a little different in PSPX to PSPX3)
|
|
STEP 9
With your MAGIC WAND
Mode = Replace
Match Mode = RGB Value
Tolerance = 0
Feather = 0
Antialias = UNchecked
Sample Merged = UNCHECKED
PSP9 - X3: Check CONTIGUOUS
PSPX - X3: There is no " Sample Merged"
PSPX - X3: Use all layers = UNChecked
Select the CENTRE transparent area
SELECTIONS >>> MODIFY >>> EXPAND = 1
SELECTIONS >>> INVERT
LAYERS >>> NEW RASTER LAYER
LAYERS >>> ARRANGE >>> SEND TO BOTTOM
Flood fill with CREAM
|
STEP 10
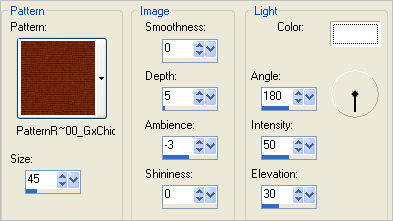
EFFECTS >>> TEXTURE EFFECTS >>> SCULPTURE
PATTERN = PatternR~00_GxChic!

ADJUST >>> SHARPNESS >>> SHARPEN MORE
DESELECT

|
STEP11
ACTIVATE RASTER 1
EFFECTS >>> PLUGINS >>> EYE CANDY 3 >>>
DROP SHADOW
|
|
STEP 12
ACTIVATE Copy of Raster 1
EFFECTS >>> PLUGINS >>> EYE CANDY 3 >>>
DROP SHADOW
Same settings
LAYERS >>> MERGE >>> MERGE VISIBLE
LAYERS >>> NEW RASTER LAYER
SELECTIONS >>> SELECT ALL
SELECTIONS >>> MODIFY >>> CONTRACT = 5
SELECTIONS >>> INVERT
Flood fill with CREAM
EFFECTS >>> 3D EFFECTS >>> INNER BEVEL
|
|
STEP 13
EFFECTS >>> 3D EFFECTS >>> DROP SHADOW
Vertical & Horizontal offsets = 1
Colour = Black
Opacity = 80
Blur = 0
Repeat Drop Shadow effect changing
Vertical & Horizontal Offsets to - ( minus ) 1
Click OK
DESELECT
EFFECTS >>> PLUGINS >>> EYE CANDY 3 >>>
DROP SHADOW
Same settings
EDIT >>> Repeat Drop Shadow.. change DIRECTION to 315
|
|
STEP 14
LAYERS >>> MERGE >>> MERGE VISIBLE
EFFECTS >>> PLUGINS >>> EYE CANDY 3 >>>
DROP SHADOW
Same settings
Save as .pspimage image
|
STEP 15
Open up the Xiao-Bai-3 image in your PSP workspace
Right click on the Title Bar and select COPY from the options
Right click on the Title Bar of your frame image
and select PASTE AS NEW LAYER from the options.
LAYERS >>> ARRANGE >>> MOVE DOWN
IMAGE >>> RESIZE = 80%
Ensure "Resize all layers" is UNCHECKED
Resample using WEIGHTED AVERAGE
ADJUST >>> SHARPNESS >>> SHARPEN
Reposition with your MOVER tool
|
|
STEP 16
LAYERS >>> MERGE >>> MERGE ALL (Flatten)
Save as .jpg image
|
. |
. |