STEP 1
Open a new image 600 x 600
Transparent background
PSPX - X2: Colour Depth = 8bits/channel
PSPX3: Colour Depth RGB = 8bits/channel
VIEW >>> RULERS
|
STEP 2
Open up the a 81711 image
in your PSP workspace
Choose your FREEHAND SELECTION TOOL
Selection Type = Point to Point
Mode = Replace
Feather = 0
Antialias = UNChecked
Select the image shown in bottom left corner
|
|
STEP 3
Right click on the Title Bar and select COPY from the options
Right click on the Title Bar of your blank image
and select PASTE AS NEW LAYER from the options.
IMAGE >>> MIRROR
ADJUST >>> SHARPNESS >>> SHARPEN
Reposition with your MOVER tool
|
|
STEP 4
EFFECTS >>> PLUGINS >>> SIMPLE >>> TOP LEFT MIRROR
Select your PRESET SHAPES tool
PRESET = Crop3TBC


|
STEP 5
LAYERS >>> NEW RASTER LAYER
Position your cursor at 50 pixels across and 50 pixels down
and drag down and out to 550 pixels across
and 550 pixels down and release
|
|
STEP 6
LAYERS >>> ARRANGE >>> MOVE DOWN
With your MAGIC WAND
Mode = Replace
Match Mode = RGB Value
Tolerance = 0
Feather = 0
Antialias = UNchecked
Sample Merged = UNCHECKED
PSP9 - X3: Check CONTIGUOUS
PSPX - X3: There is no " Sample Merged"
PSPX - X3: Use all layers = UNChecked
Select the centre green circle
EDIT >>> CLEAR
ACTIVATE RASTER 2
EDIT >>> CLEAR
DESELECT
|
|
STEP 7
ACTIVATE RASTER 3
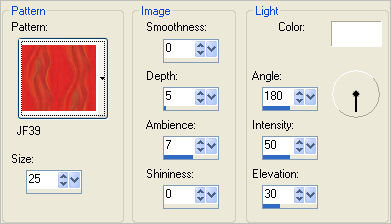
EFFECTS >>> TEXTURE EFFECTS >>> SCULPTURE
PATTERN = JF39

ADJUST >>> SHARPNESS >>> SHARPEN
|
STEP 8
ACTIVATE RASTER 1
Flood fill with Red #cd3032
ACTIVATE RASTER 3
With your MAGIC WAND.... Same settings.
But change Feather to = 2
Select the CENTRE area
ACTIVATE RASTER 1
Hit your DELETE key
DESELECT
|
|
STEP 9
ACTIVATE RASTER 3
With your MAGIC WAND.... Same settings
But change MODE to ADD (Shift)
Select the 4 circles shown
|
|
STEP 10
ACTIVATE RASTER 1
EFFECTS >>> 3D EFFECTS >>> INNER BEVEL
DESELECT
|
|
STEP 11
ACTIVATE RASTER 3
EFFECTS >>> PLUGINS >>> EYE CANDY 3 >>>
DROP SHADOW
EDIT >>> Repeat Drop Shadow..
change DIRECTION to 135
|
|
STEP 12
ACTIVATE RASTER 2
EDIT >>> Repeat Drop Shadow..
EDIT >>> Repeat Drop Shadow..
change DIRECTION to 315
|
|
STEP 13
ACTIVATE RASTER 1
SELECTIONS >>> SELECT ALL
SELECTIONS >>> MODIFY >>> CONTRACT = 7
SELECTIONS >>> INVERT
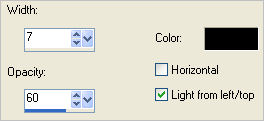
EFFECTS >>> 3D EFFECTS >>> CHISEL
COLOUR =
#f41212 |
|
STEP 14
EFFECTS >>> ARTISTIC EFFECTS >>> HALF TONE
INK COLOUR = #f41212
BACKGROUND COLOUR = BLACK
DESELECT
|
|
Your frame should look like this |
|
STEP 15
Still on Raster 1
SELECTIONS >>> SELECT ALL
SELECTIONS >>> MODIFY >>> CONTRACT = 40
EFFECTS >>> TEXTURE EFFECTS >>> BLINDS

EFFECTS >>> PLUGINS >>> EYE CANDY 3 >>>
DROP SHADOW
Same settings
EDIT >>> Repeat Drop Shadow..
change DIRECTION to 135
DESELECT
|
|
STEP 16
ACTIVATE RASTER 2
LAYERS >>> NEW RASTER LAYER
Flood fill with BLACK
SELECTIONS >>> SELECT ALL
SELECTIONS >>> MODIFY >>> CONTRACT = 2
EDIT >>> CLEAR
DESELECT
LAYERS >>> MERGE >>> MERGE VISIBLE
Save as .pspimage image
|
STEP 17
LAYERS >>> NEW RASTER LAYER
LAYERS >>> ARRANGE >>> MOVE DOWN
Flood fill with WHITE
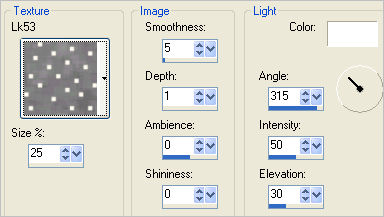
EFFECTS >>> TEXTURE EFFECTS >>> TEXTURE
TEXTURE = L&k53

|
STEP 18
Open up the canada1 image in your PSP workspace
Right click on the Title Bar and select COPY from the options
Right click on the Title Bar of your frame image
and select PASTE AS NEW LAYER from the options.
IMAGE >>> RESIZE = 80%
Ensure "Resize all layers" is UNCHECKED
Resample using WEIGHTED AVERAGE
ADJUST >>> SHARPNESS >>> SHARPEN
EFFECTS >>> PLUGINS >>> EYE CANDY 3 >>>
PERSPECTIVE SHADOW
|
|
STEP 19
Add a layer with you name if you wish.
LAYERS >>> MERGE >>> MERGE ALL (Flatten)
Save as .jpg image
|
. |
. |