STEP 1
Open up the JF_Br8 image in your PSP workspace
WINDOW >>> DUPLICATE
Close the original Image.
IMAGE >>> RESIZE = 90%
Ensure "Resize all layers" is UNCHECKED
Resample using WEIGHTED AVERAGE
|
STEP 2
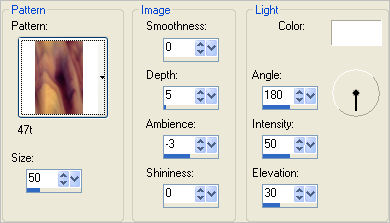
EFFECTS >>> TEXTURE EFFECTS >>> SCULPTURE
PATTERN = 47t
|
STEP 3
LAYERS >>> DUPLICATE
IMAGE >>> RESIZE = 90%
Ensure "Resize all layers" is UNCHECKED
Resample using WEIGHTED AVERAGE
ADJUST >>> SHARPNESS >>> SHARPEN
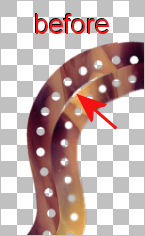
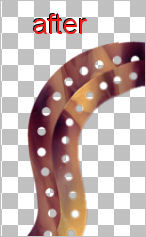
With your MOVER tool click on the duplicated bracket
then press the UP arrow on your keyboard three times
or until the gap is no longer visible.
|
 .  |
STEP 4
LAYERS >>> DUPLICATE
IMAGE >>> RESIZE = 90%
Ensure "Resize all layers" is UNCHECKED
Resample using WEIGHTED AVERAGE
ADJUST >>> SHARPNESS >>> SHARPEN
With your MOVER tool click on the duplicated bracket
then press the UP arrow on your keyboard three times
so there's no gap between the brackets. |
|
STEP 5
ACTIVATE RASTER 1
With your MAGIC WAND
Mode = Replace
Match Mode = RGB Value
Tolerance = 0
Feather = 0
Antialias = UNchecked
Sample Merged = UNCHECKED
PSP9 - X3: Check CONTIGUOUS
PSPX - X3: There is no " Sample Merged"
PSPX - X3: Use all layers = UNChecked
Select the OUTER transparent area
|
|
STEP 6
SELECTIONS >>> INVERT
SELECTIONS >>> MODIFY >>> CONTRACT = 4
SELECTIONS >>> INVERT
LAYERS >>> NEW RASTER LAYER
LAYERS >>> ARRANGE >>> MOVE DOWN
Flood fill with WHITE
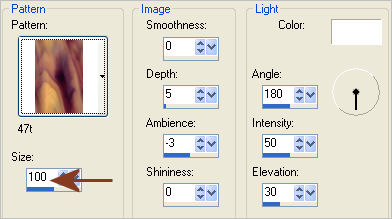
EFFECTS >>> TEXTURE EFFECTS >>> SCULPTURE
|
STEP 7
In your MATERIALS PALETTE
Load BROWN " #863a1f " in your background
EFFECTS >>> ARTISTIC EFFECTS >>> HOT WAX COATING
DESELECT
|
|
STEP 8
With your MAGIC WAND.... Same settings.
Select the CENTRE transparent area
Flood fill with
BROWN #863a1f
DESELECT
ACTIVATE
Copy (2) of Raster 1
With your MAGIC WAND.... Same settings.
Select the CENTRE transparent area
SELECTIONS >>> MODIFY >>> EXPAND = 3
ACTIVATE RASTER 2
EDIT >>> CLEAR
DESELECT
|
|
STEP 9
ACTIVATE RASTER 1
EFFECTS >>> PLUGINS >>> EYE CANDY 3 >>>
DROP SHADOW
|
|
STEP 10
ACTIVATE Copy of Raster 1
EDIT >>> Repeat Drop Shadow.
ACTIVATE Copy (2) of Raster 1
EDIT >>> Repeat Drop Shadow.
EDIT >>> Repeat Drop Shadow.. change DIRECTION to 135
|
STEP 11
ACTIVATE Copy of Raster 1
EDIT >>> Repeat Drop Shadow.
ACTIVATE RASTER 1
EDIT >>> Repeat Drop Shadow.
ADJUST >>> SHARPNESS >>> SHARPEN MORE
ACTIVATE Copy of Raster 1
EDIT >>> Repeat Sharpen More
.ACTIVATE Copy (2) of Raster 1
EDIT >>> Repeat Sharpen More
|
|
STEP 12
LAYERS >>> NEW RASTER LAYER
SELECTIONS >>> SELECT ALL
SELECTIONS >>> MODIFY >>> CONTRACT = 10
SELECTIONS >>> INVERT
Flood fill with WHITE
EFFECTS >>> TEXTURE EFFECTS >>> SCULPTURE
Same settings
EFFECTS >>> TEXTURE EFFECTS >>> TEXTURE
TEXTURE = Squares
COLOUR = #c0c0c0
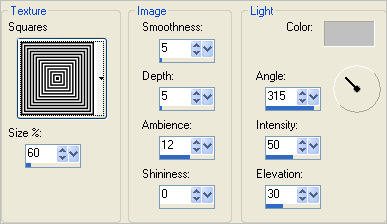 |
STEP 13
EFFECTS >>> 3D EFFECTS >>> DROP SHADOW
Vertical & Horizontal offsets = 1
Colour = Black
Opacity = 70
Blur = 0
Repeat Drop Shadow effect changing
Vertical & Horizontal Offsets to - ( minus ) 1
Click OK
DESELECT
ADJUST >>> SHARPNESS >>> SHARPEN
|
|
STEP 14
LAYERS >>> DUPLICATE
IMAGE >>> RESIZE =96%
Ensure "Resize all layers" is UNCHECKED
Resample using WEIGHTED AVERAGE
ADJUST >>> SHARPNESS >>> SHARPEN
LAYERS >>> DUPLICATE
IMAGE >>> RESIZE =96%
Ensure "Resize all layers" is UNCHECKED
Resample using WEIGHTED AVERAGE
ADJUST >>> SHARPNESS >>> SHARPEN
|
|
STEP 15
ACTIVATE Copy of Raster 3
IMAGE >>> MIRROR
|
|
STEP 16
ACTIVATE Copy (2) of Raster 3
LAYERS >>> MERGE >>> MERGE DOWN (TWICE)
EFFECTS >>> PLUGINS >>> EYE CANDY 3 >>>
DROP SHADOW
|
|
STEP 17
LAYERS >>> MERGE >>> MERGE VISIBLE
Save as .pspimage image
|
STEP 18
LAYERS >>> NEW RASTER LAYER
Flood fill with CREAM #ece9d8
LAYERS >>> ARRANGE >>> MOVE DOWN
Open up the aed_beautyandyouth_2003x image
in your PSP workspace
Activate layer 1
Right click on the Title Bar and select COPY from the options
Right click on the Title Bar of your frame image
and select PASTE AS NEW LAYER from the options.
IMAGE >>> RESIZE = 85%
Ensure "Resize all layers" is UNCHECKED
Resample using WEIGHTED AVERAGE
ADJUST >>> SHARPNESS >>> SHARPEN
Reposition with your MOVER tool
EFFECTS >>> PLUGINS >>> EYE CANDY 3 >>>
DROP SHADOW
Same settings BUT change DIRECTION to 135
Reposition with your MOVER tool
|
|
STEP 19
Add a layer with your name if you wish.
LAYERS >>> MERGE >>> MERGE ALL (Flatten)
Save as .jpg image
|
| .
|
. |