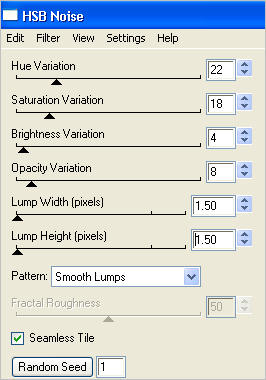
STEP 8
EFFECTS >> PLUG-IN >> EYECANDY 4000 >>
HSB Noise
use these settings.
|
|
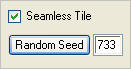
STEP 9
Close BG1
open BG2
apply the noise filter
same setting but click the random seed,
|
|
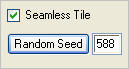
STEP 10
Close BG2
open BG3
apply the noise filter
same setting but click the random seed
|
|
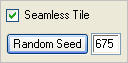
STEP 11
Close BG3
open BG4
apply the noise filter
same setting but click the random seed
CLOSE BG4 |
|
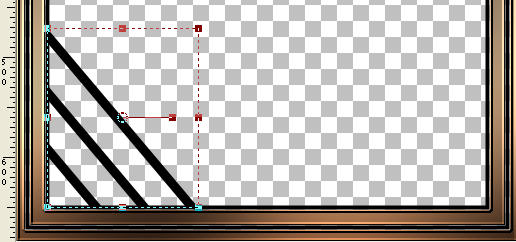
STEP 12
In your MATERIALS PALETTE
Load BLACK in your foreground
NULL your Background
Select Preset Shapes Tool
Locate the
Rectangle shape

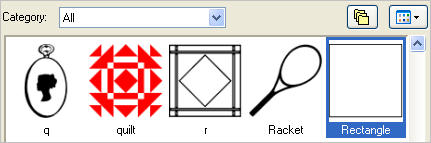
Starting at 30 pixels across and 30 pixels down
drag your cursor to 470 pixels across and 650 pixels down and release
Convert Vector to raster layer
Repeat using these instructions
Starting at 10 pixels across and 10 pixels down
drag your cursor to 490 pixels across and 670 pixels down and release
Convert Vector to raster layer
 . . 
|
STEP 13
CLOSE ALL LAYERS EXCEPT
Raster 1 and Raster 2
LAYERS >> MERGE >> VISIBLE.
Name this layer lines
LAYERS >> NEW RASTER LAYER
Name this layer frame
|
|
STEP 14
ACTIVATE the lines layer
With your MAGIC WAND
Mode = Replace
Match Mode = RGB Value
Tolerance = 0
Feather = 0
Antialias = UNchecked
Sample Merged = UNCHECKED
PSP9 - X3: Check CONTIGUOUS
PSPX - X3: There is no " Sample Merged"
PSPX - X3: Use all layers = UNChecked
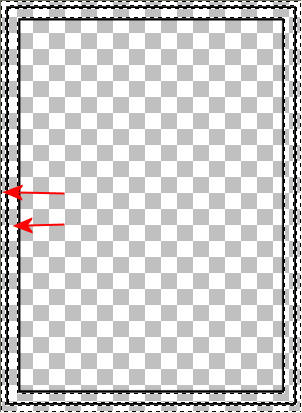
and while depressing your SHIFT key..
Select the transparent areas between
the black lines and the outer black line
and the edge of the image
|
|
STEP 15
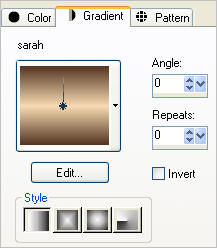
In your MATERIALS PALETTE
Load gradient sarah in your background
Angle = 0
Repeats = 0
Style = Linear
|
|
STEP 16
SELECTIONS >> MODIFY >> EXPAND = 1
Activate the frame layer
Flood Fill both selected areas with the sarah gradient
DESELECT
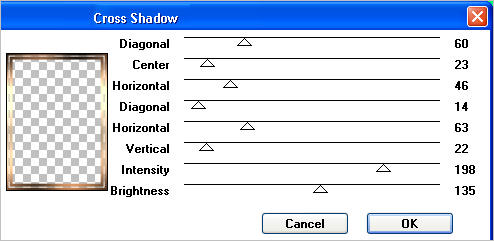
EFFECTS >> PLUG-IN >>GRAPHIC PLUS>>CROSS SHADOW
use these settings.
|
STEP 17
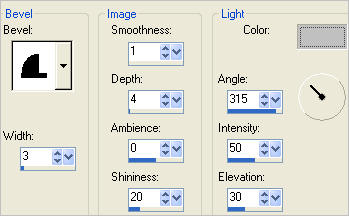
EFFECTS >> 3D EFFECTS >> INNER BEVEL
COLOR = #c0c0c0
|
|
.
|
STEP 18
In your MATERIALS PALETTE
Click the curved arrow to reverse the palettes.
Null the foreground palette.

Select Preset Shapes Tool
Find Marlettcorner use these settings

In the lower left corner starting at 26 pixels across and 470 pixels down
pull lines to 180 pixels across and 650 pixels down.
CONVERT TO RASTER LAYER
LAYER DUPLICATE
IMAGE >>> FLIP
LAYER DUPLICATE
IMAGE >>> MIRROR
LAYER DUPLICATE
IMAGE >>> FLIP
Check top of image and Move lines to line up in corners if needed
|
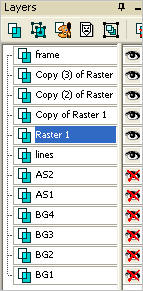
STEP 19
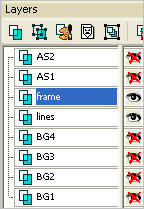
Rearrange the layers in your Layer Palette
as shown
and Activate Raster 1
LAYERS >> MERGE >> VISIBLE.
Rename this layer frame |
|
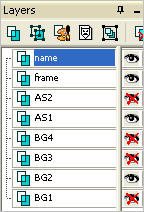
STEP 20
LAYERS >> NEW RASTER LAYER
Select your TEXT TOOL
with font and settings of your choice
add your name to the bottom center of the layer.
Rename this layer Name.
PSPX3.. click the "A" tool
then before clicking on the work
hold down the shift key and then click,
it will bring up the entry box as other versions do
Set palette as shown
|
 . .  |
STEP 21
Right click on Title Bar and select
Copy merged from the options
In ANIMATION SHOP
Right click the workspace and select
'Paste As New Animation' from the options.
Back to PSP.
CLOSE BG1
OPEN BG2
Right click on Title Bar and select
Copy merged from the options
In ANIMATION SHOP
Right click top of frame image and select
'Paste After Current Frame' from the options.
|
|
STEP 22
Back to PSP.
CLOSE BG2
CLOSE AS1
OPEN BG3
OPEN AS2
|
|
STEP 23
Right click on Title Bar and select
Copy merged from the options
In ANIMATION SHOP
Right click top of frame image and select
'Paste After Current Frame' from the options.
Back to PSP.
CLOSE BG3
OPEN BG4
|
|
STEP 24
Right click on Title Bar and select
Copy merged from the options
In ANIMATION SHOP
Right click top of frame image and select
'Paste After Current Frame' from the options.

|
STEP 25
In ANIMATION SHOP
Select the gray edge around frame 1 (F: 1)
Scroll arrow on bottom of frame to right.
Hold down the CTRL
Select the gray edge around frame 2 (F: 2)
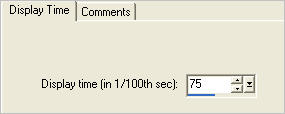
Right click on Title Bar of frames
Select 'Frame Properties' from the options
Display time = 75
|
|
STEP 26
Select the gray edge around frame 3 (F: 3)
Scroll arrow on bottom of frame to right.
Hold down the CTRL
Select the gray edge around frame 4 (F: 4)
Right click on Title Bar of frames
Select 'Frame Properties' from the options
Display time = 5
.
|
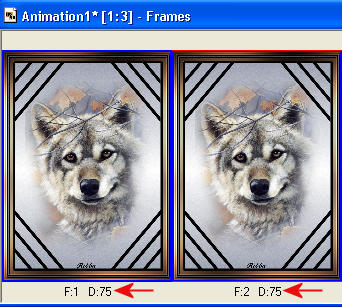
STEP 27
View >> Animation
and while it is still running
File >> Save As
Locate the folder in which you wish to save it.
Name your animation.
With the Gif Optimizer keep pressing NEXT
until you get to the last one... click FINISH
|
| |
If you wish to resize your animation...
RESIZING ANIMATIONS
Click on the Title Bar of the frames
Animation >> Resize animation
Select width and height in pixels
Click OK
Save your animation |
| |
STEP 28
Close the Animation
Close the frames.
Close Animation Shop |
| |
I hope you enjoyed the tutorial
Rebba |
| |