STEP 1
Open up the downloaded images in your PSP workspace and minimize.
NOTE: first I need to know what my tag will look like and the size.
Pick out the lady bust you wish to use, two are included. |
STEP 2
In your MATERIALS PALETTE
Load the ' 8inner ' pattern in your foreground
using these settings.
|
|
STEP 3
Open a new image 600 x 500
Transparent background
PSPX - X2: Colour Depth = 8bits/channel
PSPX3: Colour Depth RGB = 8bits/channel
Flood fill with pattern
Rename this layer bgd.
This is your 'working' image
|
STEP 4
Activate the template.psp image
Right click on the Title Bar and select COPY from the options.
Right click on the Title Bar of your 'working' image
and select PASTE AS NEW LAYER from the options.
Rename this layer template.
|
|
STEP 5
Activate the oval 2.psp image
Right click on the Title Bar and select COPY from the options.
Right click on the Title Bar of your 'working' image
and select PASTE AS NEW LAYER from the options.
Rename this layer oval.
|
|
STEP 6
Activate the harrison fisher bookplate.psp image
Right click on the Title Bar and select COPY from the options.
Right click on the Title Bar of your 'working' image
and select PASTE AS NEW LAYER from the options.
IMAGE >> RESIZE = 75%
Ensure "Resize all layers" is UNCHECKED
You will have this ------>>>>
Rename this layer tube.
|
|
STEP 7
NOTE: now the border design.
Choose your SELECTION TOOL
then click on the CUSTOM SELECTION symbol
and enter these coordinates. |
|
STEP 8
LAYERS >> NEW RASTER LAYER
Flood Fill with black #000000
DESELECT
Close the tube layer |
|
STEP 9
Activate the master gold accent.psp image
Right click on the Title Bar and select COPY from the options.
Right click on the Title Bar of your 'working' image
and select PASTE AS NEW LAYER from the options.
Move to left and line up as shown
Rename this layer accent.
|
|
STEP 10
Activate the V-First Bloom.psp image
Right click on the Title Bar and select COPY from the options.
Right click on the Title Bar of your 'working' image
and select PASTE AS NEW LAYER from the options.
IMAGE >> RESIZE = 25%
Ensure "Resize all layers" is UNCHECKED
ADJUST >>> SHARPNESS >>> SHARPEN
Rename this layer rose.
LAYERS >> DUPLICATE>> TWICE
VIEW >>> RULERS
VIEW >>> GUIDES
Draw three guide lines set on 45, 225, 400
You do this by placing your cursor on the top ruler
and drag the cursor to the required positions
on the left ruler
|
|
STEP 11
Set the top of your flower under each of the guide lines.
|
|
STEP 12
VIEW >>> GUIDES
(To clear the guides)
Close all layers except the border
|
|
STEP 13
LAYERS >>> MERGE >> VISIBLE.
Rename this layer border
EFFECTS >> IMAGE EFFECTS >> SEAMLESS TILING |
|
Your flowers will now look like this |
|
STEP 14
OPEN all layers
LAYERS >> NEW RASTER LAYER
Select your TEXT TOOL
with font and settings of your choice
add your name to the bottom left corner of the layer.
Rename this layer name.
|
|
STEP 15
LAYERS >> NEW RASTER LAYER
Flood fill with BLACK
SELECTIONS >>> SELECT ALL
SELECTIONS >>> MODIFY >>> CONTRACT = 1
EDIT >>> CLEAR
DESELECT
Rename this layer frame.
|
STEP 16
Set up LAYER PALETTE as shown
Right click on Title Bar and select
Copy merged from the options
In ANIMATION SHOP
Right click the workspace and select
'Paste As New Animation' from the options.
|
|
STEP 17
Back to PSP.
Set up LAYER PALETTE as shown
Right click on the Title Bar and
select COPY from the options.
|
|
STEP 18
In ANIMATION SHOP
Right click the workspace and select
'Paste As New Animation' from the options
ANIMATION >> Insert Frames >> Empty

You now have 2 frames side by side |
|
STEP 19
Scroll the arrow on the bottom of the frame to first frame (F:1)
Click inside the frame to highlight it,
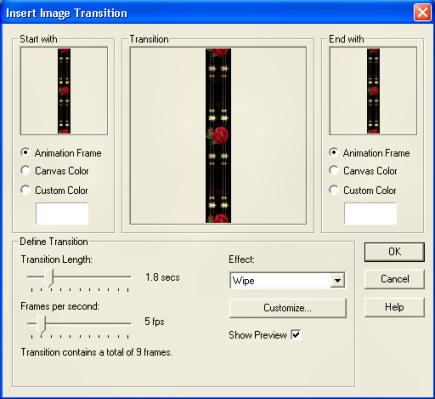
Effects >> Insert Image Transition >> WIPE.
Insert settings (Right image below)
Click Customize
Insert Wipe Transition settings
(Left image below)
Click OK
 . 
|
STEP 20
Edit >> Select All
Animation>> Cull Animation
You now have 6 frames
|
|
STEP 21
Activate the working image
Edit >> Copy
Edit >> Paste After Current Frame
Now hold down the Ctrl key and hit L 4 times
look at the bottom to see the number of frames you need 6


|
STEP 22
ACTIVATE the border frames
Edit >> Select All
Edit >> Copy
Edit >> Propagate Paste
ACTIVATE the working image
Edit >> Select All
Edit >> Paste into selected frame
The image will be attached to the mouse line it up
to the left side and click to place the border.
|
|
STEP 23
Your copy is still on the clipboard
Again on working image
Edit >> Paste into selected frame line the border
on the right side and click mouse to place it. |
|
STEP 24
Right click on top of frames
Select 'Frame Properties' from the options
Display time = 20 |
|
STEP 25
Animation >> Resize Animation 500
OR
whatever size you choose
|
|
STEP 26
View >> Animation
and while it is still running,
File >> Save As
Locate the folder in which you wish to save it.
Name your animation.
With the Gif Optimiser keep pressing NEXT
until you get to the last one... click FINISH
Close the Animation
Close the frames.
Close Animation Shop |
I hope you have enjoyed the tutorial
Rebba |
|
|