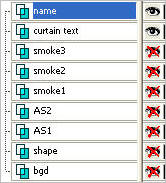
STEP 13
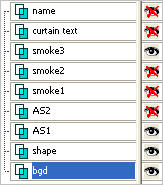
Set up LAYER PALETTE as shown
|
|
STEP 14
Right click on Title Bar and select
Copy merged from the options
In ANIMATION SHOP
Right click the workspace and select
'Paste As New Animation' from the options.
Minimize for now.
|
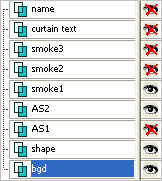
STEP 15
Back to PSP.
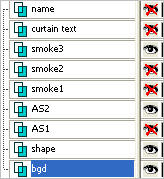
Set up LAYER PALETTE as shown
|
|
STEP 16
Right click on Title Bar and select
Copy merged from the options
In ANIMATION SHOP
Right click the workspace and select
'Paste As New Animation' from the options.
|
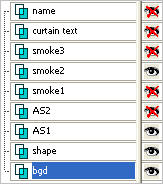
STEP 17
Back to PSP.
Set up LAYER PALETTE as shown
|
|
STEP 18
Right click on Title Bar and select
Copy merged from the options
In ANIMATION SHOP
Right click top of frame image and select
'Paste After Current Frame' from the options.

|
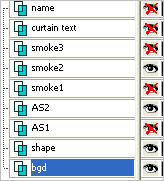
STEP 19
Back to PSP
Set up LAYER PALETTE as shown
|
|
STEP 20
Right click on Title Bar and select
Copy merged from the options
In ANIMATION SHOP
Right click top of frame image and select
'Paste After Current Frame' from the options.

|
STEP 21
Back to PSP
Set up LAYER PALETTE as shown
|
|
STEP 22
Right click on Title Bar and select
Copy merged from the options
In ANIMATION SHOP
Right click top of frame image and select
'Paste After Current Frame' from the options.
|
STEP 23
Back to PSP
Set up LAYER PALETTE as shown
|
|
STEP 24
Right click on Title Bar and select
Copy merged from the options
In ANIMATION SHOP
Right click top of frame image and select
'Paste After Current Frame' from the options.
You now have 5 frames
|
STEP 25
Back to PSP
Set up LAYER PALETTE as shown
|
|
STEP 26
Right click on Title Bar and select
Copy merged from the options
In ANIMATION SHOP
Right click top of frame image and select
'Paste After Current Frame' from the options.

|
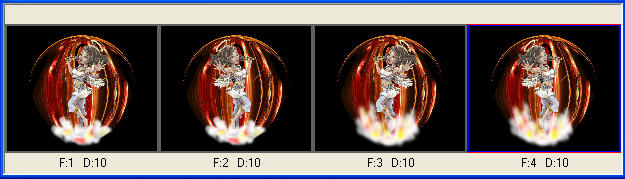
NOTE: Scroll through the frames from left to right.
You should have frame 1 and 2 with the low smoke
and the singer one direction then the other.
Frames 3 and 4 will be the same thing except the 2nd
smoke higher.
Frames 5 and 6 same thing with the highest smoke. |
STEP 27
You have 6 frames and need 12
Edit >> Select All
Edit >> Copy
Scroll arrow on bottom of frame to right
Select the gray edge around frame 6
Edit >> Paste After Current Frame
Move this out of your way
|
STEP 28
Still in Animation Shop
OPEN your minimized image (curtain)
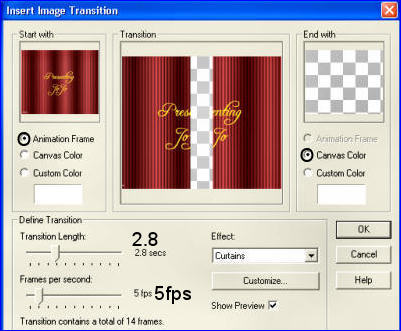
Effects >> Insert Image Transition >> Curtains
Click Customize button
enter these settings
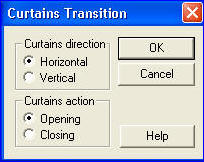 . .
Then enter these settings ------->>>>>>>
|
|
STEP 29
Scroll arrow on bottom of frames to right
Select the gray edge around frame 13
hold down the CTRL key and select frames 14 and 15
Hit the Delete key 
This should give you 12 frames
Edit >> Select All
Edit >> Copy
Edit >> Propagate Paste
Activate the singer frames
Edit >> Select All
Edit >> Paste into selected frame
Your curtain will be attached to the mouse ...
line it up in your frame and left click to place it down.
|
STEP 30
Edit >> Select All
Right click on top of frames
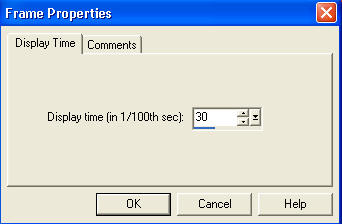
Select 'Frame Properties' from the options
Display time = 30 or what you wish
|
|
STEP 31
Scroll arrow on bottom of frame to right.
Select the gray edge around frame 12
Right click on top of frames
Select 'Frame Properties' from the options
Display time = 100 or what you wish
I also set frame 1 on 50
|
NOTE: this is a very large file I resized mine to 400 pixels
you may want to go smaller.
RESIZING ANIMATIONS
Click on the Title Bar of the frames
Animation >> Resize animation
Select width and height in pixels
Click OK
|
STEP 32
View >> Animation
and while it is still running,
File >> Save As
Locate the folder in which you wish to save it.
Name your animation.
With the Gif Optimiser keep pressing NEXT
until you get to the last one... click FINISH
Close the Animation
Close the frames.
Close Animation Shop |
|
|
I hope you enjoyed the tutorial
Rebba |
|
|