STEP 1
Open up the downloaded images in your PSP workspace and minimize.
Open frame tube in your PSP workspace
WINDOW >> DUPLICATE
Close the original image |
STEP 2
With your MAGIC WAND
Mode = Replace
Match Mode = RGB Value
Tolerance = 0
Feather = 0
Antialias = UNchecked
Sample Merged = UNCHECKED
PSP9 - X3: Check CONTIGUOUS
PSPX - X3: There is no " Sample Merged"
PSPX - X3: Use all layers = UNChecked
Click inside the frame |
STEP 3
Open paper 10.png tube in your PSP workspace
Right click on the Title Bar and select
COPY from the options.
LAYERS >> NEW RASTER LAYER
Right click on the Title Bar of your 'working' image
and select PASTE INTO SELECTION from the options.
DESELECT
|
STEP 4
LAYERS >> NEW RASTER LAYER
Choose your SELECTION TOOL
then click on the CUSTOM SELECTION symbol
and enter these coordinates.
|
|
STEP 5
Flood fill with #a69574
SELECTIONS >>> MODIFY >>> CONTRACT = 3
EDIT >>> CLEAR
DESELECT
|
|
STEP 6
Choose your SELECTION TOOL
then click on the CUSTOM SELECTION symbol
and enter these coordinates. |
|
STEP 7
Flood fill with #a69574
SELECTIONS >>> MODIFY >>> CONTRACT = 3
EDIT >>> CLEAR
DESELECT |
|
STEP 8
Choose your SELECTION TOOL
then click on the CUSTOM SELECTION symbol
and enter these coordinates. |
|
STEP 9
Flood fill with #a69574
SELECTIONS >>> MODIFY >>> CONTRACT = 3
EDIT >>> CLEAR
DESELECT |
|
STEP 10
With your MAGIC WAND
same settings
Click outside the 3 rectangles
|
|
STEP 11
ACTIVATE RASTER 2
EFFECTS >> TEXTURE EFFECTS >> WEAVE
and use these settings.
EFFECTS >> EDGE EFFECTS >> ENHANCE
DESELECT
|
|
STEP 12
ACTIVATE RASTER 3
SELECTIONS >>> SELECT ALL
SELECTIONS >>> MODIFY >>> CONTRACT = 22
SELECTIONS >>> INVERT
EDIT >>> CLEAR
DESELECT
LAYERS >>> MERGE >>> MERGE DOWN
|
|
STEP 13
Open JHanna 104 tube in your PSP workspace
Right click on the Title Bar and
select COPY from the options.
Right click on the Title Bar of your 'working' image
and select PASTE AS NEW LAYER from the options
.
IMAGE >> RESIZE = 90%
Ensure "Resize all layers" is UNCHECKED
IMAGE >>> MIRROR
ADJUST >>> SHARPNESS >>> SHARPEN
Effects >> 3D Effects >> Drop Shadow
Vertical and Horizontal = 3
Opacity 30
Blur =3.00
Color = Black.
|
|
STEP 14
LAYERS >> NEW RASTER LAYER
Select your TEXT TOOL
with font and settings of your choice
add your name to the bottom right corner of the layer.
Rename this layer Name.
Save & Minimize your image for now |
|
STEP 15
Open master beads tube in your PSP workspace
WINDOW >> DUPLICATE
Close the original image
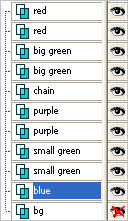
NOTE: Place the beads as shown - then set up layer palette
as shown this will move the correct beads below the chain.
The white layer is to help see,
close this layer each time
before pasting into AS. |
 .  |
STEP 16
Right click on Title Bar and select
Copy merged from the options
In ANIMATION SHOP
Right click the workspace and select
'Paste As New Animation' from the options.
|
STEP 17
Back to PSP
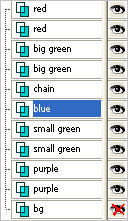
In Layer Palette left click the chain layer
and drag above the bg layer.
Move the beads as shown and
reset palette as shown.
TIP: Use the arrow keys on your keyboard
to move the beads sideways.
|
 .  |
STEP 18
Right click on Title Bar and select
Copy merged from the options
In ANIMATION SHOP
Right click top of frame image and select
'Paste After Current Frame' from the options. |
STEP 19
Back to PSP
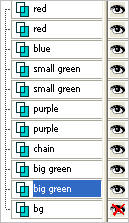
In Layer Palette left click the chain layer
and drag above the bg layer.
Move the beads as shown and
reset palette as shown. |
 .  |
STEP 20
Right click on Title Bar and select Copy merged from the options
In ANIMATION SHOP
Right click top of frame image and select 'Paste After Current Frame' from the options. |
STEP 21
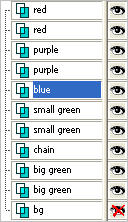
Back to PSP
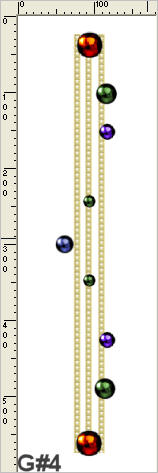
In Layer Palette left click the chain layer
and drag above the bg layer.
Move the beads as shown and
reset palette as shown. |
 .  |
STEP 22
Right click on Title Bar and select Copy merged from the options
In ANIMATION SHOP
Right click top of frame image and select 'Paste After Current Frame' from the options. |
STEP 23
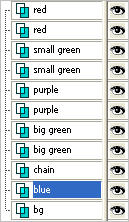
Back to PSP
In Layer Palette left click the chain layer
and drag above the bg layer.
Move the beads as shown and
reset palette as shown.
|
 .  |
STEP 24
Right click on Title Bar and select Copy merged from the options
In ANIMATION SHOP
Right click top of frame image and select 'Paste After Current Frame' from the options. |
STEP 25
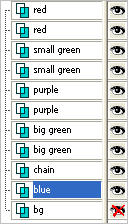
Back to PSP
In Layer Palette left click the chain layer
and drag above the bg layer.
Move the beads as shown and
reset palette as shown. |
 .  |
STEP 26
Right click on Title Bar and select Copy merged from the options
In ANIMATION SHOP
Right click top of frame image and select 'Paste After Current Frame' from the options.
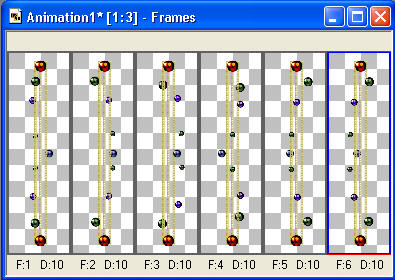
View >> Animation
Neat isn't it?
|
STEP 27
Back to PSP
OPEN YOUR MINIMIZED IMAGE
Right click on Title Bar and select
Copy merged from the options
In ANIMATION SHOP
Right click the workspace and select
'Paste As New Animation' from the options.
Depress your CTRL key and press the letter L
(Upper Case) 5 times.... you need 6 frames

|
STEP 28
Activate the bead animation frames
Edit >> Select All
Edit >> Copy
Edit >> Propagate Paste
Activate the Main animation frames
Edit >> Select All
Edit >> Paste into selected frame
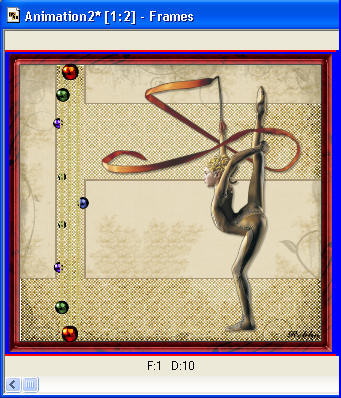
ZOOM in on frame 1 (F:1)
Beads will be attached to the mouse line it up as
shown then release mouse button.
|
STEP 29
Click on the Title Bar of the frames
Animation >> Resize animation
Select width and height in pixels
Click OK
|
|
STEP 30
View >> Animation
and while it is still running,
File >> Save As
Locate the folder in which you wish to save it.
Name your animation.
With the Gif Optimiser keep pressing NEXT
until you get to the last one... click FINISH
Close the Animation
Close the frames.
Close Animation Shop
|
|
|
I hope you have enjoyed the tutorial.
Rebba |