STEP 1
Open up the downloaded images in your PSP workspace and minimize.
Open a new image 650 x 600
Transparent background
PSPX - X2: Colour Depth = 8bits/channel
PSPX3: Colour Depth RGB = 8bits/channel |
STEP 2
SELECTIONS >> SELECT ALL
Open bg .pspimage in your PSP workspace
Right click on the Title Bar and select COPY from the options.
Right click on the Title Bar of your 'working' image
and select PASTE INTO SELECTION
from the options.
DESELECT
Rename this layer bgd
|
|
STEP 3
Open dot.pspimage in your PSP workspace
Right click on the Title Bar and select COPY from the options.
Right click on the Title Bar of your 'working' image
and select PASTE AS NEW LAYER from the options.
Rename this layer dots
|
|
STEP 4
Open angle sides.pspimage in your PSP workspace
Right click on the Title Bar and select COPY from the options.
Right click on the Title Bar of your 'working' image
and select PASTE AS NEW LAYER from the options.
Rename this layer angle sides |
|
STEP 5
Open frame.pspimage in your PSP workspace
Right click on the Title Bar and select COPY from the options.
Right click on the Title Bar of your 'working' image
and select PASTE AS NEW LAYER from the options.
Rename this layer frame |
|
STEP 6
Open apczy98.png in your PSP workspace
Right click on the Title Bar and select COPY from the options.
Right click on the Title Bar of your 'working' image
and select PASTE AS NEW LAYER from the options.
Rename this layer tube |
|
STEP 7
VIEW >>> RULERS
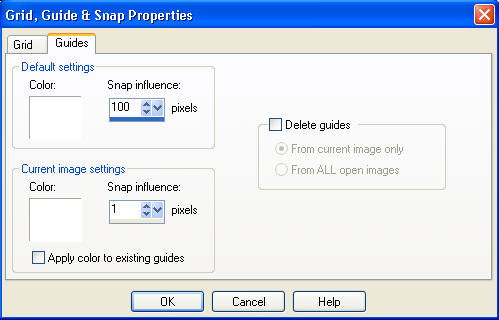
VIEW >>> CHANGE GRID, GUIDE & SNAP PROPERTIES
Click GUIDES Tab

Click OK
|
STEP 8
VIEW >>> GUIDES
Draw a guide by placing your cursor on the left ruler
and dragging to the 335 across top ruler
Line up the base of the tube as shown
VIEW >>> GUIDES
To close guides
|
|
STEP 9
Open text1.pspimage in your PSP workspace
Right click on the Title Bar and select COPY from the options.
Right click on the Title Bar of your 'working' image
and select PASTE AS NEW LAYER from the options.
Center at top
Rename this layer text |
|
STEP 10
LAYERS >> NEW RASTER LAYER
Select your TEXT TOOL
with font and settings of your choice
add your name to the bottom left corner of the layer.
Rename this layer name. |
|
STEP 11
Set up LAYER PALETTE as shown
|
|
STEP 12
Right click on Title Bar and select
Copy merged from the options
In ANIMATION SHOP
Right click the workspace and select
'Paste As New Animation' from the options.
Depress your CTRL key and press the
letter L
(Upper Case) 6 times
so that you have 7 frames
|
|
STEP 13
Back to PSP.
Open box b act.pspimage in your PSP workspace
Activate AS1
All other layers closed
Right click on Title Bar and select
Copy merged from the options
In ANIMATION SHOP
Right click the workspace and select
'Paste As New Animation' from the options.
|
|
STEP 14
Back to PSP.
Close AS1
Open & Activate AS2
Right click on Title Bar and select
Copy merged from the options
In ANIMATION SHOP
Right click top of frame image and select
'Paste After Current Frame' from the options |
|
STEP 15
Back to PSP.
Continue copy merging each of the 5 remaining AS layers in the same manner
and in ANIMATION SHOP
Right click top of frame image and select
'Paste After Current Frame' from the options.
 In ANIMATION SHOP
Select the box frames
Edit >> Select All
Animation >> Resize Animation 35% |
STEP 16
Edit >> Select All
Edit >> Copy
Edit >> Propagate Paste
Select the working bgd frames
EDIT >> Select All
Edit >> Paste into selected frame
ZOOM in on the first frame (F:1)
and place the image as shown
then release your mouse button
The box will be attached to the mouse place it on the hand
and click to place it down.
|
|
STEP 17
If you want two boxes.
Repeat....
Edit >> Paste into selected frame
The box will be attached to the mouse place it on the
lower box
and click to place it down.
|
|
STEP 18
Edit >> Select All
Right click on top of frames
Select 'Frame Properties' from the options
Display time = 20 |
STEP 19
View >> Animation
and while it is still running,
File >> Save As
Locate the folder in which you wish to save it.
Name your animation.
With the Gif Optimiser keep pressing NEXT
until you get to the last one... click FINISH
Close the Animation
Close the frames.
Close Animation Shop
|
|
|
I hope you have enjoyed the tutorial
Rebba |
|
|