STEP 1
Open a new image 410 x 310
Transparent background
PSPX - X2: Colour Depth = 8bits/channel
PSPX3: Colour Depth RGB = 8bits/channel
Flood fill with CREME #dfc4af
|
STEP 2
Open up the KaraT6260 image
in your PSP workspace
Right click on the Title Bar
and select COPY from the options.
Right click on the Title Bar of your 'working' image
and select PASTE AS NEW LAYER
from the options.
IMAGE >>> RESIZE = 60%
Ensure "Resize all layers" is UNCHECKED
Resample using WEIGHTED AVERAGE
In your LAYER PALETTE change the
BLEND MODE to LUMINANCE (L)
|
|
STEP 3
Open up the
D50_Seabrook_Jane_FurryLogic15_Alert
image in your PSP workspace
Right click on the Title Bar
and select COPY from the options.
Right click on the Title Bar of your 'working' image
and select PASTE AS NEW LAYER
from the options.
IMAGE >>> RESIZE = 60%
Ensure "Resize all layers" is UNCHECKED
Resample using WEIGHTED AVERAGE
ADJUST >>> SHARPNESS >>> SHARPEN
|
|
STEP 4
EFFECTS >>> 3D EFFECTS >>> DROP SHADOW |
|
STEP 5
LAYERS >> NEW RASTER LAYER
Select your TEXT TOOL
with font and settings of your choice
add your name to the bottom left or right
corner of the layer. |
|
STEP 6
LAYERS >> NEW RASTER LAYER
Flood fill with #bd8d67
SELECTIONS >>> SELECT ALL
SELECTIONS >>> MODIFY >>> CONTRACT = 5
EDIT >>> CLEAR
DESELECT
|
|
STEP 7
EFFECTS >>> 3D EFFECTS >>> DROP SHADOW |
|
STEP 8
Repeat Drop Shadow effect changing
Vertical & Horizontal Offsets to - ( minus ) 1
Click OK |
|
STEP 9
EFFECTS >>> 3D EFFECTS >>> DROP SHADOW |
|
STEP 10
EFFECTS >>> 3D EFFECTS >>> DROP SHADOW |
|
|
STEP 11
In your MATERIALS PALETTE
Load RED in background
AND
NULL your foreground
|
|
STEP 12
LAYERS >> NEW RASTER LAYER
Select your TEXT tool
PSPX3 TIP:
Before clicking on the image hold down your shift key,
then, when you click on your image the text box will show up
Use these settings
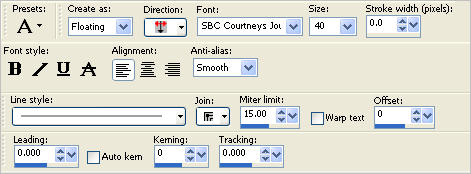
Type: PEEK - A - BOO!
EFFECTS >>> 3D EFFECTS >>> DROP SHADOW
Vertical & Horizontal offsets = 1
Colour = Black
Opacity = 60
Blur = 0
DESELECT
Reposition with your MOVER tool

|
Now on to the ANIMATION
|
| . |
STEP 13
Right click on Title Bar and select
Copy merged from the options
In ANIMATION SHOP
Right click the workspace and select
'Paste As New Animation' from the options.
Effects >> Insert Image Transition.
Select WIPE from the options
Click the CUSTOMIZE button
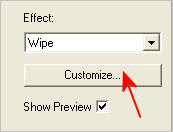
Enter these settings
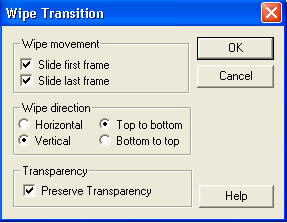
Click OK
Enter these settings
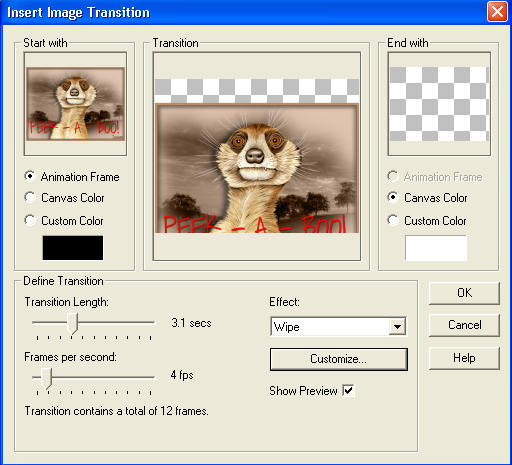
Click OK
|
STEP 14
On the top Menu....
Edit >> Select All
Edit >> Copy
Edit >> Paste After Current Frame
Click inside frame 14 (F:14)
Scroll to the last frame
Depress your SHIFT KEY
Click inside frame 26 (F:26)
Animation >> Reverse frames
This is how the frames should look
in the
middle of the 26 frames
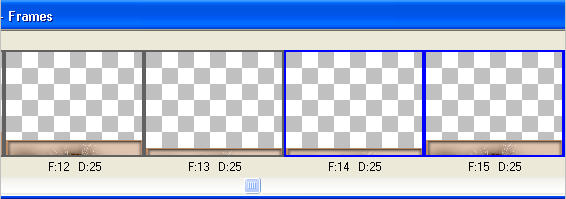
|
STEP 15
RIGHT Click inside frame 14 (F:14)
Click on Insert Frames from the options
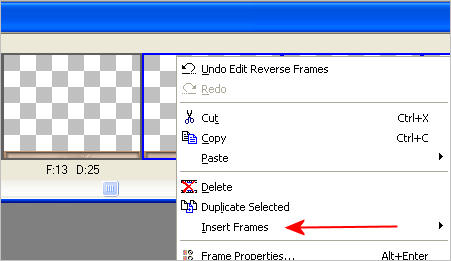
Select EMPTY

Enter these settings
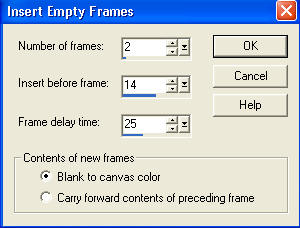
Click OK
You should now have 28 frames
and frames 14 (F:14) and 15 (F:15) should be empty.
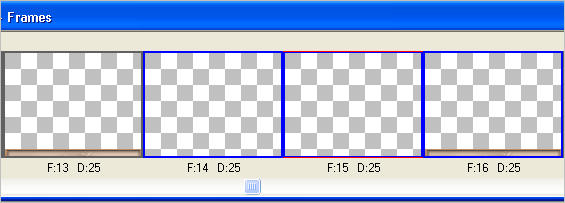
|
STEP 16
Edit >> Select All
Right click on Title Bar of frames
Select 'Frame Properties' from the options
Display time = 10

Click OK
LEFT Click inside frame 14 (F:14)
Depress your SHIFT KEY
LEFT Click inside frame 15 (F:15)
Right click on Title Bar of frames
Select 'Frame Properties' from the options
Display time = 50
Click OK
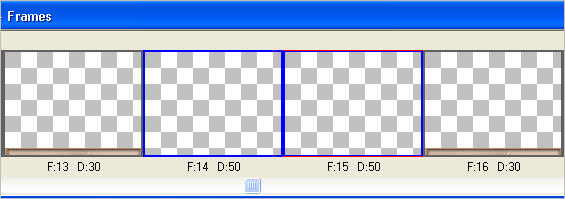
LEFT Click inside frame 28 (F:28)
Right click on Title Bar of frames
Select 'Frame Properties' from the options
Display time = 100
Click OK
|
STEP 17
View >> Animation
and while it is still running,
File >> Save As
Locate the folder in which you wish to save it.
Name your animation.
With the Gif Optimiser keep pressing NEXT
until you get to the last one... click FINISH
Close the Animation
Close the frames.
Close Animation Shop |
Now... wasn't that easy??!! *S*
|
| |