|
|
STEP 13
OK.... Now we are going to do a 'serious' practice animation *S*
In ANIMATION SHOP
CLOSE the EFFECTS option
CLOSE the animation frame (tropical fish)
CLOSE ANIMATION SHOP
.
|
STEP 14
BACK TO PSP
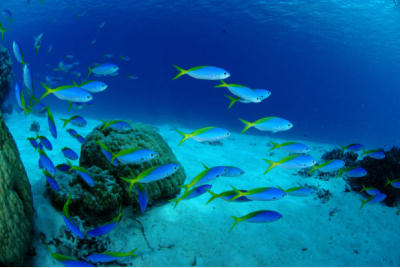
Open up the blueocean image in your PSP workspace
|
|
STEP 15
Right click on Title Bar and select
Copy from the options
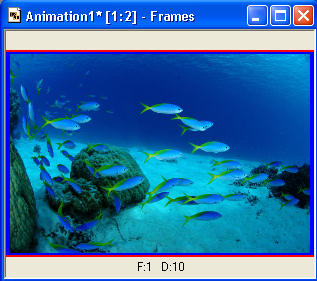
In ANIMATION SHOP
Right click the workspace and select
'Paste As New Animation' from the options |
|
STEP 16
Effects >> Insert Image Effects.
Choose UNDERWATER if not already showing.
Click CUSTOMIZE
(You may have more or less "lines"
in the vector box ...
depending on the last settings used by you
......
we need to remove all of them)
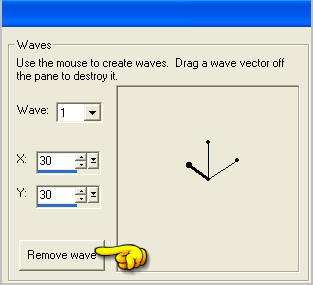
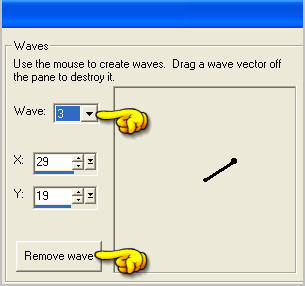
For this exercise I have 3 "wave lines" in my vector pane
Select Wave #1
In the WAVES box click REMOVE WAVE
|
|
STEP 17
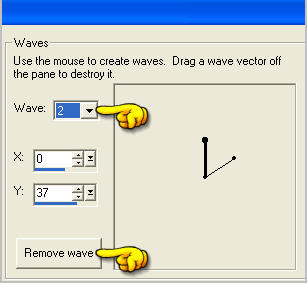
Wave #1 settings have cleared
We have 2 "LINES" still showing
So select "2" from the drop down box
Click REMOVE WAVE
|
|
STEP 18
Wave #2 settings have cleared
We have 1"LINE" still showing
So select "3" from the drop down box
Click REMOVE WAVE |
|
STEP 19
Wave #3 settings have cleared
Now you will have only the large central point showing
and we are ready to insert new settings.
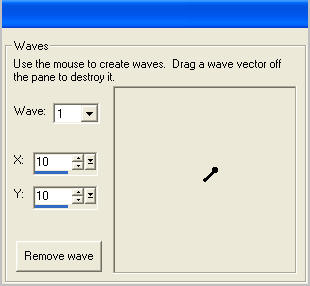
Select "1" from the drop down box
|
|
STEP 20
Enter "10" in the "X" drop down box
and
Enter "10" in the "Y" drop down box
A new line will appear in the vector box on the right
|
|
STEP 21
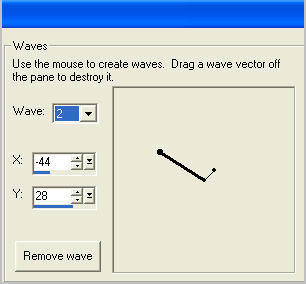
Select "2" from the drop down box
Enter "- (minus) 44 " in the "X" drop down box
and
Enter "28" in the "Y" drop down box
A new line will appear in the vector box on the right
|
|
STEP 22
Enter the settings for
EFFECTS / Sunlight intensity / and Liquid properties
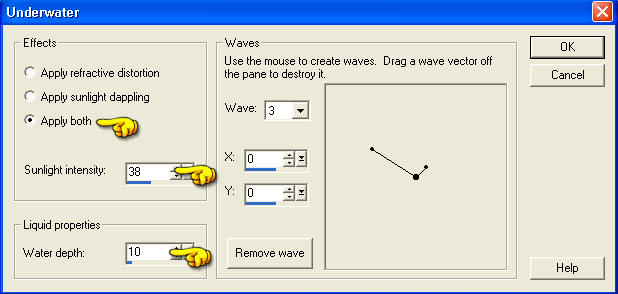
Click OK
Your EFFECTS PREVIEW will now show your animated image
Check that you have entered the "Effect length" and "Frames per second" settings

Click OK
|
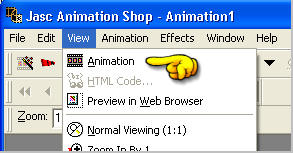
STEP 23
On the top MENU
Click VIEW >>> ANIMATION
|
|
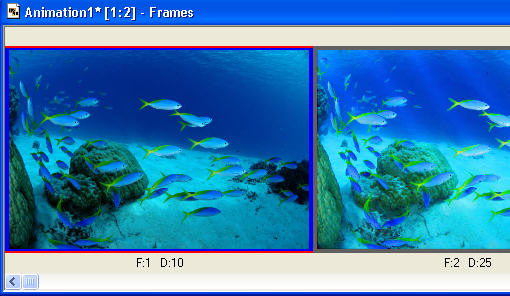
STEP 24
You will notice the animation "jumps"
This is because the first frame is not animated.
Activate the animation frames
Click inside frame 1 (F:1)
the surrounding edge will turn red.
|
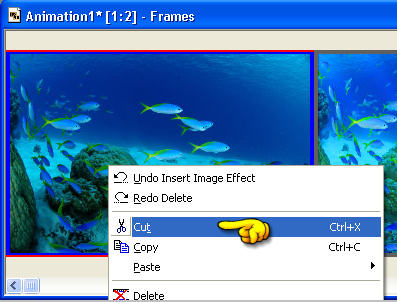
STEP 25
Right click and from the drop down options
select CUT
|
|
Your animation should run perfectly now.
I changed the Frame Properties to 25
to get this result.
|
|
Follow any further instructions in any tutorial you may be doing as to
Frame Properties
Resizing... etc
and you're done!! |
If you wish to save your completed animation
View >> Animation
and while it is still running,
File >> Save As
Locate the folder in which you wish to save it.
Name your animation.
With the Gif Optimiser keep pressing NEXT
until you get to the last one... click FINISH
Close the Animation
Close the frames.
Close Animation Shop
|
| |
..
|
FURTHER INFORMATION
|
In the “Effects” area:
.
|
· Choose the “Apply refractive distortion” option.....
to apply a wavy water effect.
Choose the “Apply sunlight dappling” option......
to apply moving areas of increased lightness.
Choose the “Apply both” option......
to use the “Apply refractive distortion”
and the “Apply sunlight dappling” options simultaneously.
Set the “Sunlight intensity” edit box
to the desired sun brightness level.
Valid values range from 1 to 100.
|
| .. |
..
|
In the “Liquid properties” area:
.
|
Set the “Water depth” edit box to the desired depth level (greater values result in greater distortion).
Valid values range from 1 to 100.
|
| |
..
|
In the “Waves” area:
..
|
Use the vectors panel to insert new waves in the effect by clicking over the central point and dragging it outward.
The vector representing the wave will be completed once you release the mouse.
As you add new waves, the Wave drop down box will add a new number to its list.
|
The “X” and “Y” edit boxes will show the coorditates of the crest or outer point of the wave vector as you drag it.
You can also see the “X” and “Y” coordinates of any of the created waves by clicking their outer point.
|
To delete a wave vector, simply click its outer point and drag it outside the vectors panel.
As an alternative way to delete vectors, select its number from the “Wave” edit box and click the “Remove Wave” button.
..
|
..
|