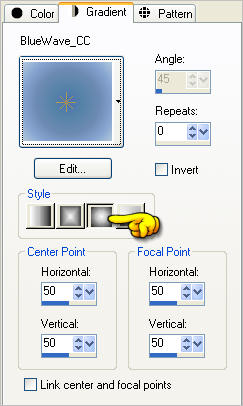
In your MATERIALS PALETTE load
BlueWave_CC GRADIENT in the foreground
using these settings |
|
VIEW >>> RULERS
Open a new image 600 x 600
Transparent background
RASTER BACKGROUND
PSPX - X2: Colour Depth = 8bits/channel
PSPX3: Colour Depth RGB = 8bits/channel
Flood fill with the gradient
|
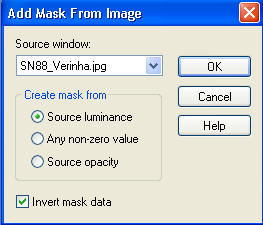
Open up the SN88_Verinha.jpg image in your PSP workspace
and minimize
LAYERS >>> NEW MASK LAYER >>> FROM IMAGE
LAYERS >>> MERGE >>> MERGE GROUP |
|
Reposition with your MOVER tool |
|
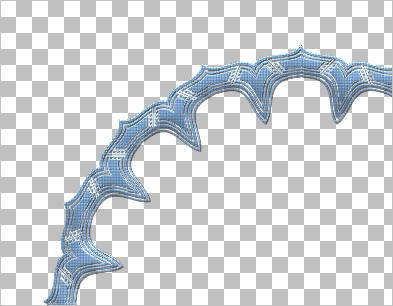
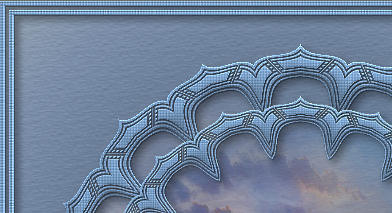
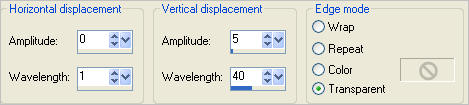
EFFECTS >>> DISTORTION EFFECTS >>> WAVE
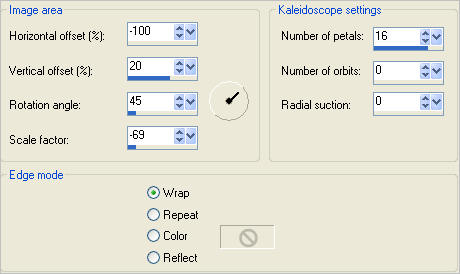
EFFECTS >>> REFLECTION EFFECTS >>> KALEIDOSCOPE
|
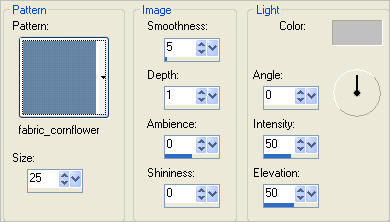
EFFECTS >>> TEXTURE EFFECTS >>> SCULPTURE
COLOUR = #c0c0c0
Pattern = fabric_cornflower |
|
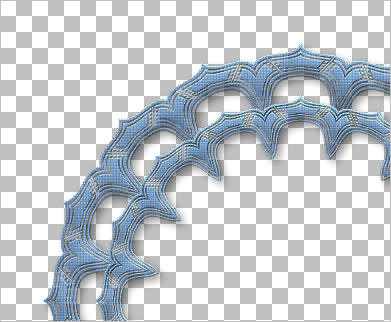
EFFECTS >>> 3D EFFECTS >>> DROP SHADOW
Vertical & Horizontal offsets = 1
Colour = Black
Opacity = 50
Blur = 0
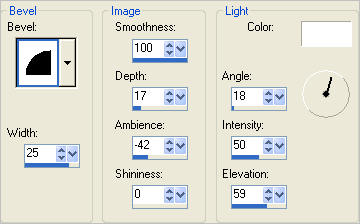
EFFECTS >>> 3D EFFECTS >>> INNER BEVEL
ADJUST >>> SHARPNESS >>> SHARPEN
|
|
LAYERS >>> DUPLICATE
IMAGE >>> RESIZE = 80%
Ensure "Resize all layers" is UNCHECKED
Resample using WEIGHTED AVERAGE
ADJUST >>> SHARPNESS >>> SHARPEN
EFFECTS >>> PLUGINS >>> EYE CANDY 3 >>> DROP SHADOW
Same settings
ACTIVATE Group - Raster 1
EDIT >>> Repeat Drop Shadow..
|
|
LAYERS >>> NEW RASTER LAYER
LAYERS >>> ARRANGE >>> MOVE DOWN
Flood fill with the gradient
ACTIVATE Group - Raster 1
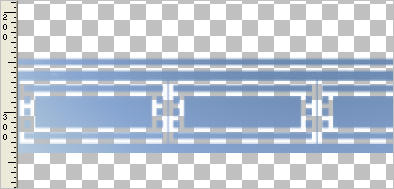
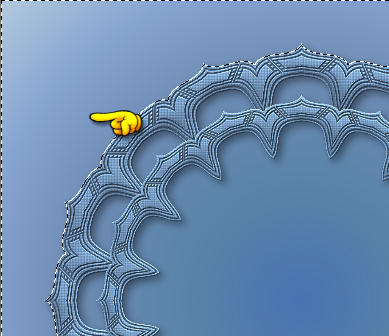
With your MAGIC WAND.... Same settings.
and while depressing your SHIFT KEY...
Select the area shown
|
|
SELECTIONS >>> INVERT
SELECTIONS >>> MODIFY >>> CONTRACT = 5
LAYERS >>> NEW RASTER LAYER
LAYERS >>> ARRANGE >>> MOVE DOWN
Open up the calguisrolfhilger05012012 image
in your PSP workspace
Right click on the Title Bar and select COPY from the options
Right click on the Title Bar of your tag image
and select PASTE INTO SELECTION from the options.
DESELECT
|
|
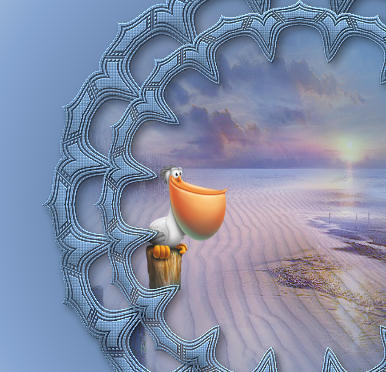
Open up the mou_happy pelikan image
in your PSP workspace
Right click on the Title Bar and select COPY from the options
IMAGE >>> RESIZE = 25%
Ensure "Resize all layers" is UNCHECKED
Resample using WEIGHTED AVERAGE
Right click on the Title Bar of your tag image
and select PASTE AS NEW LAYER from the options.
IMAGE >>> MIRROR
ADJUST >>> SHARPNESS >>> SHARPEN
Reposition with your MOVER tool
|
|
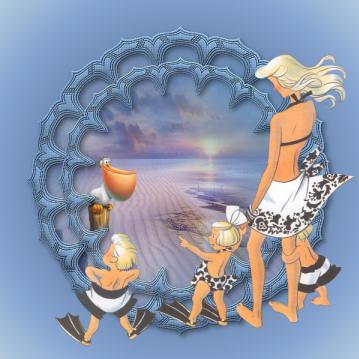
ACTIVATE THE TOP LAYER
Open up the Mira_LLC_les_triples_a_la_mer_28 image
in your PSP workspace
Right click on the Title Bar and select COPY from the options
Right click on the Title Bar of your tag image
and select PASTE AS NEW LAYER from the options.
Reposition with your MOVER tool
|
|
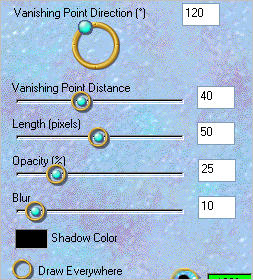
EFFECTS >>> PLUGINS >>> EYE CANDY 3 >>>
PERSPECTIVE SHADOW |
|
ACTIVATE RASTER 1
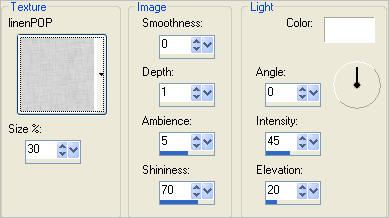
EFFECTS >>> TEXTURE EFFECTS >>> TEXTURE
|
|
LAYERS >>> MERGE >>> MERGE VISIBLE
LAYERS >>> NEW RASTER LAYER
Flood fill with gradient
SELECTIONS >>> SELECT ALL
SELECTIONS >>> MODIFY >>> CONTRACT = 5
EDIT >>> CLEAR
DESELECT
EFFECTS >>> TEXTURE EFFECTS >>> TEXTURE
Same settings
EFFECTS >>> 3D EFFECTS >>> DROP SHADOW
Vertical & Horizontal offsets = 1
Colour = Black
Opacity = 70
Blur = 0
Repeat Drop Shadow effect changing
Vertical & Horizontal Offsets to - ( minus ) 1
Click OK
ADJUST >>> SHARPNESS >>> SHARPEN MORE
|
|
EFFECTS >>> PLUGINS >>> EYE CANDY 3 >>> DROP SHADOW
Same settings
LAYERS >>> DUPLICATE
IMAGE >>> RESIZE = 97%
Ensure "Resize all layers" is UNCHECKED
Resample using WEIGHTED AVERAGE
ADJUST >>> SHARPNESS >>> SHARPEN
|
|
LAYERS >>> MERGE >>> MERGE ALL (Flatten)
Save as .jpg image
.
|
|
|