KALEIDOSCOPE
PSP8 to PSPX3
This tutorial was written by Jemima ~ JANUARY 2012
Copyright © 2012 ~ Jemima ~ All rights reserved
********************************
This was created using PSP9 but can be adapted for other versions of PSP.
You will need the
following to complete this tutorial
Materials
jule_braided_ribbon_8_11.psp
Betsie_353_28 jan[1].2010.pspimage
55_BrookesSwags_BKD2006.pspimage
SE_CurledStuddedRibbon_9.pspimage
Save to a folder on your computer
esp_gold_web_orig.jpg
Save to your PSP Patterns folder
PSP8: C:\Program Files\Jasc Software\Paint Shop Pro 8\Patterns
PSP9: C:\Program Files\Jasc Software\Paint Shop Pro 9\Patterns
PSPX: C:\Program Files\Corel\Corel Paint Shop Pro X\Patterns
PSPXI / X2: C:\Program Files\Corel\Corel Paint Shop Pro Photo X2\Corel_08
PSPX3: C:\Program Files\Corel\X3\PSPClassic\Corel_08
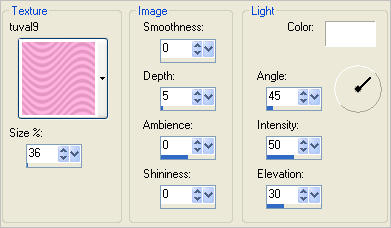
tuval9.bmp
Save to your PSP Textures folder
PSP8: C:\Program Files\Jasc Software\Paint Shop Pro 8\Textures
PSP9: C:\Program Files\Jasc Software\Paint Shop Pro 9\Textures
PSPX: C:\Program Files\Corel\Corel Paint Shop Pro X\Textures
PSPXI / X2: C:\Program Files\Corel\Corel Paint Shop Pro Photo X2\Corel_15
PSPX3: C:\Program Files\Corel\X3\PSPClassic\Corel_15
WINGDNG2.TTF
Save to your WINDOWS >>> FONTS folder
or
to a folder where you store your extra fonts.
Plugins
** EYE CANDY3 **
http://pspgroep.seniorennet.be/filterpagina.htm
********************************
I thought this was rather interesting and useful.. hope you do too. *S*
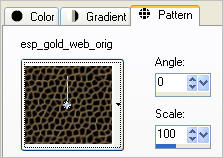
In your MATERIALS PALETTE
Load the ' esp_gold_web_orig ' pattern in your background
using the settings below.
Load CREAM ' #e3ceb7 ' in your foreground
Open a new image 550 x 550
Transparent background
PSPX - X2: Colour Depth = 8bits/channel
PSPX3: Colour Depth RGB = 8bits/channel
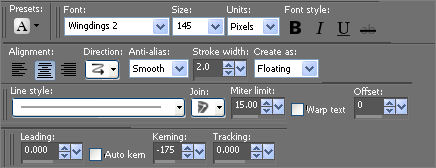
Select your TEXT tool
PSPX - PSPX3: SEE SEPARATE FONT INSTRUCTIONS BELOW
Use these settings
(You should already have "Wingdings2" in your fonts collection)
Place your cursor somewhere near the centre of your image.
PSPX - X3 |
PSPX3 TIP: hold down the shift key when
clicking on the A (Text Tool) the box will show up as other versions
otherwise type the text and then click on the apply changes
(green button in the tools options next to presets) |
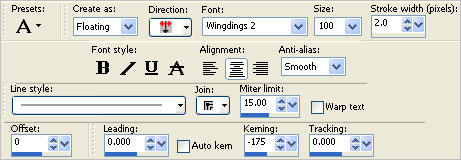
Everything is the same here EXCEPT for the SIZE of the font.
|
|
Place your cursor somewhere near the centre of your image.
These settings will leave only a slight gap where the design meets.
|
Enter the letters (lower case) hghghg
Click APPLY
EFFECTS >>> 3D EFFECTS >>> DROP SHADOW
Vertical & Horizontal offsets = 1
Colour = Black
Opacity = 70
Blur = 0
Repeat Drop Shadow effect changing
Vertical & Horizontal Offsets to - ( minus ) 1
Click OK
DESELECT

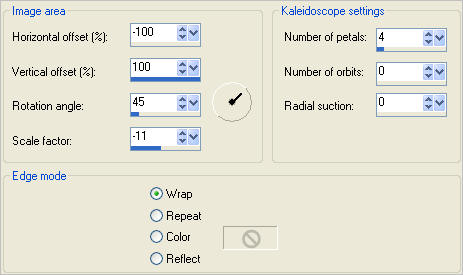
EFFECTS >>> REFLECTION EFFECTS >>> KALEIDOSCOPE
(NOTE: PSPX2... Change HORIZONTAL OFFSET to - (minus) 94 to get same result.)
How about this result!!! *S*
Save as fontframe.pspimage image
Let's try something else....
Open a new image 550 x 550
Transparent background
PSPX - X2: Colour Depth = 8bits/channel
PSPX3: Colour Depth RGB = 8bits/channel
Open up the jule_braided_ribbon_8_11 image in your PSP workspace
Activate the
Kopie von Zusammengefasst 4 layer
Right click on the Title Bar and select COPY from the options
Right click on the Title Bar of your new blank image
and select PASTE AS NEW LAYER from the options.
PSP8 - PSP9:IMAGE >>> ROTATE >>> FREE ROTATE = RIGHT 90
Ensure "All layers" is UNCHECKED
PSPX - PSPX3: IMAGE >>> FREE ROTATE = RIGHT 90
Ensure "All layers" is UNCHECKED
IMAGE >>> RESIZE = 80%
Ensure "Resize all layers" is UNCHECKED
Resample using WEIGHTED AVERAGE
EFFECTS >>> REFLECTION EFFECTS >>> KALEIDOSCOPE
Same settings
ADJUST >>> SHARPNESS >>> SHARPEN
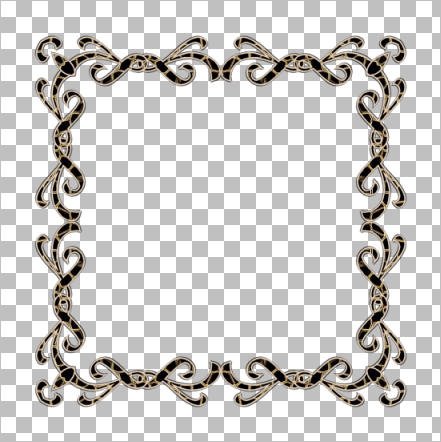
Save as braidframe.pspimage image
OK.. now we'll create some corners to match the above frame
Open a new image 550 x 550
Transparent background
PSPX - X2: Colour Depth = 8bits/channel
PSPX3: Colour Depth RGB = 8bits/channel
Open up the jule_braided_ribbon_8_11 image in your PSP workspace
Activate the Kopie von Zusammengefasst 4 layer
Right click on the Title Bar and select COPY from the options
Right click on the Title Bar of your new blank image
and select PASTE AS NEW LAYER from the options.
IMAGE >>> RESIZE = 70%
Ensure "Resize all layers" is UNCHECKED
Resample using WEIGHTED AVERAGE
EFFECTS >>> REFLECTION EFFECTS >>> KALEIDOSCOPE
Use the same settings BUT change the
SCALE FACTOR to - (minus) 20
Save as braidcorners.pspimage image
NOTE: You can change the size of the corners by playing around with:
(1)... the percentage of 'resizing'
(2)... and fiddling with the Scale Factor
Now we'll try it with an image that's at an angle.
Open a new image 550 x 550
Transparent background
PSPX - X2: Colour Depth = 8bits/channel
PSPX3: Colour Depth RGB = 8bits/channel
Open up the SE_CurledStuddedRibbon_9 image in your PSP workspace
Right click on the Title Bar and select COPY from the options
Right click on the Title Bar of your new blank image
and select PASTE AS NEW LAYER from the options.
DO NOT RESIZE
EFFECTS >>> REFLECTION EFFECTS >>> KALEIDOSCOPE
Use the same settings BUT change the
SCALE FACTOR to - (minus) 7
Save as .pspimage image
Last one coming up...
Open a new image 550 x 550
Transparent background
PSPX - X2: Colour Depth = 8bits/channel
PSPX3: Colour Depth RGB = 8bits/channel
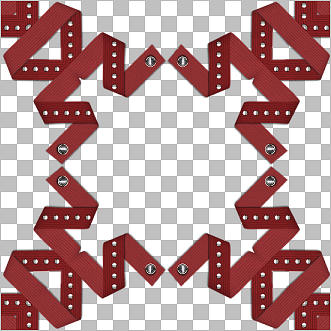
Open up the 55_BrookesSwags_BKD2006 image in your PSP workspace
Right click on the Title Bar and select COPY from the options
Right click on the Title Bar of your new blank image
and select PASTE AS NEW LAYER from the options.
EFFECTS >>> REFLECTION EFFECTS >>> KALEIDOSCOPE
Use the same settings BUT change the
SCALE FACTOR to - (minus) 16
ADJUST >>> BRIGHTNESS and CONTRAST >>> BRIGHTNESS/CONTRAST
Save as .pspimage image
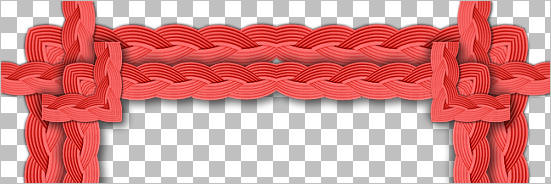
Ok... enough playing... let's do something with our creations.
We'll need the following:
braidcorners.pspimage
braidframe.pspimage
fontframe.pspimage
Open a new image 550 x 550
Transparent background
PSPX - X2: Colour Depth = 8bits/channel
PSPX3: Colour Depth RGB = 8bits/channel
ACTIVATE the braidframe.pspimage
Right click on the Title Bar and select COPY from the options
Right click on the Title Bar of your blank image
and select PASTE AS NEW LAYER from the options.
ACTIVATE the braidcorners.pspimage
Right click on the Title Bar and select COPY from the options
Right click on the Title Bar of your frame image
and select PASTE AS NEW LAYER from the options.
EFFECTS >>> 3D EFFECTS >>> DROP SHADOW
Vertical & Horizontal offsets = 1
Colour = Black
Opacity = 70
Blur = 3.00
Repeat Drop Shadow effect changing
Vertical & Horizontal Offsets to - ( minus ) 1
Click OK

LAYERS >>> MERGE >>> MERGE DOWN
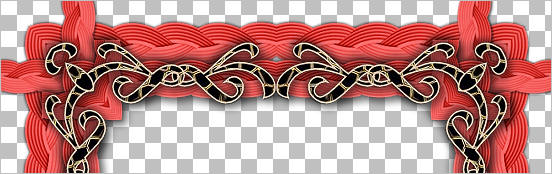
LAYERS >>> DUPLICATE
IMAGE >>> RESIZE = 85%
Ensure "Resize all layers" is UNCHECKED
Resample using WEIGHTED AVERAGE
EFFECTS >>> PLUGINS >>> EYE CANDY 3 >>> DROP SHADOW
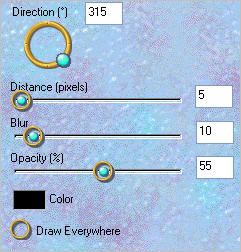
EDIT >>> Repeat Drop Shadow.. change DIRECTION to 135
ACTIVATE the fontframe.pspimage
Right click on the Title Bar and select COPY from the options
Right click on the Title Bar of your frame image
and select PASTE AS NEW LAYER from the options.
EFFECTS >>> PLUGINS >>> EYE CANDY 3 >>> DROP SHADOW
Same settings
EDIT >>> Repeat Drop Shadow.. change DIRECTION to 315
ADJUST >>> SHARPNESS >>> SHARPEN
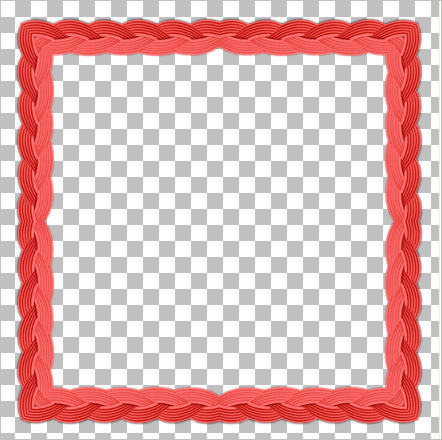
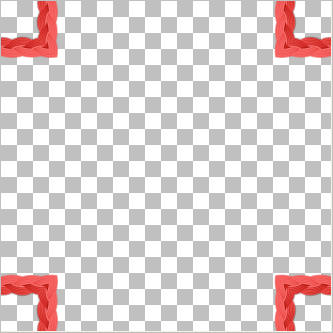
ACTIVATE RASTER 1
Flood fill with RED #f35957
Choose your SELECTION TOOL then click on the CUSTOM SELECTION symbol
and enter these coordinates.

Hit your DELETE key
DESELECT
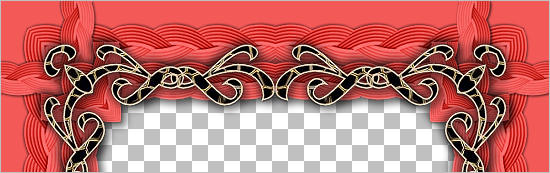
ACTIVATE RASTER 2
EFFECTS >>> PLUGINS >>> EYE CANDY 3 >>> DROP SHADOW
Same settings
EDIT >>> Repeat Drop Shadow.. change DIRECTION to 135

LAYERS >>> MERGE >>> MERGE VISIBLE
LAYERS >>> NEW RASTER LAYER
Flood fill with RED #f35957
EFFECTS >>> TEXTURE EFFECTS >>> TEXTURE
SELECTIONS >>> SELECT ALL
SELECTIONS >>> MODIFY >>> CONTRACT = 10
EDIT >>> CLEAR
EFFECTS >>> 3D EFFECTS >>> DROP SHADOW
Vertical & Horizontal offsets = 1
Colour = Black
Opacity = 70
Blur = 3.00
Repeat Drop Shadow effect changing
Vertical & Horizontal Offsets to - ( minus ) 1
Click OK
DESELECT
EFFECTS >>> PLUGINS >>> EYE CANDY 3 >>> DROP SHADOW
Same settings
EDIT >>> Repeat Drop Shadow.. change DIRECTION to 315
LAYERS >>> MERGE >>> MERGE VISIBLE
Save as .pspimage image
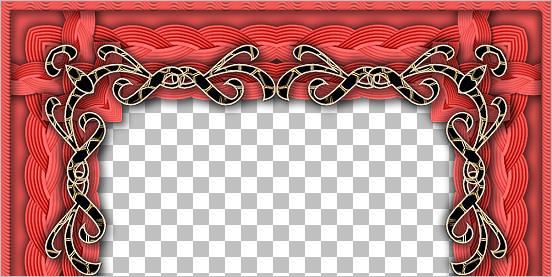
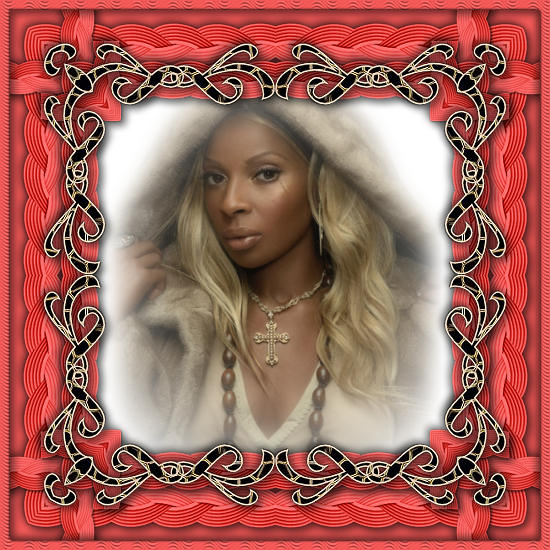
Now you have to find a suitable image to frame *S*
I used the image supplied ... you can use one of your choice.
I hope you enjoyed this tutorial.
Page designed by

for
http://www.artistrypsp.com/
Copyright ©
2000-2011 Artistry In PSP / PSP Artistry
All rights reserved.
Unless specifically made available for
download,
no graphics or text may be removed from
this site for any reason
without written permission from Artistry
In PSP / PSP Artistry
|