CREATING & WORKING WITH GUIDES
PSP8 to PSPX3
This tutorial was written by Jemima ~ July 2012
Copyright © 2012 ~ Jemima ~ All rights reserved
********************************
This was created using PSP9 but can be adapted for other versions of PSP.
********************************
When I was first asked to use GUIDES it caused me some confusion.
Having never used them before I found that the instructions were not explicit enough for a 'newbie'.
So I will attempt to simplify the instructions here.
You will need the sample.pspimage (Right click and Save As)
First you need to open a new canvas ( blank image )
Mine is 500 x 500
VIEW >>> RULERS
Flood fill it with a colour of your choice... mine is
#b76d4a
TO MODIFY SETTINGS FOR GUIDES
You have 2 options...
OPTION 1
You need to go to your top Menu..
VIEW >>> CHANGE GRID, GUIDE & SNAP PROPERTIES
 Click on the GUIDES Tab
Select the colour you wish to use (I chose WHITE)
The Default settings group box shows settings
for all the guides you place in the future.
The Current image settings group box shows settings
for the guides in the current image.

For either the default or current image settings, select from these options:
Color Click in the color box to choose a new guide color.
Right-click the color box to pick from the Recent Colors dialog.
Snap influence Controls how many pixels away an item must be
to snap to a guide or grid.
Once your settings are entered... click OK
The Snap to Guides option must be selected in the View menu.

|
OPTION 2
Right-click the image Title Bar to display a context menu,
and choose Change Grid, Guide, and Snap Properties.
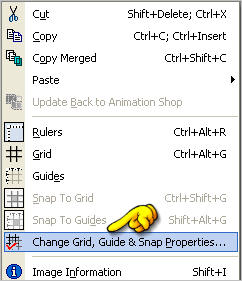
Click the Guides tab.
The Default settings group box shows settings
for all the guides you place in the future.
The Current image settings group box shows settings
for the guides in the current image.
For either the default or current image settings, select from these options:
Color ... Click in the color box to choose a new guide color.
Right-click the color box to pick from the Recent Colors dialog.
Snap influence ... Controls how many pixels away an item must be
to snap to a guide or grid.
Once your settings are entered... click OK
Right-click the image Title Bar to display a context menu.
The Guides and Snap to Guides options must be selected in the View menu.

|
OK... now we have the settings entered and...
the "Snap to Guides" selected on the VIEW Menu..
Place your cursor over the top ruler ... a large + sign will appear

Depress your left Mouse Button
The + sign will change to

and drag down to the 200 pixel mark on your left ruler and release.
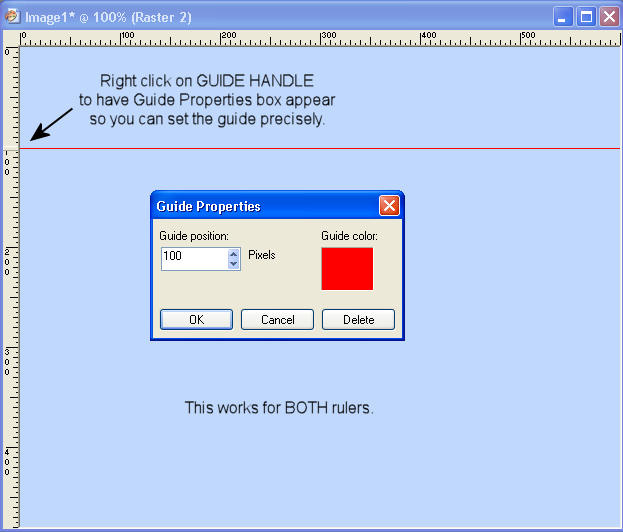
The 200 pixel mark will be 'raised'.... this is the GUIDE HANDLE
As you drag, the Status Bar displays the guide’s position in pixels

Place your cursor over the top ruler again...
Depress your left Mouse Button
The + sign will change to
and drag down to the 300 pixel mark on your left ruler and release.
The 300 pixel mark will be 'raised'.... this is the GUIDE HANDLE

If you make an error you can 'grab' the GUIDE HANDLE and move to the required position
OR
to delete the Guide
drag the GUIDE HANDLE back up to the top ruler.
The same method works for vertical guides.
Place your cursor over the left ruler ...
Depress your left Mouse Button
The + sign will change to
and drag across to the 200 pixel mark on your left ruler and release.
The 200 pixel mark will be 'raised'.... this is the GUIDE HANDLE

Place your cursor over the left ruler ...
Depress your left Mouse Button
The + sign will change to
and drag across to the 300 pixel mark on your left ruler and release.
The 300 pixel mark will be 'raised'.... this is the GUIDE HANDLE

TIP: You can right click on the GUIDE HANDLE to set guide precisely.
To delete one guide:
Do either of the following:
Drag the guide handle in the ruler off the image window.
Double-click the guide handle to display the Guide Properties dialog and click Delete.
To delete all guides in an image or all open images:
Choose View > Change Grid, Guide, and Snap Properties.
Click the Guides tab.
Mark the Delete guides check box, and then select From current image only or From ALL open images.
Click OK.
*/*/*/*/*/*/*/*/*/*/*/*/*/*/*/*/*/*/*/*/*/*
Right... now let's test the guides.
The image used will be 'pasted' on to the same layer.
Open up the
sample.pspimage in your PSP workspace
Right click on the Title Bar and select COPY from the options
Right click on the Title Bar of your frame image
and select PASTE AS NEW SELECTION from the options.
Place your selection in the top left square created by the GUIDES.
It will cling to the bottom right corner.

Release
Right click on the Title Bar of your frame image
and select PASTE AS NEW SELECTION from the options.
Place your selection in the top right square created by the GUIDES.
It will cling to the bottom left corner.

Release
Right click on the Title Bar of your frame image
and select PASTE AS NEW SELECTION from the options.
Place your selection in the bottom left square created by the GUIDES.
It will cling to the top right corner.

Release
Right click on the Title Bar of your frame image
and select PASTE AS NEW SELECTION from the options.
Place your selection in the bottom right square created by the GUIDES.
It will cling to the top left corner.

Release and DESELECT
LAYERS >>> NEW RASTER LAYER
Open up the sample.pspimage in your PSP workspace
WINDOW >>> DUPLICATE
Close the original Image
IMAGE >>> RESIZE = 50%
Ensure "Resize all layers" is UNCHECKED
Resample using WEIGHTED AVERAGE
Right click on the Title Bar of your frame image
and select PASTE AS NEW SELECTION from the options.
Place your selection in the CENTRE square created by the GUIDES.
Place it in to the top left corner.

Right click on the Title Bar of your frame image
and select PASTE AS NEW SELECTION from the options.
Place your selection in the CENTRE square created by the GUIDES.
Place it in to the top right corner.

Right click on the Title Bar of your frame image
and select PASTE AS NEW SELECTION from the options.
Place your selection in the CENTRE square created by the GUIDES.
Place it in to the bottom left corner.
Right click on the Title Bar of your frame image
and select PASTE AS NEW SELECTION from the options.
Place your selection in the CENTRE square created by the GUIDES.
Place it in to the bottom right corner.
DESELECT

To remove the guides...
VIEW >>> GUIDES


I hope this hasn't been too complicated. *S*
Page designed by

for
http://www.artistrypsp.com/
Copyright © 2003-2012 Artistry In PSP / PSP Artistry
All rights reserved.
Unless specifically made available for download,
no graphics or text may be removed from this site for any reason
without written permission from Artistry In PSP / PSP Artistry
|