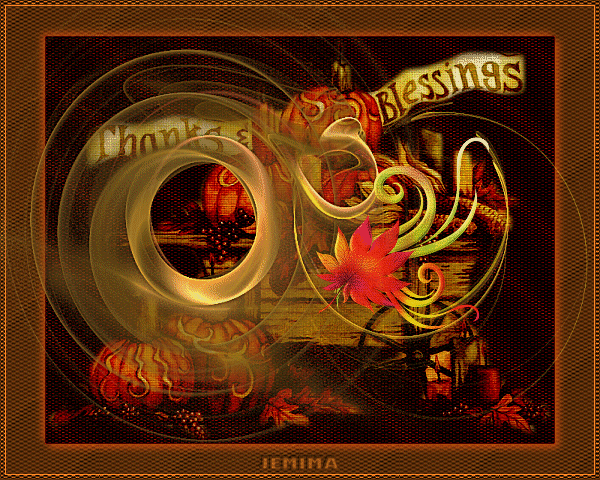
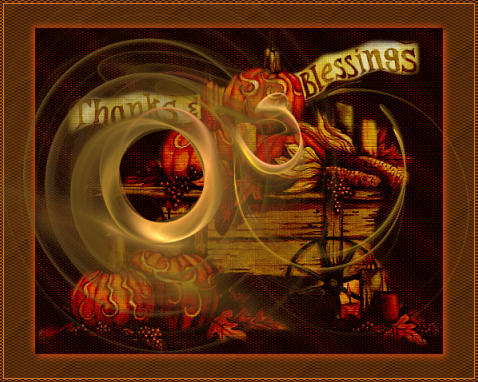
THANKSGIVING 2012
PSP8 to PSPX3
This tutorial was written by Jemima ~ MARCH 2012
Copyright © 2012 ~ Jemima ~ All rights reserved
********************************
This was created using PSP9 but can be adapted for other versions of PSP.
No artists or copyright infringement is intended on any of the tubes used in this tutorial.
The tubes were acquired in good faith as to their legality.
If there is a problem, please contact the author and the image/s will be removed.
You will need the
following to complete this tutorial
Materials
holiday3.psp
a 81711.png
Apo-110604-191-3-ak.pspimage
Save to a folder on your computer
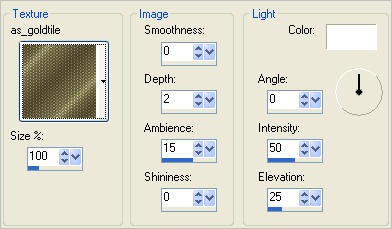
as_goldtile.bmp
Save to your PSP Textures folder
PSP8: C:\Program Files\Jasc Software\Paint Shop Pro 8\Textures
PSP9: C:\Program Files\Jasc Software\Paint Shop Pro 9\Textures
PSPX: C:\Program Files\Corel\Corel Paint Shop Pro X\Textures
PSPXI / X2: C:\Program Files\Corel\Corel Paint Shop Pro Photo X2\Corel_15
PSPX3: C:\Program Files\Corel\X3\PSPClassic\Corel_15
Plugins
** EYE CANDY3 **
http://www.pircnet.com/downloads.html
********************************
In your MATERIALS PALETTE
Load BROWN " #5a2e0a " in your foreground
Open a new image 600 x 480
Transparent background
PSPX - X2: Colour Depth = 8bits/channel
PSPX3: Colour Depth RGB = 8bits/channel
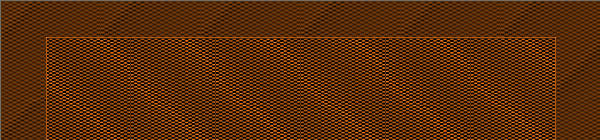
Flood fill with BROWN
EFFECTS >>> TEXTURE EFFECTS >>> TEXTURE
LAYERS >>> DUPLICATE
IMAGE >>> RESIZE = 85%
Ensure "Resize all layers" is UNCHECKED
Resample using WEIGHTED AVERAGE
EFFECTS >>> EDGE EFFECTS >>> ENHANCE
IMAGE >>> FLIP
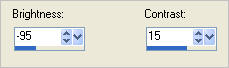
ADJUST >>> BRIGHTNESS and CONTRAST >>> BRIGHTNESS/CONTRAST
Open up the holiday3 image in your PSP workspace
Right click on the Title Bar and select COPY from the options
Right click on the Title Bar of your tag image
and select PASTE AS NEW LAYER from the options.
IMAGE >>> RESIZE = 75%
Ensure "Resize all layers" is UNCHECKED
Resample using WEIGHTED AVERAGE
In your LAYER PALETTE change BLEND MODE to HARD LIGHT

ACTIVATE RASTER 1
SELECTIONS >>> SELECT ALL
SELECTIONS >>> MODIFY >>> CONTRACT = 5
SELECTIONS >>> INVERT
EFFECTS >>> EDGE EFFECTS >>> ENHANCE
EFFECTS >>> 3D EFFECTS >>> DROP SHADOW
Vertical & Horizontal offsets = 1
Colour = ORANGE #f88426
Opacity = 100
Blur = 0
Repeat Drop Shadow effect changing
Vertical & Horizontal Offsets to - ( minus ) 1
Click OK
DESELECT

ACTIVATE Copy of Raster 1
SELECTIONS >>> SELECT ALL
SELECTIONS >>> FLOAT
SELECTIONS >>> DEFLOAT
EFFECTS >>> PLUGINS >>> EYE CANDY 3 >>> DROP SHADOW
COLOUR = #f75913
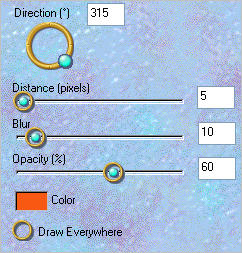
EDIT >>> Repeat Drop Shadow.. change DIRECTION to 135
DESELECT

ACTIVATE RASTER 2
Open up the Apo-110604-191-3-ak image in your PSP workspace
Right click on the Title Bar and select COPY from the options
Right click on the Title Bar of your tag image
and select PASTE AS NEW LAYER from the options.
ADJUST >>> SHARPNESS >>> SHARPEN MORE
Open up the a 81711.png image in your PSP workspace
Choose your FREEHAND SELECTION TOOL
Selection Type = Point to Point
Mode = Replace
Feather = 0
Antialias = UNChecked
Select the bottom left image
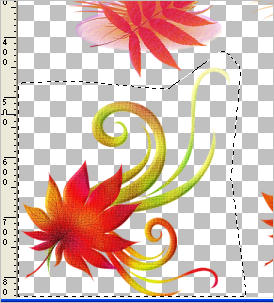
Right click on the Title Bar and select COPY from the options
Right click on the Title Bar of your tag image
and select PASTE AS NEW LAYER from the options.
IMAGE >>> RESIZE = 50%
Ensure "Resize all layers" is UNCHECKED
Resample using WEIGHTED AVERAGE
ADJUST >>> SHARPNESS >>> SHARPEN
Reposition with your MOVER tool

ACTIVATE RASTER 1
LAYERS >>> NEW RASTER LAYER
Select your TEXT TOOL
with font and settings of your choice
add your name to the bottom of the layer.

LAYERS >>> MERGE >>> MERGE DOWN
ACTIVATE RASTER 4
Right click on the Title Bar and select COPY from the options
In ANIMATION SHOP
Right click the workspace and select
'Paste As New Animation' from the options.
Right click top of frame image and select
'Paste After Current Frame' from the options.
Click inside the first frame (F:1) to activate
Effects >> Insert Image Transition >> Twist
Use these settings
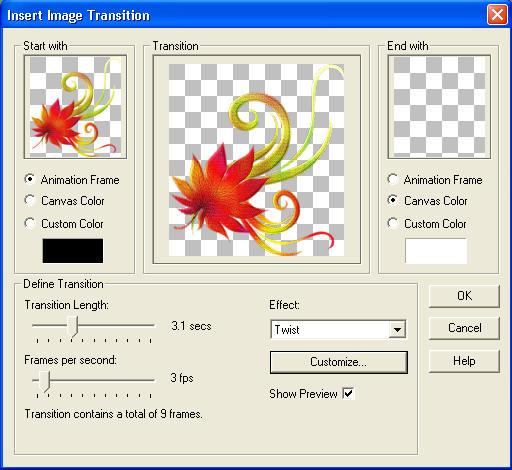
Click on the CUSTOMIZE button and enter these settings
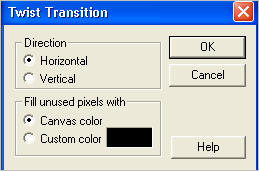
Click OK (Twice)
BACK TO PSP
Close Raster 4
Activate Raster 1
Right click on Title Bar and select
Copy merged from the options
In ANIMATION SHOP
Right click the workspace and select
'Paste As New Animation' from the options.
Right click top of frame image and select
'Paste After Current Frame' from the options.
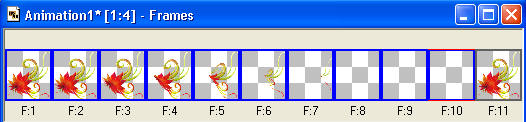
Depress your CTRL key and press the letter L
(Upper Case) 9 times
You should now have 11 frames

Click on the Title Bar of the 'Flower' frames (Animation1*) to activate
Edit >> Select All
Edit >> Copy
Edit >> Propagate Paste
Click on the Title Bar of the 'Tag' frames (Animation2*) to activate
Edit >> Select All
ZOOM IN to the first frame (F:1)
Edit >> Paste into selected frame
Carefully place the banner top centre of your tag and release mouse button.
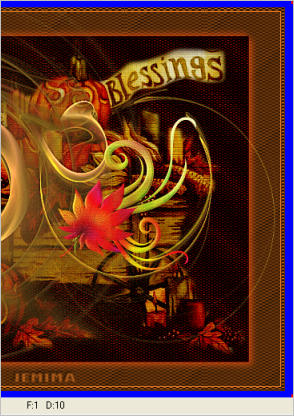
Click inside Frame 1 (F:1) to activate
Right click on Title Bar of frames
Select 'Frame Properties' from the options
Display time = 100
Click inside Frame 11 (F:11) to activate
Right click on Title Bar of frames
Select 'Frame Properties' from the options
Display time = 100
View >> Animation
and while it is still running,
File >> Save As
Locate the folder in which you wish to save it.
Name your animation.
With the Gif Optimiser keep pressing NEXT
until you get to the last one... click FINISH
Close the Animation
Close the frames.
Close Animation Shop
RESIZING ANIMATIONS
Click on the Title Bar of the frames
Animation >> Resize animation
Select width and height in pixels
Click OK
Save your animation |
TESTERS RESULTS
Page designed by

for
http://www.artistrypsp.com/
Copyright ©
2003-2012 Artistry In PSP / PSP Artistry
All rights reserved.
Unless specifically made available for
download,
no graphics or text may be removed from
this site for any reason
without written permission from Artistry
In PSP / PSP Artistry
|