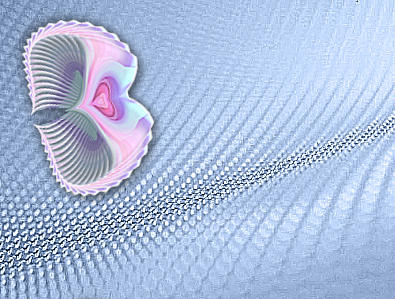
STEP 1
VIEW >>> RULERS
Open up the1600_110.jpg image in your PSP workspace
WINDOW >>> DUPLICATE
Close the original Image
LAYERS >>> Promote background layer
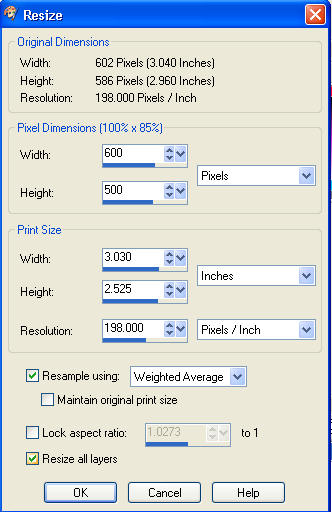
IMAGE >>> RESIZE
Use these settings
|
|
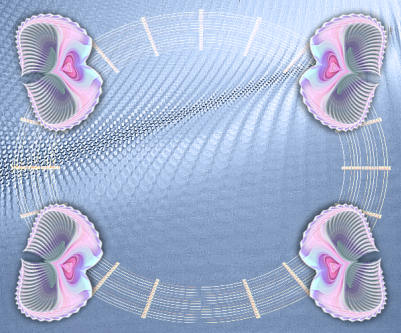
STEP 2
EFFECTS >>> DISTORTION EFFECTS >>> TWIRL
DEGREES = - (MINUS) 320
IMAGE >>> RESIZE = 90%
Ensure "Resize all layers" is UNCHECKED
Check 'Lock Aspect Ratio'
Resample using WEIGHTED AVERAGE
EFFECTS >>> DISTORTION EFFECTS >>> WAVE
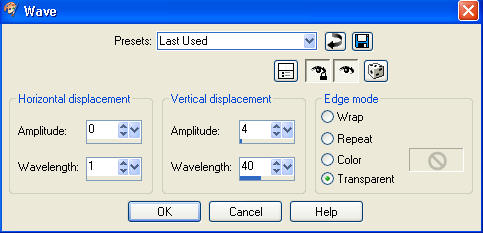
|
STEP 3
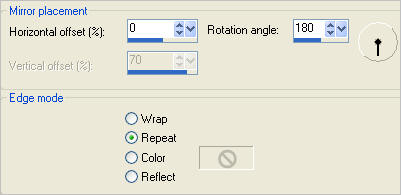
EFFECTS >>> REFLECTION EFFECTS >>>
ROTATING MIRROR
ADJUST >>> SHARPNESS >>> SHARPEN MORE
|
|
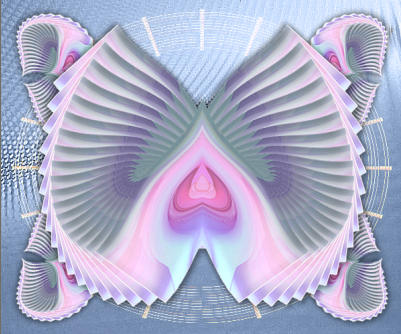
STEP 4
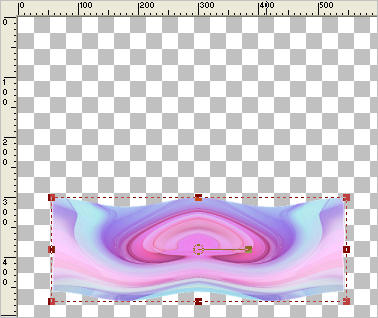
Select your DEFORMATION tool
Mode = SCALE
use default settings
PSPX-X3:Select your PICK tool
Drag the centre top node down to the 300 pixel mark
on the left ruler
Drag the centre bottom node up to the 460 pixel mark
on the left ruler
Drag the centre left node to the 50 pixel mark
on the top ruler
Drag the centre right node to the 550 pixel mark on the top ruler
|
|
STEP 5
Click the RESET RECTANGLE arrow
Select the MOVER tool to disengage the
DEFORMATION tool (PICK tool)
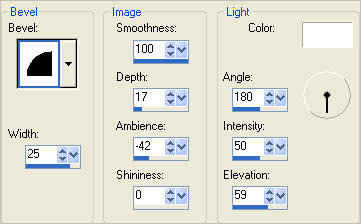
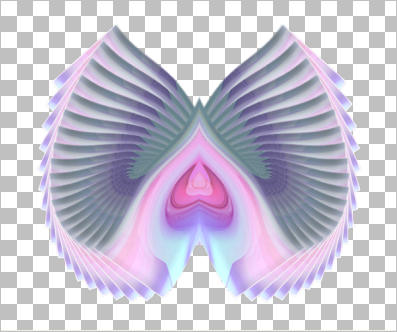
EFFECTS >>> 3D EFFECTS >>> INNER BEVEL
|
|
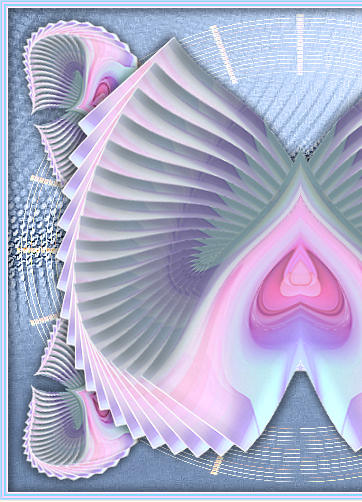
STEP 6
EFFECTS >>> PLUGINS >>> MuRa's Meister >>> Copies >>> Cards
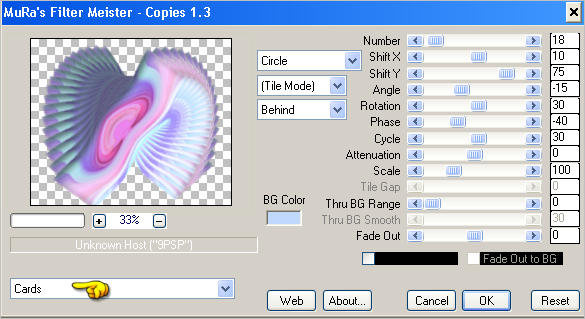
|
NOTE!!!
The resulting image colour may differ
from that shown below.
I did this tut again to double check the instructions and the resulting image was lighter than that shown below.
If this occurs with your result don't worry about it
....
Just omit the ADJUST >>> BRIGHTNESS and CONTRAST >>> BRIGHTNESS/CONTRAST
instruction in STEP 8
|
STEP 7
IMAGE >>> RESIZE = 90%
Ensure "Resize all layers" is UNCHECKED
Resample using WEIGHTED AVERAGE
IMAGE >>> FLIP
IMAGE >>> MIRROR
EFFECTS >>> REFLECTION EFFECTS >>>
ROTATING MIRROR
Same settings
|
|
STEP 8
ADJUST >>> SHARPNESS >>> SHARPEN
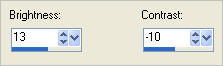
ADJUST >>> BRIGHTNESS and CONTRAST >>> BRIGHTNESS/CONTRAST (See NOTE above)
 LAYERS >>> DUPLICATE
CLOSE RASTER 1
IMAGE >>> RESIZE = 55%
Ensure "Resize all layers" is UNCHECKED
Resample using WEIGHTED AVERAGE
ADJUST >>> SHARPNESS >>> SHARPEN MORE
Reposition with your MOVER tool
|
|
STEP 9
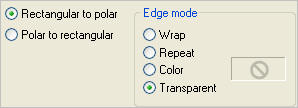
EFFECTS >>> DISTORTION EFFECTS >>> POLAR COORDINATES |
|
STEP 10
IMAGE >>> MIRROR
IMAGE >>> RESIZE = 90%
Ensure "Resize all layers" is UNCHECKED
Resample using WEIGHTED AVERAGE
PSP8 - PSP9:IMAGE >>> ROTATE >>> FREE ROTATE = LEFT 15.00
Ensure "All layers" is UNCHECKED
PSPX - PSPX3: IMAGE >>> FREE ROTATE = LEFT 15.00
Ensure "All layers" is UNCHECKED
ADJUST >>> SHARPNESS >>> SHARPEN MORE
Reposition with your MOVER tool
|
|
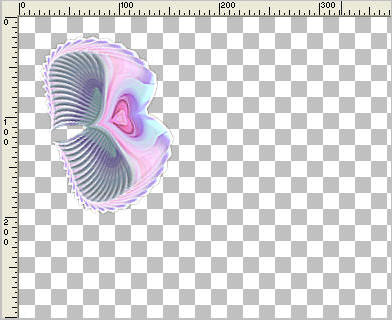
STEP 11
EFFECTS >>> PLUGINS >>> EYE CANDY 3 >>> DROP SHADOW |
|
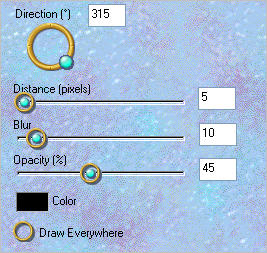
STEP 12
EDIT >>> Repeat Drop Shadow.. change DIRECTION to 135 |
|
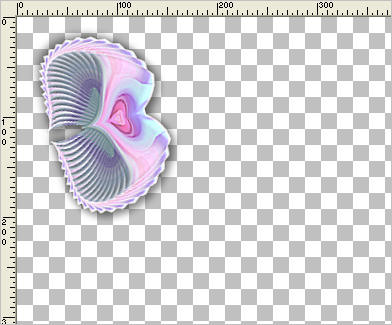
STEP 13
EFFECTS >>> PLUGINS >>> SIMPLE >>> TOP LEFT MIRROR
LAYERS >>> ARRANGE >>> MOVE DOWN
LAYERS >>> NEW RASTER LAYER
LAYERS >>> ARRANGE >>> MOVE DOWN
SELECTIONS >>> SELECT ALL
Open up the Flow02.jpg image in your PSP workspace
Right click on the Title Bar and select COPY from the options
Right click on the Title Bar of your tag image
and select PASTE INTO SELECTION from the options.
DESELECT
|
|
STEP 14
LAYERS >>> NEW RASTER LAYER
Flood fill with BLUE #c0d8fb
LAYERS >>> ARRANGE >>> MOVE DOWN
ACTIVATE RASTER 2
EFFECTS >>> EDGE EFFECTS >>> ENHANCE MORE
In your LAYER PALETTE change the
BLEND MODE to LUMINANCE (L)
|
|
STEP 15
Open up the JF_wiregrid image in your PSP workspace
Right click on the Title Bar and select COPY from the options
Right click on the Title Bar of your tag image
and select PASTE AS NEW LAYER from the options.
Select your DEFORMATION tool
Mode = SCALE
use default settings
PSPX-X3:Select your PICK tool
Drag the centre top node down to the 350 pixel mark
on the left ruler
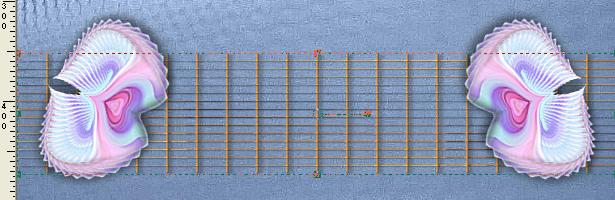
Click the RESET RECTANGLE arrow
Select the MOVER tool to disengage the DEFORMATION tool (PICK tool)
|
STEP 16
EFFECTS >>> DISTORTION EFFECTS >>> POLAR COORDINATES
Same settings
IMAGE >>> FLIP
LAYERS >>> DUPLICATE
LAYERS >>> MERGE >>> MERGE DOWN
In your LAYER PALETTE change the BLEND MODE to SCREEN
EFFECTS >>> EDGE EFFECTS >>> ENHANCE MORE
|
|
STEP 17
OPEN & ACTIVATE RASTER 1
EFFECTS >>> PLUGINS >>> EYE CANDY 3 >>> DROP SHADOW
Same settings
EDIT >>> Repeat Drop Shadow.. change DIRECTION to 315
|
|
STEP 18
LAYERS >>> NEW RASTER LAYER
Flood fill with BLUE
SELECTIONS >>> SELECT ALL
SELECTIONS >>> MODIFY >>> CONTRACT = 2
Flood fill with PINK #fcd5fd
SELECTIONS >>> MODIFY >>> CONTRACT = 2
Flood fill with BLUE
SELECTIONS >>> MODIFY >>> CONTRACT = 2
Flood fill with PINK #fcd5fd
SELECTIONS >>> MODIFY >>> CONTRACT = 2
EDIT >>> CLEAR
DESELECT
EFFECTS >>> EDGE EFFECTS >>> ENHANCE
EFFECTS >>> PLUGINS >>> EYE CANDY 3 >>> DROP SHADOW
Same settings
EDIT >>> Repeat Drop Shadow.. change DIRECTION to 135
|
|
STEP 19
ACTIVATE RASTER 1
Open up the KB-The_Night_Before_The_Full_Mo_ image
in your PSP workspace
Right click on the Title Bar and select COPY from the options
Right click on the Title Bar of your tag image
and select PASTE AS NEW LAYER from the options.
IMAGE >>> RESIZE = 40%
Ensure "Resize all layers" is UNCHECKED
Resample using WEIGHTED AVERAGE
ADJUST >>> SHARPNESS >>> SHARPEN
EFFECTS >>> PLUGINS >>> EYE CANDY 3 >>> DROP SHADOW
Same settings
Reposition with your MOVER tool
|
|
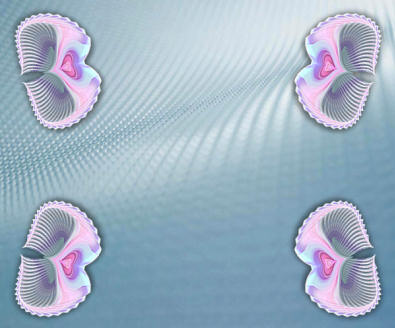
STEP 20
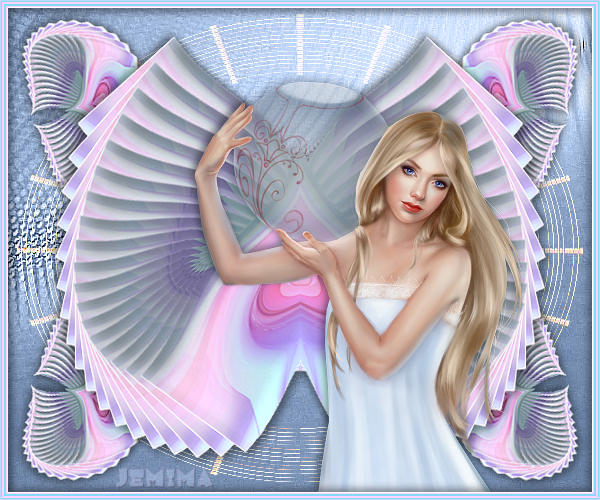
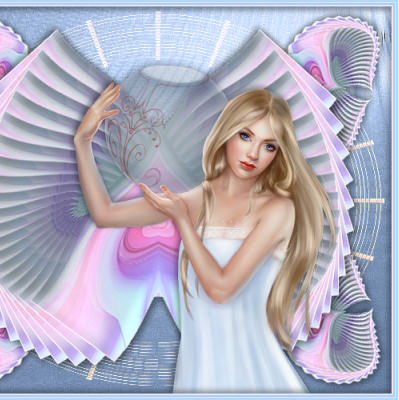
LAYERS >>> MERGE >>> MERGE ALL (Flatten)
Save as .jpg image
.
|
|
|