OCEAN DEPTHS
PSP8 to PSPX3
This tutorial was written by Jemima ~ JULY 2011
Copyright © 2011 ~ Jemima ~ All rights reserved
********************************
This was created using PSP9 but can be adapted for other versions of PSP.
You will need the
following to complete this tutorial
Materials
Abstract8.jpg
PearlMermaidBorder_FBR 2-23-06 232 KB.psp
Zhen Lian Quan fishes-colorel.pspimage
Yoka-Misted-Jellyfish080909.pspimage
Bubbles3.pspimage
Save to a folder on your computer
Plugins
** NONE**
********************************
VIEW >>> RULERS
Open a new image 600 x 480
Transparent background
PSPX - X2: Colour Depth = 8bits/channel
PSPX3: Colour Depth RGB = 8bits/channel
Flood fill with PALE BLUE #aabcd3
LAYERS >>> NEW RASTER LAYER
Flood fill with WHITE
In your LAYER PALETTE change the OPACITY to 65%
Change the BLEND MODE to DISSOLVE
Open up the Abstract8.jpg image in your PSP workspace
Right click on the Title Bar and select COPY from the options
Right click on the Title Bar of your tag image
and select PASTE AS NEW LAYER from the options.
Choose your SELECTION TOOL
Selection Type = Rectangle
Mode = Replace
Feather = 15
Antialias = Checked
Starting at 40 pixels across and 40 pixels down
drag your cursor to 560 pixels across and 430 pixels down and release
SELECTIONS >>> INVERT
Hit your DELETE key
DESELECT
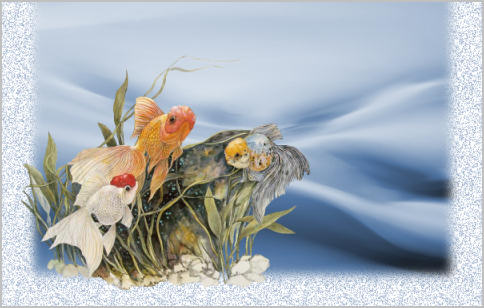
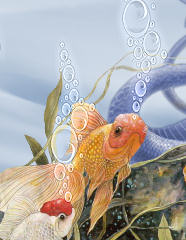
Open up the Zhen Lian Quan fishes-colorel image in your PSP workspace
Right click on the Title Bar and select COPY from the options
Right click on the Title Bar of your tag image
and select PASTE AS NEW LAYER from the options.
IMAGE >>> RESIZE = 50%
Ensure "Resize all layers" is UNCHECKED
Resample using WEIGHTED AVERAGE
Reposition with your MOVER tool
Open up the PearlMermaidBorder_FBR 2-23-06 232 KB image in your PSP workspace
WINDOW >>> DUPLICATE
Close the original Image
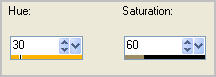
ADJUST >>> HUE & SATURATION >>> COLORIZE
In your MATERIALS PALETTE
Load DARK BLUE " #384776 " in your foreground
Select your CHANGE TO TARGET brush

Use these settings
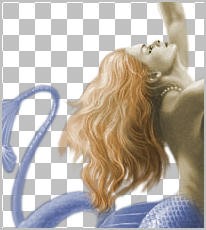
Using your right mouse button carefully change the colour of the mermaids' tail.
Note: the more times you go over the tail
the darker it will become.
I went over this 3 times.

Change your foreground colour to BROWN #85592b
Change the SIZE of your CHANGE TO TARGET brush to 20
Carefully colour the mermaid's hair.
I went over it twice.
Right click on the Title Bar and select COPY from the options
Right click on the Title Bar of your tag image
and select PASTE AS NEW LAYER from the options
IMAGE >>> RESIZE = 85%
Ensure "Resize all layers" is UNCHECKED
Resample using WEIGHTED AVERAGE.
Select your DEFORMATION tool
Mode = SCALE
use default settings
PSPX-X3:Select your PICK tool
Drag the 'rotate handle' in the centre of your image down a little as shown below
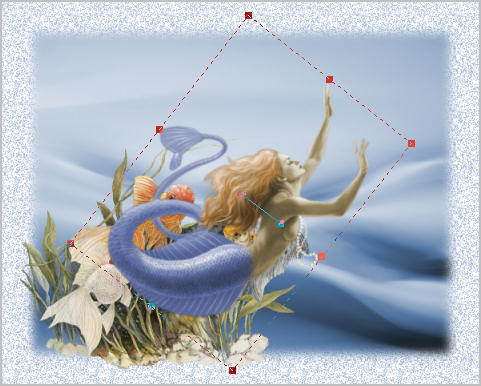
Click the RESET RECTANGLE arrow
Select your MOVER tool
ADJUST >>> SHARPNESS >>> SHARPEN
LAYERS >>> ARRANGE >>> MOVE DOWN
Reposition with your MOVER tool
ACTIVATE RASTER 4
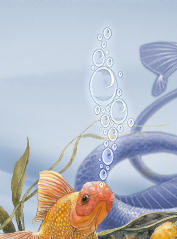
Open up the Bubbles3 image in your PSP workspace
Right click on the Title Bar and select COPY from the options
Right click on the Title Bar of your tag image
and select PASTE AS NEW LAYER from the options.
Reposition with your MOVER tool to the top left of your image
LAYERS >>> DUPLICATE
IMAGE >>> FLIP
LAYERS >>> MERGE >>> MERGE DOWN
LAYERS >>> DUPLICATE
IMAGE >>> MIRROR
Open up the Bubbles3 image in your PSP workspace
Right click on the Title Bar and select COPY from the options
Right click on the Title Bar of your tag image
and select PASTE AS NEW LAYER from the options.
IMAGE >>> RESIZE = 70%
Ensure "Resize all layers" is UNCHECKED
Resample using WEIGHTED AVERAGE
ADJUST >>> SHARPNESS >>> SHARPEN
Reposition with your MOVER tool
LAYERS >>> DUPLICATE
IMAGE >>> FLIP
Reposition with your MOVER tool
LAYERS >>> DUPLICATE
IMAGE >>> RESIZE = 90%
Ensure "Resize all layers" is UNCHECKED
Resample using WEIGHTED AVERAGE
ADJUST >>> SHARPNESS >>> SHARPEN
Reposition with your MOVER tool
CLOSE Raster 4 and Raster 5
ACTIVATE Raster 3
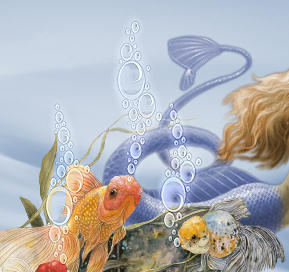
Open up the Yoka-Misted-Jellyfish080909 image in your PSP workspace
Right click on the Title Bar and select COPY from the options
Right click on the Title Bar of your tag image
and select PASTE AS NEW LAYER from the options.
IMAGE >>> RESIZE = 55%
Ensure "Resize all layers" is UNCHECKED
Resample using WEIGHTED AVERAGE
Reposition with your MOVER tool to the top left of your image
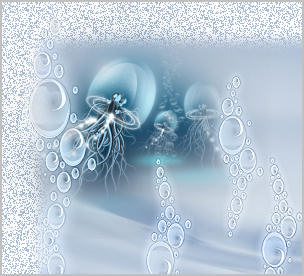
In your LAYER PALETTE change the OPACITY to 55%
Change the BLEND MODE to LUMINANCE (L)
OPEN ALL LAYERS
ACTIVATE Raster 3
EFFECTS >>> 3D EFFECTS >>> DROP SHADOW
COLOUR = BLACK
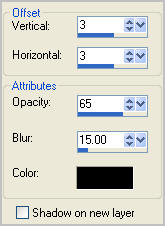
EFFECTS >>> 3D EFFECTS >>> DROP SHADOW
Change Vertical and Horizontal settings to - (minus) 3
SELECTIONS >>> SELECT ALL
SELECTIONS >>> MODIFY >>> CONTRACT = 5
SELECTIONS >>> INVERT
ACTIVATE RASTER 2
EFFECTS >>> 3D EFFECTS >>> INNER BEVEL
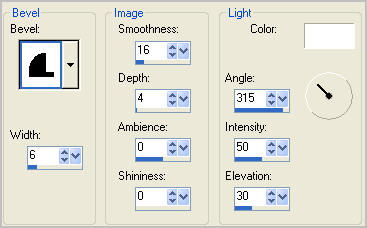
EFFECTS >>> 3D EFFECTS >>> DROP SHADOW
Same settings
EFFECTS >>> 3D EFFECTS >>> DROP SHADOW
Change Vertical and Horizontal settings to 3
DESELECT
Save as .psp image
or
.pspimage
************ This next part is optional ************
************
ACTIVATE RASTER 3
In your LAYER PALETTE change the BLEND MODE to DIFFERENCE
OR
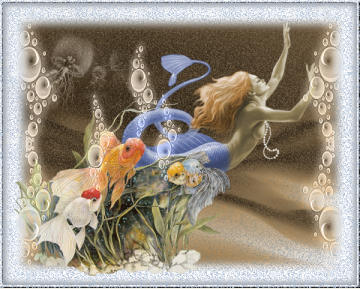
In your LAYER PALETTE change the BLEND MODE to EXCLUSION
************
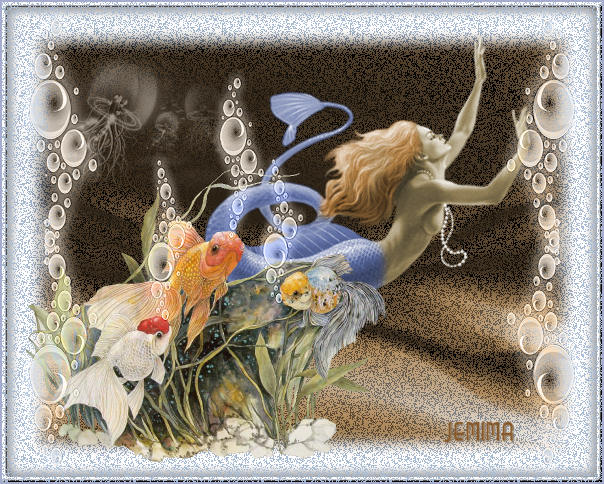
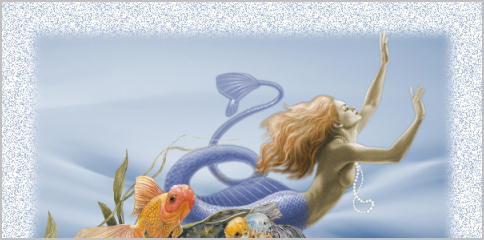
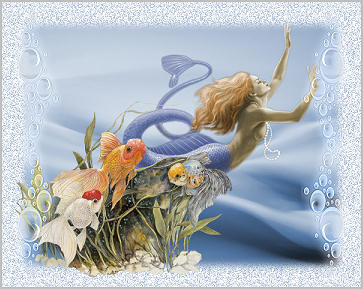
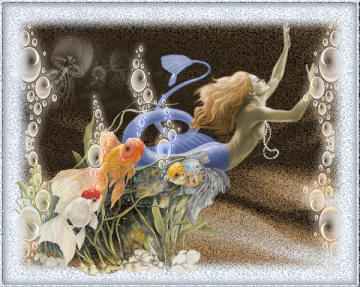
My final result at the top of this page used the DIFFERENCE option
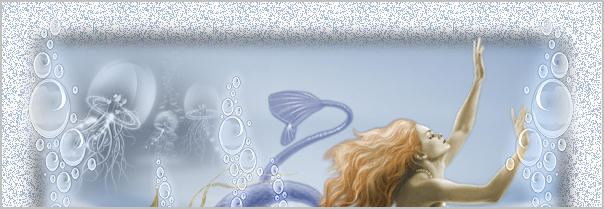
LAYERS >>> MERGE >>> MERGE ALL (Flatten)
IMAGE >>> ADD BORDERS = SYMMETRIC 2
COLOUR = BLUE #a5accd
Save as .jpg image
TESTERS RESULTS
Page designed by

for
http://www.artistrypsp.com/
Copyright ©
2000-2012 Artistry In PSP / PSP Artistry
All rights reserved.
Unless specifically made available for
download,
no graphics or text may be removed from
this site for any reason
without written permission from Artistry
In PSP / PSP Artistry
|