CONCERTO
PSP8 - PSPX3
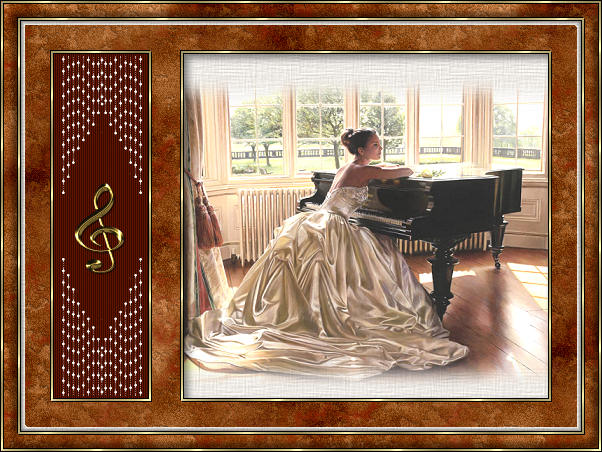
This tutorial was
created by Jemima using PSP9 ~ OCTOBER 2011
BUT should be creatable using all versions of PSP
Copyright © 2012 ~ Jemima
~ All rights reserved
********************************
You will need the
following to complete this tutorial
Materials
R[1].H._Elegance.psp
AutumnFills-iac-02.pspimage
DiamondDanglersKRC2010.pspimage
SC~GoldnSilverMusicalNotes~9-15-11.pspimage
Save to a folder on your computer
linenPOP.bmp
goldpattern.bmp
Save to your PSP Patterns folder
PSP8: C:\Program Files\Jasc Software\Paint Shop Pro 8\Patterns
PSP9: C:\Program Files\Jasc Software\Paint Shop Pro 9\Patterns
PSPX: C:\Program Files\Corel\Corel Paint Shop Pro X\Patterns
PSPXI / X2: C:\Program Files\Corel\Corel Paint Shop Pro Photo X2\Corel_08
PSPX3: C:\Program Files\Corel\X3\PSPClassic\Corel_08
Plugins
** EYE CANDY3 **
http://www.pircnet.com/downloads.html
********************************
Open a new image 600 x 450
Transparent background
PSPX - X2: Colour Depth = 8bits/channel
PSPX3: Colour Depth RGB = 8bits/channel
Flood fill with WHITE
Open up the AutumnFills-iac-02 image in your PSP workspace
Make sure Raster 1 is activated
CLOSE the LOGO layer
In your MATERIALS PALETTE
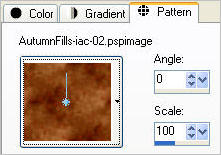
Load the ' AutumnFills-iac-02 ' pattern in your foreground
(It will be at the top of the options window)
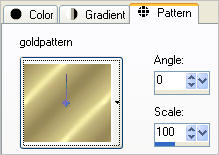
Load the ' goldpattern.bmp ' pattern in your background
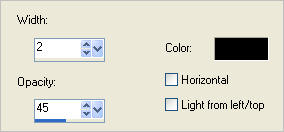
using the settings below.
 . . 
LAYERS >>> NEW RASTER LAYER
Flood fill with the AutumnFills pattern
LAYERS >>> NEW RASTER LAYER
Flood fill with the goldpattern pattern
SELECTIONS >>> SELECT ALL
SELECTIONS >>> MODIFY >>> CONTRACT = 2
EDIT >>> CLEAR
SELECTIONS >>> MODIFY >>> CONTRACT = 15
Flood fill with the goldpattern pattern
SELECTIONS >>> MODIFY >>> CONTRACT = 2
EDIT >>> CLEAR
DESELECT
EFFECTS >>> 3D EFFECTS >>> DROP SHADOW
Vertical & Horizontal offsets = 1
Colour = Black
Opacity = 100
Blur = 0
Repeat Drop Shadow effect changing
Vertical & Horizontal Offsets to - ( minus ) 1
Click OK

With your MAGIC WAND
Mode = Replace
Match Mode = RGB Value
Tolerance = 0
Feather = 0
Antialias = UNchecked
Sample Merged = UNCHECKED
PSP9 - X3: Check CONTIGUOUS
PSPX - X3: There is no " Sample Merged"
PSPX - X3: Use all layers = UNChecked
Select the area between the 2 gold frames
ACTIVATE RASTER 2
EFFECTS >>> 3D EFFECTS >>> INNER BEVEL
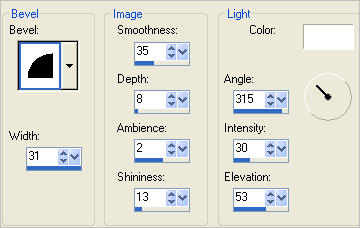

EFFECTS >>> 3D EFFECTS >>> CHISEL
COLOUR = #404040

DESELECT

LAYERS >>> NEW RASTER LAYER
Choose your SELECTION TOOL then click on the CUSTOM SELECTION symbol
and enter these coordinates.
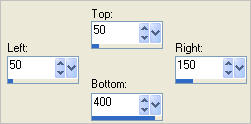
Flood fill with the goldpattern pattern
SELECTIONS >>> MODIFY >>> CONTRACT = 2
EDIT >>> CLEAR
DESELECT
Choose your SELECTION TOOL then click on the CUSTOM SELECTION symbol
and enter these coordinates.
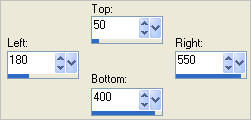
Flood fill with the goldpattern pattern
SELECTIONS >>> MODIFY >>> CONTRACT = 2
EDIT >>> CLEAR
DESELECT
EFFECTS >>> 3D EFFECTS >>> DROP SHADOW
Vertical & Horizontal offsets = 1
Colour = Black
Opacity = 100
Blur = 0
Repeat Drop Shadow effect changing
Vertical & Horizontal Offsets to - ( minus ) 1
Click OK
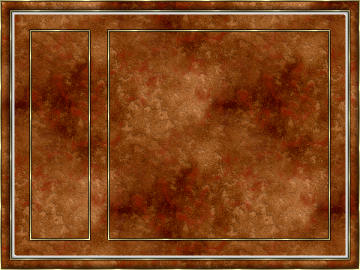
With your MAGIC WAND.... Same settings.
Click in the centre of the RIGHT gold frame
ACTIVATE RASTER 2
EDIT >>> CLEAR
SELECTIONS >>> INVERT
LAYERS >>> NEW RASTER LAYER
LAYERS >>> ARRANGE >>> MOVE DOWN
EFFECTS >>> PLUGINS >>> EYE CANDY 3 >>> DROP SHADOW
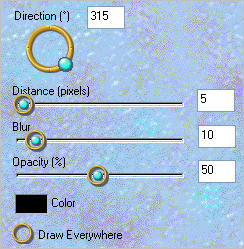
DESELECT

ACTIVATE RASTER 4
With your MAGIC WAND.... Same settings.
Click in the centre of the LEFT gold frame
LAYERS >>> NEW RASTER LAYER
LAYERS >>> ARRANGE >>> MOVE DOWN
Flood fill with BROWN #611501
EFFECTS >>> TEXTURE EFFECTS >>> BLINDS
COLOUR = #000000
DESELECT

Open up the DiamondDanglersKRC2010 image in your PSP workspace
Right click on the Title Bar and select COPY from the options
Right click on the Title Bar of your tag image
and select PASTE AS NEW LAYER from the options.
IMAGE >>> RESIZE = 25%
Ensure "Resize all layers" is UNCHECKED
Resample using WEIGHTED AVERAGE
Reposition with your MOVER tool
ADJUST >>> SHARPNESS >>> SHARPEN MORE
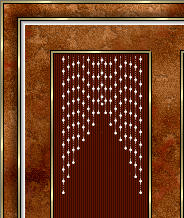
LAYERS >>> DUPLICATE
IMAGE >>> FLIP
LAYERS >>> MERGE >>> MERGE DOWN
Open up the SC~GoldnSilverMusicalNotes~9-15-11 image in your PSP workspace
Activate Layer 1
Choose your SELECTION TOOL
Selection Type = Rectangle
Mode = Replace
Feather = 0
Antialias = UNChecked
Select the note shown
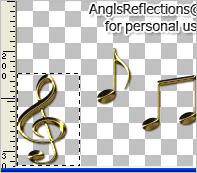
Right click on the Title Bar and select COPY from the options
Right click on the Title Bar of your tag image
and select PASTE AS NEW LAYER from the options.
Reposition with your MOVER tool
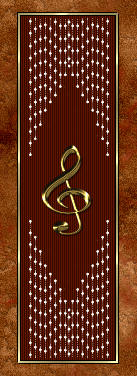
CLOSE RASTER 1
LAYERS >>> MERGE >>> MERGE VISIBLE
OPEN RASTER 1
Save as .psp image
This is your frame.
Now we'll add an image.
ACTIVATE RASTER 1
EFFECTS >>> TEXTURE EFFECTS >>> TEXTURE
COLOUR = #e5e2dd
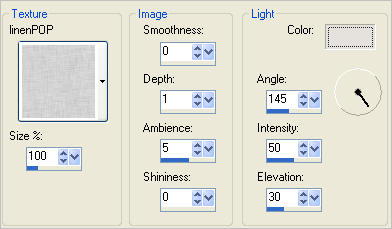
Open up the R[1].H._Elegance image in your PSP workspace
Activate Layer 1
Right click on the Title Bar and select COPY from the options
Right click on the Title Bar of your tag image
and select PASTE AS NEW LAYER from the options.
IMAGE >>> RESIZE = 70%
Ensure "Resize all layers" is UNCHECKED
Resample using WEIGHTED AVERAGE
ADJUST >>> BRIGHTNESS and CONTRAST >>> BRIGHTNESS/CONTRAST

Reposition to the right with your MOVER tool
ADJUST >>> SHARPNESS >>> SHARPEN
LAYERS >>> MERGE >>> MERGE ALL (Flatten)
IMAGE >>> ADD BORDERS
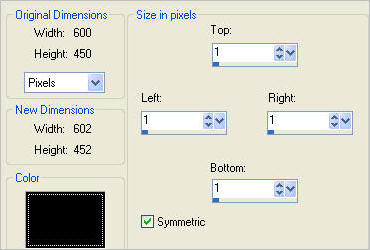
Save as .jpg image
Testers Results
Page designed by

for

http://www.artistrypsp.com/
Copyright ©
2000-2012 Artistry In PSP / PSP Artistry
All rights reserved.
Unless specifically made available for
download,
no graphics or text may be removed from
this site for any reason
without written permission from Artistry
In PSP / PSP Artistry
|