This tutorial was written by Rebba to be shared with the Artistry Master Group.
Feb, 2011
I have created the animation to have fun with but also to teach perhaps a
different way of doing it, I call My Way. I'm not a tutorial writer so this is more in
steps and doesn't expound on the design or PSP part of the tutorial. If you have any
STEP 1
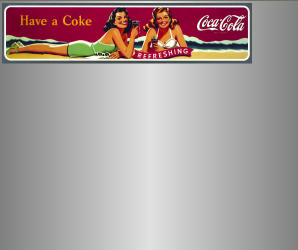
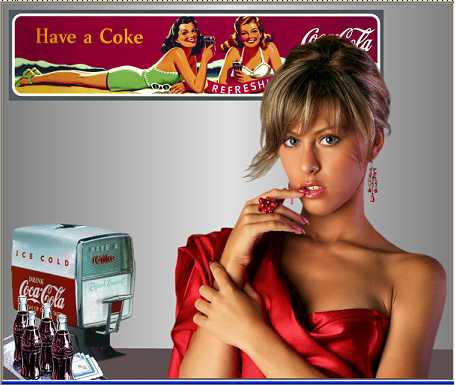
Open a new image 600 x 500
Transparent background
PSPX - X2: Colour Depth = 8bits/channel
PSPX3: Colour Depth RGB = 8bits/channel
This is your 'working' image
|
| |
|
STEP 2
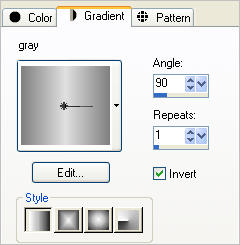
In your MATERIALS PALETTE
Load the ' gray ' gradient in your foreground
using these settings.
Flood Fill the 'working' image
with the gray gradient
Rename this layer background
|
|
STEP 3
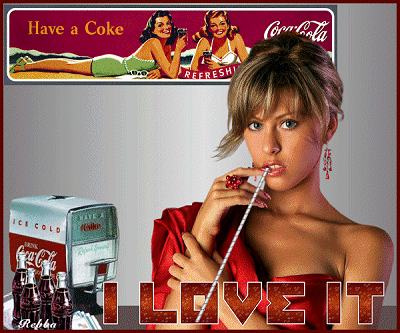
Open the pcocacola 143 image
Right click on the Title Bar
and select COPY from the options.
Right click on the Title Bar of your 'working' image and select
PASTE AS NEW LAYER from the options
IMAGE >> RESIZE = 50%
Ensure "Resize all layers" is UNCHECKED
Move to the top left.
Rename this layer back sign
|
|
STEP 4
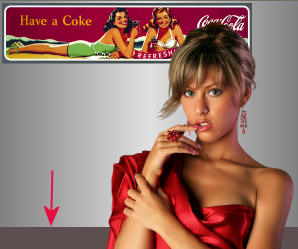
Open the anna.br-ah tube
Right click on the Title Bar
and select COPY from the options.
Right click on the Title Bar of your 'working' image and select
PASTE AS NEW LAYER from the options
IMAGE >> RESIZE = 75%
Ensure "Resize all layers" is UNCHECKED
IMAGE >>> MIRROR
Move to left lower side.
Rename this layer girl
We will position everything shortly.
|
|
STEP 5
LAYERS >> NEW RASTER LAYER
Choose your SELECTION TOOL
Selection Type = Rectangle
Mode = Replace
Feather = 0
Antialias = UNChecked
Draw out a strip across the bottom
about 40 pixels high.
Flood Fill with color #5d4f4f.
DESELECT
Rename this layer table strip
In your Layer Palette
Move this layer below the girl layer
|
|
STEP 6
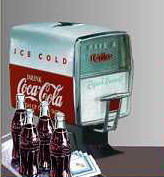
Open the Kcoke 3 tube
Right click on the Title Bar and select COPY from the options.
Right click on the Title Bar of your 'working' image and select
PASTE AS NEW LAYER from the options
Rename this layer coke machine
Move to lower left side. |
|
STEP 7
Open the XBA coke tray
Right click on the Title Bar and select COPY from the options.
Right click on the Title Bar of your 'working' image and select
PASTE AS NEW LAYER from the options
Rename this layer bottles
IMAGE >> RESIZE = 35%
Ensure "Resize all layers" is UNCHECKED
IMAGE >>> MIRROR
Reposition with your Mover Tool
|
|
STEP 8
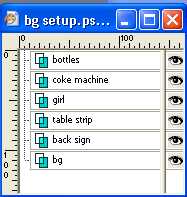
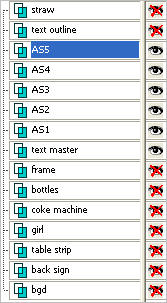
Set your layer palette as shown. |
|
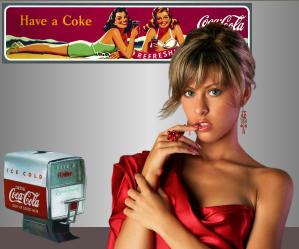
Now position the tubes on working image as shown.
 |
STEP 9
With the bottles layer active
SELECTIONS >> SELECT ALL
SELECTIONS >> MODIFY >>CONTRACT = 5
SELECTIONS >> INVERT
LAYERS >> NEW RASTER LAYER
Flood Fill with BROWN # 5c0602
DESELECT
Rename this layer frame
|
|
STEP 10
Open the straw tube
Right click on the Title Bar
and select COPY from the options.
Right click on the Title Bar of your 'working' image and select
PASTE AS NEW LAYER from the options
Rename this layer straw
Place as shown.
|
|
STEP 11
In your MATERIALS PALETTE
Load WHITE in your foreground
Load BROWN ' #5c0602 ' in your background
LAYERS >> NEW RASTER LAYER
Name this layer text master
Select your TEXT TOOL
Font =
AgitProp
Use these settings
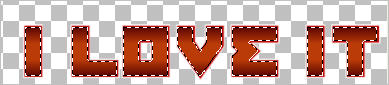
Type I LOVE IT in all caps.
Move this to the bottom right as shown.
SELECTIONS >> SELECT NONE
LAYERS >> ARRANGE >> MOVE DOWN
 |
STEP 12
Note we will be using many text layers so don't move any of these layers once they are placed.
Close all layers except the text layer.
Duplicate this layer.
SELECTIONS >> SELECT ALL
SELECTIONS >> FLOAT
SELECTIONS >> DEFLOAT
SELECTIONS >> MODIFY >> CONTRACT = 1
on Copy of text layer
hit the delete key.
This will give you a white outline
DESELECT
Name this layer text outline layer
and close the layer.
This example shows the outline
|
STEP 13
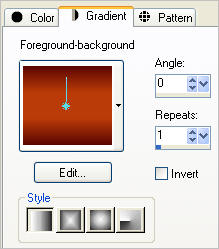
In your MATERIALS PALETTE
Load BROWN' #5c0602 ' in your foreground
Load RED' #ba3b07 ' in your background
Select the gradient option in the foreground
choose Foreground-background gradient
using settings shown
|
|
STEP 14
On the text master layer,
Choose your MAGIC WAND
use these
settings

Hold down the Shift key
and select inside each letter of the text
SELECTIONS >> MODIFY >>CONTRACT = 1
Fill with the gradient
Leave selected until stated to deselect.
.
|
STEP 15
LAYERS >> DUPLICATE (5 times)
In the LAYER PALETE
from bottom going up rename the duplicated layers
AS1
AS2
AS3
AS4
AS5 |
|
|