I have created the animation to have fun with but also to teach perhaps a
different way of doing it, I call My Way. I'm not a tutorial writer so this is more in
steps and doesn't expound on the design or PSP part of the tutorial. If you have any
STEP 1
Open the tube, duplicate
and close the original.
With your Selection Tool set to Rectangle,
Antialias = Unchecked
Feather = 0
select the
text and delete.
Again with your Selection Tool,
same settings,
Starting at 0 pixels down and
300 pixels across
drag your cursor
to the bottom right corner to
select the image,
Image >> Crop to selection
This is your 'working' image.
|
|
STEP 2
Using the Freehand Tool
select the bottom heart
Right click on the Title Bar
and select COPY from the options.
Right click in your PSP workspace
and select PASTE AS NEW IMAGE
from the options.
Minimize this image
Return to
your 'working' image.
and delete the heart.
|
|
STEP 3
Layers >> New Raster Layer
Layers >> Arrange >> Send to bottom
Flood Fill with White
|
|
STEP 4
Activate Raster 1
With your Lasso Tool
go around one of the hearts to select it.
Edit >> Copy
Edit >> Paste as a new layer.
Select >> None
Now move the heart to the top of tag as shown
|
|
STEP 5
We need to add a frame if you want one.
Layers >> New Raster Layer
Selection >> Select All
Selection >> Modify >> Contract 5
Selection >> Invert
fill with color of choice.
DESELECT
.
|
|
STEP 6
Close Raster 3
Activate Raster 2
Note: I always use 'copy merge' when possible it saves time from dupicating and merging images in the layer palette.
Now Edit >> Copy Merged
Now Edit >> Copy Merged
Open ANIMATION SHOP
Edit >> Paste as new animation.
|
|
Edit >> Copy Merged
Open ANIMATION SHOP
Right click top of frame image and select
'Paste After Current Frame' from the options.
|
|
STEP 8
On the single heart layer use the
Deformation Tool to rotate a little
and move it down as shown
over the top heart
.
Click the RESET RECTANGLE arrow
Select your Mover Tool to deselect the
Deformation Tool
ADJUST >> SHARPNESS >> SHARPEN
|
|
Edit >> Copy >> Merged
In ANIMATION SHOP
Edit >> Paste after Current Frame.
|
|
|
Back to PSP.
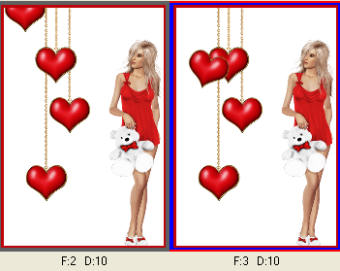
Again use Deformation Tool and rotate,
move down as shown
over the middle heart.
ADJUST >> SHARPNESS >> SHARPEN
|
|
STEP 11
Edit >> Copy >> Merged
In ANIMATION SHOP
Edit >> Paste after Current Frame.
Back to PSP.
Use Deformation Tool and rotate,
move down as shown,
under middle heart
.
ADJUST >> SHARPNESS >> SHARPEN
Edit >> Copy Merged
In ANIMATION SHOP
Edit >> Paste after Current Frame.
|
|
STEP 12
Back to PSP.
No deform just move as shown
Edit >> Copy Merged
In ANIMATION SHOP
Edit >> Paste after Current Frame.
|
|
STEP 13
Back to PSP.
CLOSE Raster 3
Maximize the image of the heart
lying on its side that you created earlier
Right click on the Title Bar
and select COPY from the options.
Right click on the Title Bar
of your 'working' image
and select PASTE AS NEW LAYER
from the options.
|
|
STEP 14
Edit >> Copy >> Merged
In ANIMATION SHOP
Edit >> Paste after Current Frame.

|
STEP 15
Back to PSP.
LAYERS >> NEW RASTER LAYER
Select your TEXT TOOL
with font and settings of your choice
add your name to the
bottom left corner of the layer.
Rename this layer Name.
PSPX3.. click the "A" tool
then before clicking on the work
hold down the shift key and then click,
it will bring up the entry box
as other versions do
Right click on Title Bar and select
Copy from the options
Right click in your PSP workspace
and select PASTE AS NEW IMAGE
from the options. |
|
STEP 16
Right click on Title Bar and select
Copy from the options
In ANIMATION SHOP
Right click the workspace and select
'Paste As New Animation' from the options.
|
STEP 17
Now in ANIMATION SHOP
On the NAME frame
Edit >> Copy
Edit >> Propagate Paste
Click on the Title Bar of the 7 frames image
Edit >> Select All
Edit >> Paste into selected frame
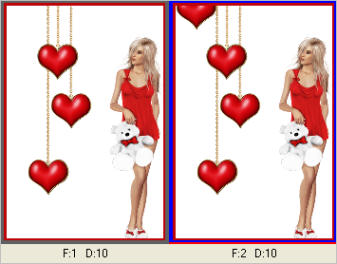
Place the name in the bottom left corner of the first frame (F:1)

|
STEP 18
Right click on Title Bar of frames
Select 'Frame Properties' from the options
Display time =30
Now go to the last frame (F:7) and click on it.
Right click on Title Bar of frames
Select 'Frame Properties' from the options
Display time =150
View >> Animation
( I resized mine to 400 pixel tall and saved.)
Activate the 7 animation frames
ANIMATION >> RESIZE
Height = 400 pixels
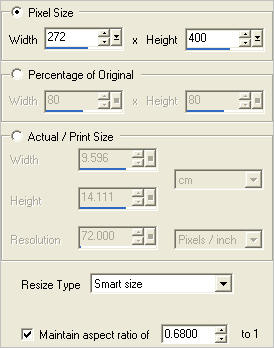
Click OK
Save your completed animation
File >> Save As
Name your animation.
With the Gif Optimiser keep pressing NEXT
until you get to the last one... click FINISH
Close the Animation
Close the frames.
Close Animation Shop
Your finished!
I hope you enjoyed this simple animation.
|
| |


