STEP 1
Open the saved images in your PSP workspace...
Beauty_2949225259.pspimage
blank master 6.pspimage
missy_tagtemplate50.pspimage
Open a new image 500 x 500
Transparent background
PSPX - X2: Colour Depth = 8bits/channel
PSPX3: Colour Depth RGB = 8bits/channel
Flood Fill the layer with WHITE and rename this layer "background".
|
STEP 2
Open the missy_tagtemplate50
In your LAYER PALETTE
highlight the scalloped circle layer
Right click on the Title Bar and select COPY from the options
|
STEP 3
Right click on the Title Bar of your new working image
and select PASTE AS NEW LAYER from the options.
|
STEP 4
Open the Beauty_2949225259 tube
Activate Raster 1
Right click on the Title Bar and select COPY from the options
Right click on the Title Bar of your new working image
and select PASTE AS NEW LAYER from the options.
IMAGE >>> MIRROR
IMAGE >>> RESIZE = 68%
Ensure "Resize all layers" is UNCHECKED
Move this to the lower right side.
|
|
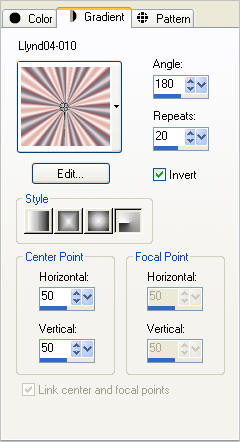
In your Materials Palette
select the gradient option.
Select the Llynd 04-010 gradient
with these settings.
|
|
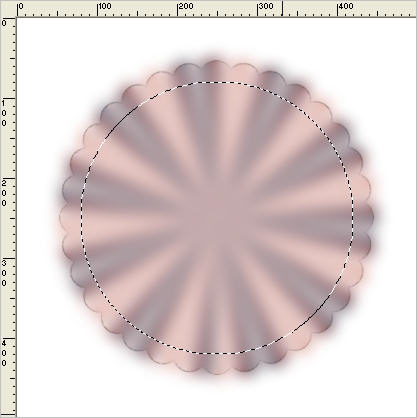
STEP 6
With the template layer activated
( Raster 2 )
Select the template with your
MAGIC WAND
Mode = Replace
Match Mode = RGB Value
Tolerance = 0
Feather = 0
Antialias = Checked
Sample Merged = UNCHECKED
PSP9 - X3: Check CONTIGUOUS
PSPX - X3: There is no " Sample Merged"
PSPX - X3: Use all layers = UNChecked
PSP9 - X3: ANTIALIAS = Inside
SELECTIONS >> MODIFY >> CONTRACT = 2
Flood fill with the gradient.
LAYERS >>> NEW RASTER LAYER
Flood fill with the gradient.
DESELECT
Adjust >> Blur >> Gaussian Blur
RADIUS = 10.
In the layer palette rename this layer
" AS1 ".
Duplicate this layer rename it
"
AS2 "
On " AS2 " layer
IMAGE >>> RESIZE = 102%
Ensure "Resize all layers" is UNCHECKED
|
|
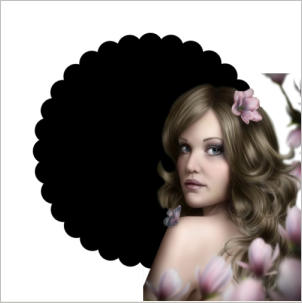
STEP 7
Close the girl layer...
Raster 3
With the " AS2 " layer active
LAYERS >>> NEW RASTER LAYER
Choose your SELECTION TOOL
Selection Type = Circle
Mode = Replace
Feather = 0
Antialias = Checked
Start your circle 250 pixels across
and 250 pixels down
and draw it out to 80 pixels across
and 80 pixels down .
|
|
STEP 8
Set your foreground color to
#dcbdbb
LAYERS >>> NEW RASTER LAYER
Flood fill with this color.
DESELECT
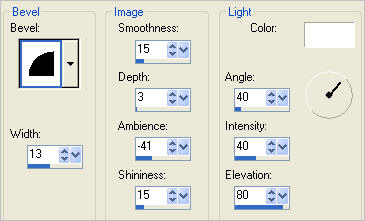
EFFECTS >> 3D EFFECTS >> INNER BEVEL
using these settings.
|
|
STEP 9
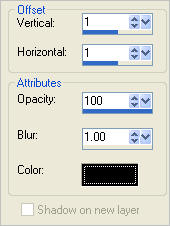
EFFECTS >> 3D EFFECTS >> DROP SHADOW
Vertical & Horizontal offsets = 1
Colour = Black
Opacity = 100
Blur = 0
Repeat Drop Shadow effect
changing
Vertical & Horizontal Offsets to
- ( minus ) 1
Click OK
DESELECT
|
|
Now open the blank master 6 image.
Right click on the Title Bar and select COPY from the options
On the working image
Right click on the Title Bar
and select PASTE AS NEW LAYER from the options.
PSP8 - PSP9:IMAGE >> ROTATE >> FREE ROTATE = LEFT 90
Ensure "All layers" is UNCHECKED
PSPX - PSPX2: IMAGE >> FREE ROTATE = LEFT 90
Ensure "All layers" is UNCHECKED
|
|
STEP 11
LAYERS >>> NEW RASTER LAYER
Change the foreground color to
#b78e8e
or
#ab726f
if you like the text darker.
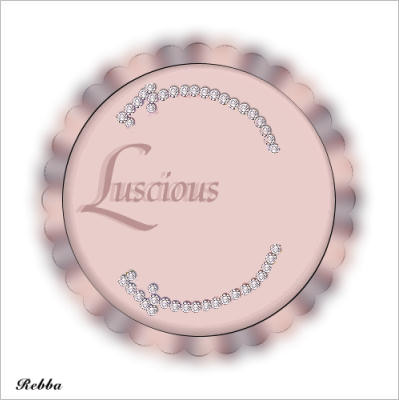
Open your Luscious brush,
textbrush51-kris
size 180,
step 32,
density and opacity100
rotation 0.
Apply brush to left center of circle.
LAYERS >>> NEW RASTER LAYER
and add your name.
|
|
STEP 12
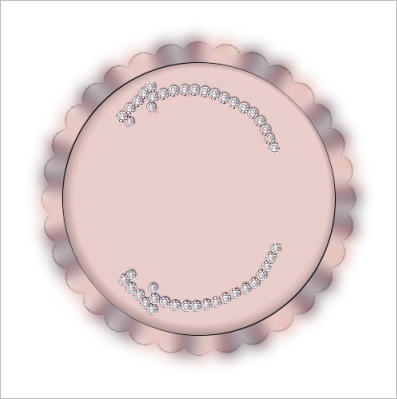
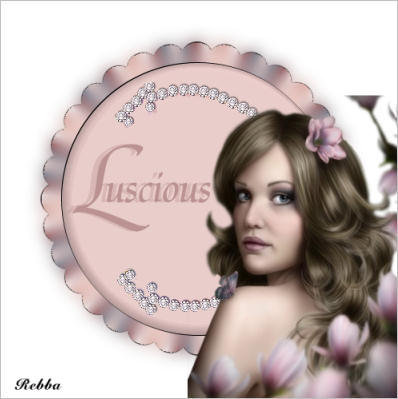
Open all layers and move things around if needed, check sample for placement.
Highlight your background layer, make sure all layers are open except AS2.
Right click on the Title Bar and select
COPY >> MERGED
Open ANIMATION SHOP
right click in workspace and select
PASTE AS NEW ANIMATION
Go Back to PSP.
Close AS1 layer
Open AS2 layer
Right click on the Title Bar and select
COPY >> MERGED
In ANIMATION SHOP
Right click top of frame and select
PASTE AFTER CURRENT FRAME
|
|
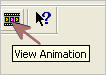
STEP 13
Right click on frames Title Bar
and select
VIEW >> ANIMATION
or
Click on "View Animation" button
|
|
STEP 14
Leave your speed on 10.
The size at 500 pixel isn't a
large file but you can resize to 400 pixel if you wish.
Check your animation while it runs.
Save your completed animation
File >> Save As
Name your animation.
With the Gif Optimiser keep pressing NEXT
until you get to the last one... click FINISH
Close the Animation
Close the frames.
Close Animation Shop
|
|
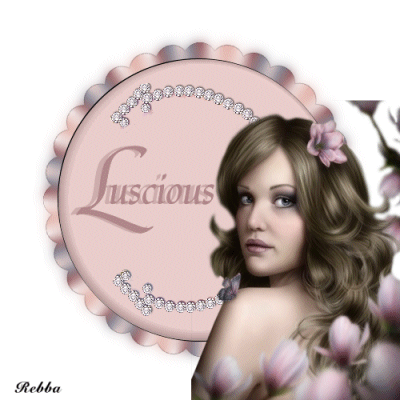
I hope you had fun doing this tutorial.
|
| |