STEP 1
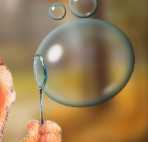
Open the bubblebunny-tya tube in your PSP workspace
WINDOW >>> DUPLICATE
Close the original image.
Add the background of choice I used a country scene and blurred it.
LAYERS >> ARRANGE >> SEND TO BOTTOM
Rename this Layer background
Activate layer 8 the single bubble, duplicate this layer.
Rename Copy of Layer 8 to B2
Rename Layer 8 to B1.
Activate the top Merged layer and rename it Rabbit 1
duplicate this layer,
Rename this Layer Rabbit 2
Activate the Merged layer (grouped bubbles) duplicate this layer,
Rename Merged layer to group1
Rename Copy of Merged layer to group2
|
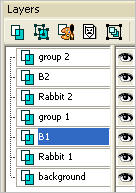
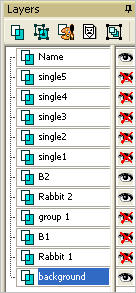
STEP 2
Now move and set up your layer palette to look like this. |
|
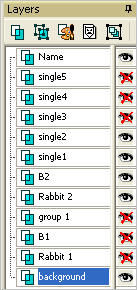
STEP 3
This will be the same as mine so it is easy to follow.
Select B1 and resize 80%
all layers unchecked.
Now close layer B2
and move B1 to fit onto the bubble blower.
|
|
STEP 4
Now select Rabbit 2 and with your Freehand Selection Tool
(Lasso)
Selection Type = Point to Point
Mode = Replace
Feather = 0
Antialias = Checked
go around the rabbits cheek like this. |
|
STEP 5
Effects >> Distortion Effects >> Punch
STRENGTH = 100
Click OK
DESELECT
In the Layer Palette I always check the animation as I work on it so lets do that.
With all layers open click on B2 and see it you have a small and large bubble.
Now click on Rabbit 2 is his cheek small and larger?
It is!
Great ... now lets move on.
|
STEP 6
Close B1, B2 and group 1 just to make it less confusing.
Activate group 2
We need to ungroup one of the layers so we can move the bubbles around.
Freehand Selection Tool
(Lasso)
same settings
go around a group of the bubbles
Right click on Title Bar >>
Select COPY from the options
SELECT >> NONE
Right click on Title Bar
>> Select PASTE AS NEW LAYER from the options
With your MOVER TOOL reposition to an area of your choosing.
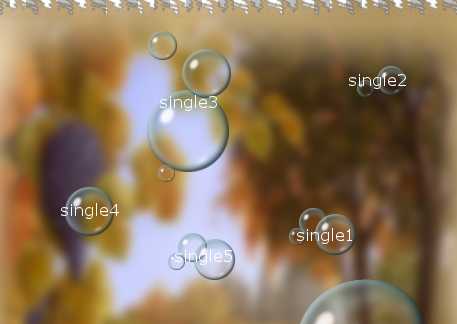
Rename this layer single1
REPEAT the above instructions on another set of bubbles
Make sure your are always on group 2 in the layer palette before copying.
Rename this layer single2
REPEAT the above instructions on another set of bubbles
Rename this layer single3
REPEAT the above instructions on another set of bubbles
Rename this layer single4
REPEAT the above instructions on another set of bubbles
Rename this layer single5
These are the ones I did, one group at time.
|
STEP 7
Lets delete group 2 now we don't need it.
In the Layer Palette
Activate group 2
Right click
and select DELETE from the options
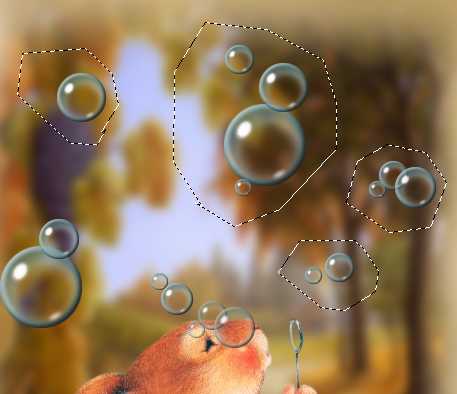
This is the way I numered my bubbles.
The writing is only to show you which bubble is what number.
This is also the placement I used for the bubbles.
 |
STEP 8
Activate the background layer
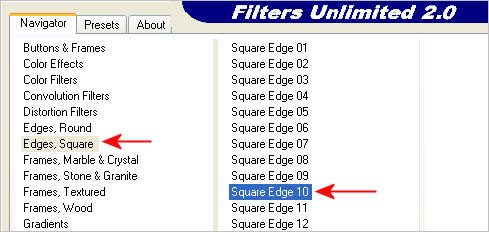
EFFECTS >> PLUGINS >>
<
I.C.NET Software> >>Filters Unlimited 2.0
Select the Edges, Square option
and Square Edge10
(or an edge of your choice.)
Click APPLY
|
STEP 9
LAYERS >> NEW RASTER LAYER
LAYERS >>> ARRANGE >>> BRING TO TOP
Select your TEXT tool
and a font of choice
Add your name on the bottom left side
Rename this layer Name
|
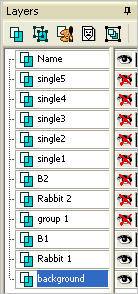
STEP 10
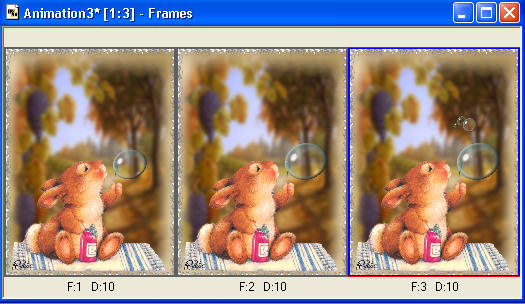
Now for the animation.
Set up your layer palette like this.
Activate the background layer
|
|
STEP 11
Right click on the Title Bar and select COPY >> MERGED from the options
Open ANIMATION SHOP
Right click in work space and select Paste As New Animation.
This is Frame 1 in Animation Shop.
|
STEP 12
Back to PSP.
Close Rabbit1 and B1,
Open Rabbit 2 and B2
Right click on the Title Bar
select
COPY >> MERGED from the options
In Animation Shop
Click top of frame and select
Paste After Current Frame.
This is Frame 2 in Animation Shop.
|
|
STEP 13
Back to PSP.
Open single1
Right click on the Title Bar
and select
COPY >> MERGED from the options
In Animation Shop
Click top of frames and select
Paste After Current Frame.
This is Frame 3 in Animation Shop.
|
STEP 14
Open single2
Right click on the Title Bar
and select COPY >> MERGED from the options
In Animation Shop
Click top of frames and select
Paste After Current Frame.
This is Frame 4 in Animation Shop.
|
|
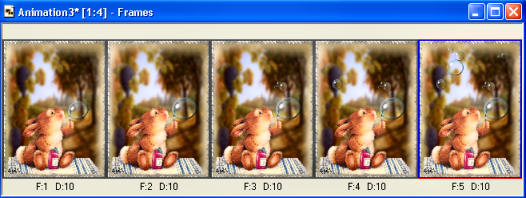
STEP 15
Open single3
Right click on the Title Bar
and select COPY >> MERGED from the options
In Animation Shop
Click top of frames and select
Paste After Current Frame.
This is Frame 5 in Animation Shop.
NOTE: These bubbles can be moved around any way, I try to start from the bubble blower and setthem like they would float up from there. Set the next layer palette like this.
|
|
|
STEP 16
Open single4
Right click on the Title Bar
and select COPY >> MERGED from the options
In Animation Shop
Click top of frames and select
Paste After Current Frame.
This is Frame 6 in Animation Shop.
|
STEP 17
Open single5
Right click on the Title Bar
and select COPY >> MERGED from the options
In Animation Shop
Click top of frames and select
Paste After Current Frame.
This is Frame7 in Animation Shop. |
STEP 18
Finally, open the group 1 layer
(everything is open except Rabbit1 and B1),
Right click on the Title Bar
and select COPY MERGED from the options
In Animation Shop
Click top of frames and select
Paste After Current Frame.
This is Frame 8 in Animation Shop.
|
STEP 19
Check your animation.
The speed is set on 10 and I thought that looked good but I did change mine to 15.
Use speed you like.
To change it to 15...
Click on the Title Bar of the frames
EDIT >> Select None
EDIT >> Select All
ANIMATION >>> Frame Properties
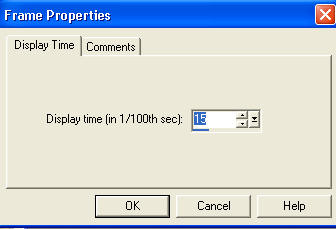
Click OK |
I also resized mine to 400 tall.
Click on the Title Bar of the frames
Animation >> Resize animation,
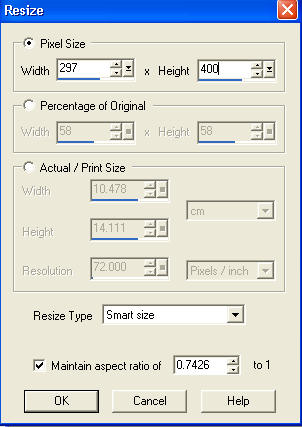
Click OK
|
After resizing I export back to PSP and sharpen.
Edit >> Select None
Edit >> Select All
FILE >> EXPORT FRAMES >> TO PAINT SHOP PRO
In PSP
Adjust >> Sharpen each layer.
When you export images from ANIMATION SHOP into PSP and you sharpen them etc.
then you have to close the image to take it back to ANIMATION SHOP.
Close ( X out the frame)
The dialogue box that opens asks 'do you want to save the changes?'
you need to check "NO"
then it asks 'do you want to update the changes
back to AS?'
You check "YES"
I
it then opens back up in ANIMATION SHOP.
If you ever have one working and you forget to
send it back to AS you can't close it out in AS until it is sent back
Now check the animation,
if speed and everything is to your liking then ..
Save your completed animation
File >> Save As
Name your animation.
With the Gif Optimiser keep pressing NEXT
until you get to the last one... click FINISH
Close the Animation
Close the frames.
Close Animation Shop
|
I hope you have enjoyed this tut and had some fun.
Rebba
|
| |