LUCINDA
PSP8 to PSPX3
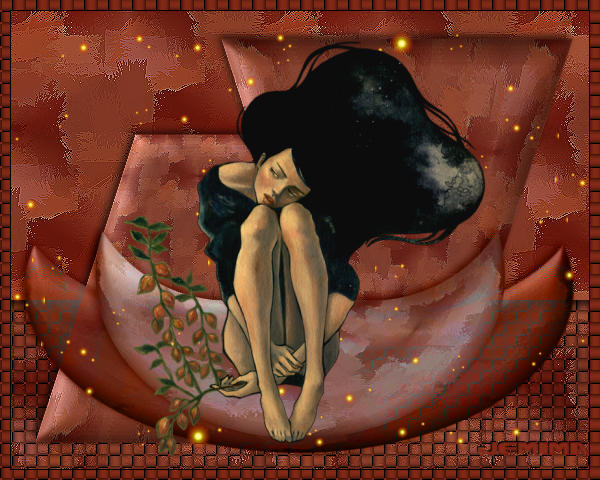
This tutorial was written by Jemima ~ December 2010
Copyright © 2010 ~ Jemima ~ All rights reserved
********************************
This was created using PSP9 but can be adapted for other versions of PSP.
You will need the
following to complete this tutorial
Materials
Jen_vrouw 351_04-11-2010.pspimage
firesparkles_ao.psp
Save to a folder on your computer
JF_Pattern876.jpg
Save to your PSP Patterns folder
PSP8: C:\Program Files\Jasc Software\Paint Shop Pro 8\Patterns
PSP9: C:\Program Files\Jasc Software\Paint Shop Pro 9\Patterns
PSPX: C:\Program Files\Corel\Corel Paint Shop Pro X\Patterns
PSPXI / X2: C:\Program Files\Corel\Corel Paint Shop Pro Photo X2\Corel_08
PSPX3: C:\Program Files\Corel\X3\PSPClassic\Corel_08
Plugins
** EYE CANDY3 **
http://www.pircnet.com/downloads.html
********************************
In your MATERIALS PALETTE
Load the ' JF_Pattern876 ' pattern in your foreground
using the settings below.
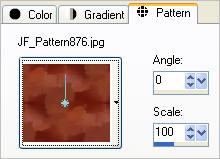
Load DEEP RED ' #832916 ' in your background
Open a new image 600 x 480
Transparent background
PSPX - X2: Colour Depth = 8bits/channel
PSPX3: Colour Depth RGB = 8bits/channel
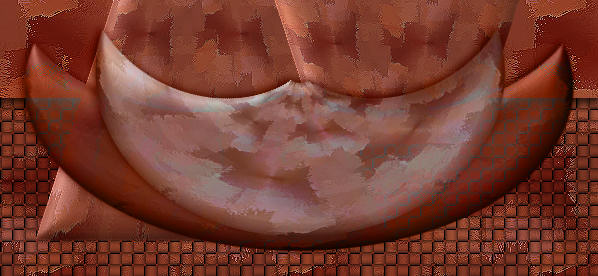
Flood fill with DEEP RED
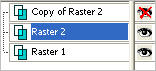
LAYERS >>> NEW RASTER LAYER (Raster 2)
Flood fill with the pattern
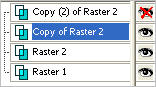
LAYERS >>> DUPLICATE (Copy of Raster 2)
CLOSE Copy of Raster 2
ACTIVATE RASTER 2
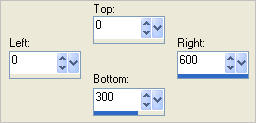
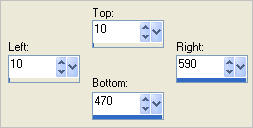
Choose your SELECTION TOOL then click on the CUSTOM SELECTION
symbol
and enter these coordinates.
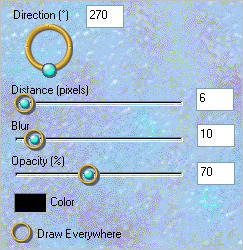
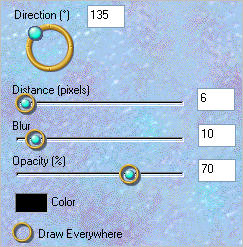
EFFECTS >>> PLUGINS >>> EYE CANDY 3 >>> DROP SHADOW
SELECTIONS >>> INVERT
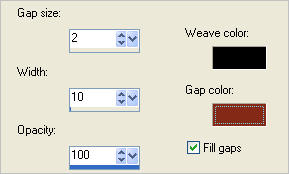
EFFECTS >>> TEXTURE EFFECTS >>> WEAVE
WEAVE COLOUR = BLACK
GAP COLOUR = #832916
DESELECT
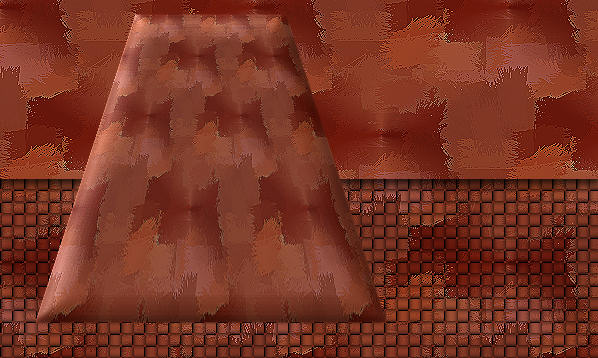
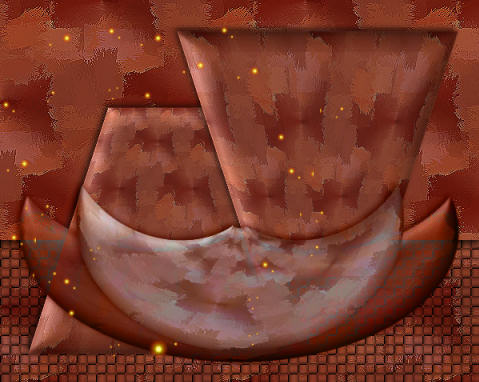
OPEN & ACTIVATE Copy of Raster 2
IMAGE >>> RESIZE = 75%
Ensure "Resize all layers" is UNCHECKED
Resample using WEIGHTED AVERAGE
EFFECTS>>> GEOMETRIC EFFECTS >>> PERSPECTIVE - VERTICAL

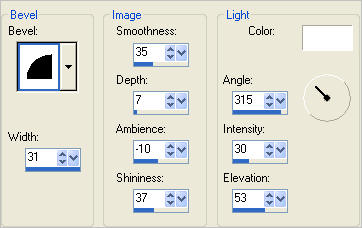
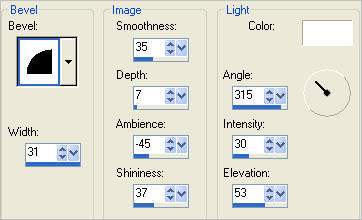
EFFECTS >>> 3D EFFECTS >>> INNER BEVEL
LAYERS >>> DUPLICATE ( Copy (2) of Raster 2 )
CLOSE "Copy (2) of Raster 2"
ACTIVATE
"Copy of Raster 2"
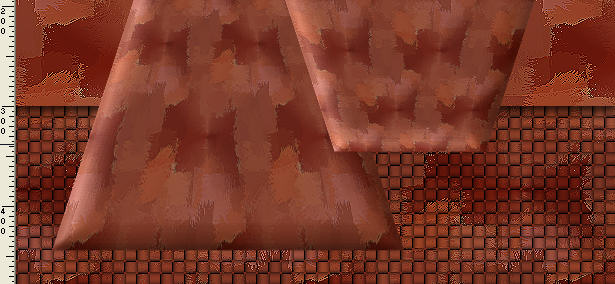
Reposition with your MOVER tool to the bottom left of your image
ADJUST >>> SHARPNESS >>> SHARPEN
LAYERS >>> DUPLICATE
Rename "
Copy (3) of Raster 2"
IMAGE >>> FLIP
Reposition with your MOVER tool to the top right...
OPEN and ACTIVATE Copy (2) of Raster 2
Rename this layer "Polar"
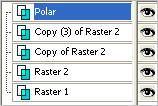
LAYERS >>> DUPLICATE
CLOSE "Copy of Polar"
ACTIVATE the POLAR layer
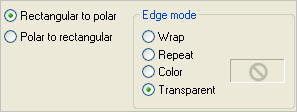
EFFECTS >>> DISTORTION EFFECTS >>> POLAR COORDINATES
If you don't have your RULERS showing..
VIEW >>> RULERS
Select your DEFORMATION tool
Mode = SCALE
use default settings
PSPX-X3:Select your PICK tool
Drag the centre LEFT node leftwards, level with the 24 pixel mark on the top ruler.
Drag the centre RIGHT node to the right, level with the 576
pixel mark on the top ruler.
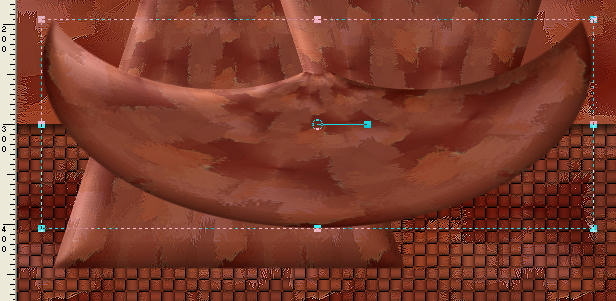
Click the RESET RECTANGLE arrow
Reposition with your MOVER tool
OPEN & ACTIVATE the " Copy of Polar" layer
EFFECTS >>> DISTORTION EFFECTS >>> POLAR COORDINATES
Reposition with your MOVER tool

ACTIVATE the POLAR layer
EFFECTS >>> 3D EFFECTS >>> INNER BEVEL
EFFECTS >>> PLUGINS >>> EYE CANDY 3 >>> DROP SHADOW
ACTIVATE the " Copy of Polar" layer
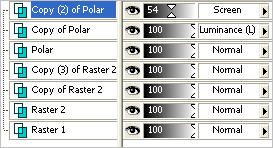
In your LAYER PALETTE change the BLEND MODE to LUMINANCE (L)
LAYERS >>> DUPLICATE ( Copy (2) of Polar )
In your LAYER PALETTE change the OPACITY to 54%
Change the BLEND MODE to SCREEN
ACTIVATE the Copy of POLAR layer
EFFECTS >>> PLUGINS >>> EYE CANDY 3 >>> DROP SHADOW
Same settings
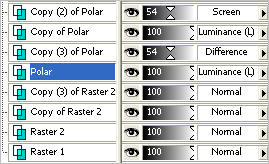
LAYERS >>> DUPLICATE
Rename this layer "
Copy (3) of Polar "
In your LAYER PALETTE change the OPACITY to 54%
Change the BLEND MODE to DIFFERENCE
ON THE POLAR LAYER
In your LAYER PALETTE change the BLEND MODE to LUMINANCE (L)
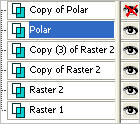
Rearrange layers as shown below
ACTIVATE "Copy of Raster 2"
EFFECTS >>> PLUGINS >>> EYE CANDY 3 >>> DROP SHADOW
Same settings
ACTIVATE "Copy (3) of Raster 2"
EFFECTS >>> PLUGINS >>> EYE CANDY 3 >>> DROP SHADOW
Same settings
ACTIVATE "Copy (2) of Polar "
Open up the firesparkles_ao image in your PSP workspace
Right click on the Title Bar and select COPY from the options
Right click on the Title Bar of your tag image
and select PASTE AS NEW LAYER from the options.
Reposition with your MOVER tool to the left side of the tag
LAYERS >>> DUPLICATE ( Copy of Raster 3 )
IMAGE >>> FLIP
IMAGE >>> MIRROR
Open up the Jen_vrouw 351_04-11-2010 image in your PSP workspace
Right click on the Title Bar and select COPY from the options
Right click on the Title Bar of your tag image
and select PASTE AS NEW LAYER from the options.
IMAGE >>> RESIZE = 65%
Ensure "Resize all layers" is UNCHECKED
Resample using WEIGHTED AVERAGE
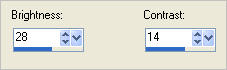
ADJUST >>> BRIGHTNESS and CONTRAST >>> BRIGHTNESS/CONTRAST
Reposition with your MOVER tool
LAYERS >>> MERGE >>> MERGE VISIBLE
LAYERS >>> NEW RASTER LAYER
Flood fill with DEEP RED
Choose your SELECTION TOOL then click on the CUSTOM SELECTION symbol
and enter these coordinates.
EDIT >>> CLEAR
SELECTIONS >>> INVERT
EFFECTS >>> TEXTURE EFFECTS >>> WEAVE
Same settings
EFFECTS >>> 3D EFFECTS >>> DROP SHADOW
Vertical & Horizontal offsets = 1
Colour = Black
Opacity = 100
Blur = 0
Repeat Drop Shadow effect changing
Vertical & Horizontal Offsets to - ( minus ) 1
Click OK
DESELECT
TOP

BOTTOM

LAYERS >>> MERGE >>> MERGE ALL (Flatten)
Save as .jpg image
Page designed by

for
http://www.artistrypsp.com/
Copyright ©
2000-2011 Artistry In PSP / PSP Artistry
All rights reserved.
Unless specifically made available for
download,
no graphics or text may be removed from
this site for any reason
without written permission from Artistry
In PSP / PSP Artistry
|