SPECIAL PLACE
PSP8 - PSPX3
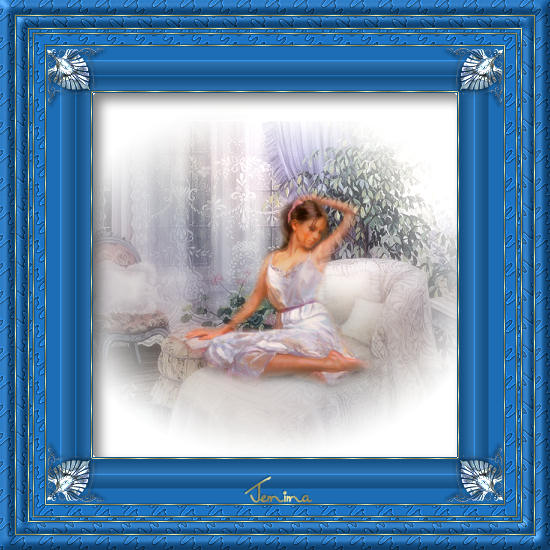
This tutorial was
created by Jemima using PSP9 ~ APRIL 2011
BUT should be creatable using all versions of PSP
Copyright © 2010/11 ~ Jemima
~ All rights reserved
********************************
You will need the
following to complete this tutorial
Materials
coin45.tub
Kat_0126.pspimage
CJ_Special Place_Misted.psp
Save to a folder on your computer
beige140.jpg
007_verloop8a-ca.jpg
Save to your PSP Patterns folder
PSP8: C:\Program Files\Jasc Software\Paint Shop Pro 8\Patterns
PSP9: C:\Program Files\Jasc Software\Paint Shop Pro 9\Patterns
PSPX: C:\Program Files\Corel\Corel Paint Shop Pro X\Patterns
PSPXI / X2: C:\Program Files\Corel\Corel Paint Shop Pro Photo X2\Corel_08
PSPX3: C:\Program Files\Corel\X3\PSPClassic\Corel_08
Plugins
** SIMPLE FILTERS **
download
** EYE CANDY3 **
http://www.pircnet.com/downloads.html
********************************
In your MATERIALS PALETTE
Load the ' beige140 ' pattern in your foreground
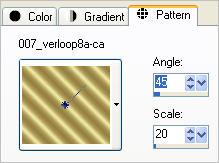
Load the ' 007_verloop8a-ca ' pattern in your background
using the settings below.
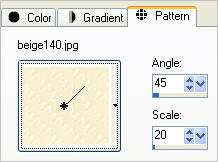 . . 
Open a new image 550 x 550
Transparent background
PSPX - X3: Colour Depth = 8bits/channel
PSPX3: Colour Depth RGB = 8bits/channel
Flood fill with foreground pattern
EFFECTS >>> ARTISTIC EFFECTS >>> CHROME
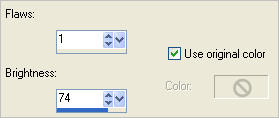
ADJUST >>> HUE & SATURATION >>> COLORIZE

ADJUST >>> SHARPNESS >>> SHARPEN MORE
SELECTIONS >>> SELECT ALL
SELECTIONS >>> MODIFY >>> CONTRACT = 15
Right click on the Title Bar
Select CUT from the options
LAYERS >>> NEW RASTER LAYER
Right click on the Title Bar of your frame image
and select PASTE INTO SELECTION from the options.
IMAGE >>> FLIP
SELECTIONS >>> DEFLOAT
SELECTIONS >>> MODIFY >>> CONTRACT = 12
Right click on the Title Bar
Select CUT from the options

LAYERS >>> NEW RASTER LAYER
Right click on the Title Bar of your frame image
and select PASTE INTO SELECTION from the options.
IMAGE >>> FLIP
SELECTIONS >>> DEFLOAT
SELECTIONS >>> MODIFY >>> CONTRACT = 20
EDIT >>> CLEAR
DESELECT

CLOSE RASTER 1
ACTIVATE RASTER 2
With your MAGIC WAND
Mode = Replace
Match Mode = RGB Value
Tolerance = 0
Feather = 0
Antialias = UNchecked
Sample Merged = UNCHECKED
PSP9 - X3: Check CONTIGUOUS
PSPX - X3: There is no " Sample Merged"
PSPX - X3: Use all layers = UNChecked
Select the OUTER transparent area
SELECTIONS >>> INVERT
LAYERS >>> NEW RASTER LAYER
Flood fill with GOLD PATTERN
SELECTIONS >>> MODIFY >>> CONTRACT = 1
EDIT >>> CLEAR
SELECTIONS >>> MODIFY >>> CONTRACT = 12
Flood fill with GOLD PATTERN
SELECTIONS >>> MODIFY >>> CONTRACT = 1
EDIT >>> CLEAR
LAYERS >>> ARRANGE >>> MOVE UP
DESELECT
EFFECTS >>> 3D EFFECTS >>> DROP SHADOW
Vertical & Horizontal offsets = 1
Colour = Black
Opacity = 100
Blur = 0
Repeat Drop Shadow effect changing
Vertical & Horizontal Offsets to - ( minus ) 1
Click OK

LAYERS >>> DUPLICATE
IMAGE >>> RESIZE = 93%
Ensure "Resize all layers" is UNCHECKED
Resample using WEIGHTED AVERAGE

OPEN & ACTIVATE RASTER 1
EFFECTS >>> 3D EFFECTS >>> INNER BEVEL
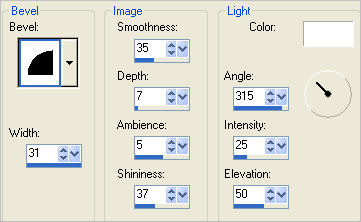
ACTIVATE RASTER 2
EDIT >>> Repeat Inner Bevel

ACTIVATE Copy of Raster 4
LAYERS >>> MERGE >>> MERGE DOWN
With your MAGIC WAND
Mode = Replace
Match Mode = RGB Value
Tolerance = 0
Feather = 0
Antialias = UNchecked
Sample Merged = UNCHECKED
PSP9 - X3: Check CONTIGUOUS
PSPX - X3: There is no " Sample Merged"
PSPX - X3: Use all layers = UNChecked
Select the CENTRE transparent area
SELECTIONS >>> MODIFY >>> EXPAND = 3
LAYERS >>> NEW RASTER LAYER
LAYERS >>> ARRANGE >>> SEND TO BOTTOM
Flood fill with BLUE #1d6db5
SELECTIONS >>> MODIFY >>> CONTRACT = 20
EDIT >>> CLEAR
DESELECT
LAYERS >>> DUPLICATE
IMAGE >>> RESIZE = 93%
Ensure "Resize all layers" is UNCHECKED
Resample using WEIGHTED AVERAGE
ADJUST >>> SHARPNESS >>> SHARPEN MORE
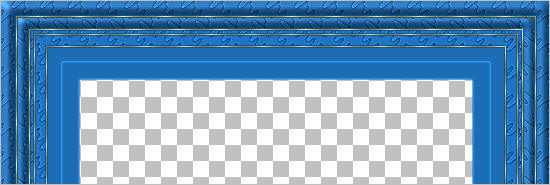
LAYERS >>> DUPLICATE
IMAGE >>> RESIZE = 93%
Ensure "Resize all layers" is UNCHECKED
Resample using WEIGHTED AVERAGE
ACTIVATE Copy of Raster 5
EFFECTS >>> 3D EFFECTS >>> INNER BEVEL
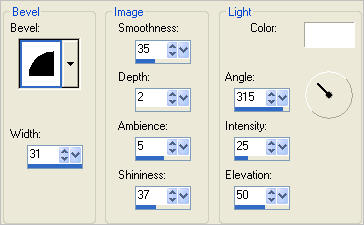
ACTIVATE Copy (2) of Raster 5
EDIT >>> Repeat Inner Bevel
IMAGE >>> FLIP
IMAGE >>> MIRROR

With your MAGIC WAND.... Same settings.
Select the CENTRE transparent area
SELECTIONS >>> MODIFY >>> EXPAND = 2
EDIT >>> CLEAR
LAYERS >>> NEW RASTER LAYER
Flood fill with GOLD pattern
SELECTIONS >>> MODIFY >>> CONTRACT = 1
EDIT >>> CLEAR
DESELECT
LAYERS >>> ARRANGE >>> BRING TO TOP
EFFECTS >>> 3D EFFECTS >>> DROP SHADOW
Vertical & Horizontal offsets = 1
Colour = Black
Opacity = 100
Blur = 0
Repeat Drop Shadow effect changing
Vertical & Horizontal Offsets to - ( minus ) 1
Click OK

ACTIVATE Copy (2) of Raster 5
Open up the coin45.tub image in your PSP workspace
Right click on the Title Bar and select COPY from the options
Right click on the Title Bar of your frame image
and select PASTE AS NEW LAYER from the options.
Reposition with your MOVER tool
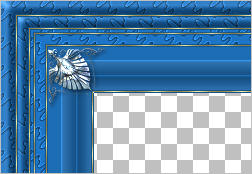
EFFECTS >>> PLUGINS >>> SIMPLE >>> TOP LEFT MIRROR
LAYERS >>> MERGE >>> MERGE VISIBLE
Save as .psp image
With your MAGIC WAND.... Same settings.
Select the CENTRE transparent area
SELECTIONS >>> INVERT
EFFECTS >>> PLUGINS >>> EYE CANDY 3 >>> DROP SHADOW
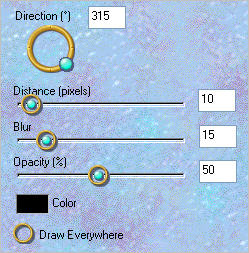
DESELECT
LAYERS >>> NEW RASTER LAYER
LAYERS >>> ARRANGE >>> MOVE DOWN
Flood fill with WHITE
Open up the CJ_Special Place_Misted image in your PSP workspace
Right click on the Title Bar and select COPY from the options
Right click on the Title Bar of your frame image
and select PASTE AS NEW LAYER from the options.
Open up the Kat_0126 image in your PSP workspace
Right click on the Title Bar and select COPY from the options
Right click on the Title Bar of your frame image
and select PASTE AS NEW LAYER from the options.
IMAGE >>> RESIZE = 35%
Ensure "Resize all layers" is UNCHECKED
Resample using WEIGHTED AVERAGE
Reposition with your MOVER tool

LAYERS >>> MERGE >>> MERGE ALL (Flatten)
Save as .jpg image
Testers Results
Page designed by

for

http://www.artistrypsp.com/
Copyright ©
2000-2011 Artistry In PSP / PSP Artistry
All rights reserved.
Unless specifically made available for
download,
no graphics or text may be removed from
this site for any reason
without written permission from Artistry
In PSP / PSP Artistry
|