NEW YEAR 2012
PSP8 - PSPX3

This tutorial was
created by Jemima using PSP9 ~ SEPTEMBER 2011
BUT should be creatable using all versions of PSP
Copyright © 2010/11 ~ Jemima
~ All rights reserved
********************************
You will need the
following to complete this tutorial
Materials
JF_NY_wordart_2.pspimage
accents_LH.psp
swanja_couple08_1.pspimage
Save to a folder on your computer
bhw30.jpg
134SPLGt.jpg
Save to your PSP Patterns folder
PSP8: C:\Program Files\Jasc Software\Paint Shop Pro 8\Patterns
PSP9: C:\Program Files\Jasc Software\Paint Shop Pro 9\Patterns
PSPX: C:\Program Files\Corel\Corel Paint Shop Pro X\Patterns
PSPXI / X2: C:\Program Files\Corel\Corel Paint Shop Pro Photo X2\Corel_08
PSPX3: C:\Program Files\Corel\X3\PSPClassic\Corel_08
Plugins
** EYE CANDY3 **
http://www.pircnet.com/downloads.html
** SIMPLE FILTERS **
download
********************************
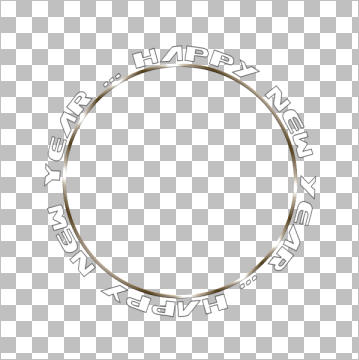
Open up the JF_NY_wordart_2 image in your PSP workspace
WINDOW >>> DUPLICATE
Close the original Image
ACTIVATE RASTER 1
EFFECTS >>> TEXTURE EFFECTS >>> SCULPTURE
COLOUR = #c0c0c0
PATTERN = bhw30

With your MAGIC WAND
Mode = Replace
Match Mode = RGB Value
Tolerance = 0
Feather = 0
Antialias = Checked
Sample Merged = UNCHECKED
PSP9 - X3: Check CONTIGUOUS
PSPX - X3: There is no " Sample Merged"
PSPX - X3: Use all layers = UNChecked
PSP9 - X3: ANTIALIAS = Outside
Select the OUTER transparent area
SELECTIONS >>> INVERT
SELECTIONS >>> MODIFY >>> CONTRACT = 3
SELECTIONS >>> INVERT
LAYERS >>> NEW RASTER LAYER
LAYERS >>> ARRANGE >>> MOVE DOWN
Flood fill with WHITE
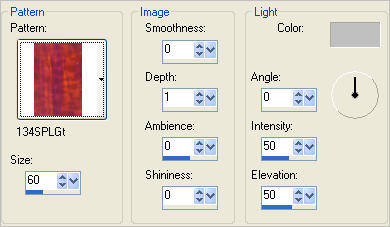
EFFECTS >>> TEXTURE EFFECTS >>> SCULPTURE
COLOUR = #c0c0c0
PATTERN = 134SPLGt
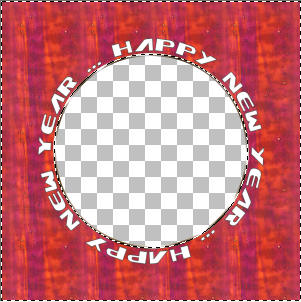
ACTIVATE RASTER 1
LAYERS >>> DUPLICATE
LAYERS >>> ARRANGE >>> MOVE DOWN
LAYERS >>> MERGE >>> MERGE DOWN
DESELECT
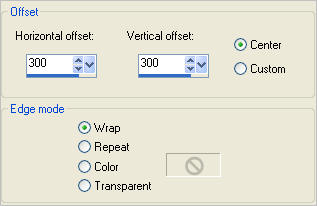
EFFECTS >>> IMAGE EFFECTS >>> OFFSET
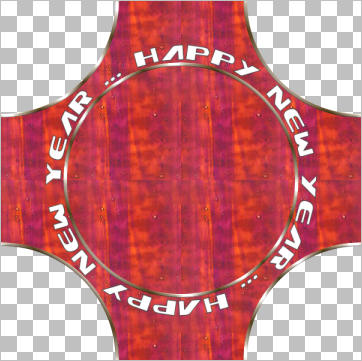
LAYERS >>> NEW RASTER LAYER
LAYERS >>> ARRANGE >>> MOVE DOWN
Flood fill with WHITE
EFFECTS >>> TEXTURE EFFECTS >>> SCULPTURE
Same settings
ACTIVATE RASTER 2
With your MAGIC WAND.... Same settings.
and while depressing your SHIFT KEY...
Select the 4 corner areas
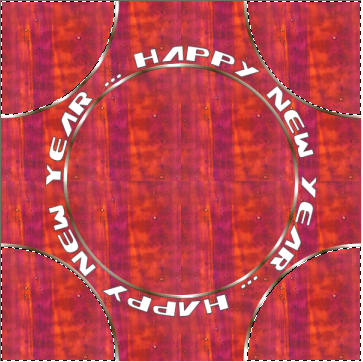
ACTIVATE RASTER 3
EFFECTS>>> GEOMETRIC EFFECTS >>> CIRCLE
EDGE MODE = Transparent
DESELECT
Choose your SELECTION TOOL
Selection Type = Circle
Mode = Replace
Feather = 0
Antialias = Checked
Starting at 300 pixels across and 300 pixels down
drag your cursor down and to the right until it matches the
circle created by the last instruction and release
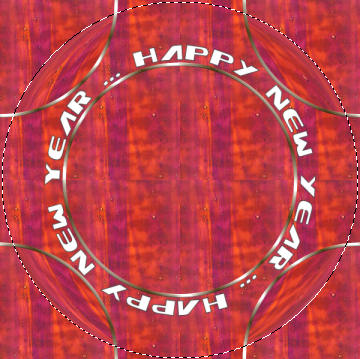
EFFECTS >>> PLUGINS >>> EYE CANDY 3 >>> DROP SHADOW

EDIT >>> Repeat Drop Shadow.. change DIRECTION to 135
EFFECTS >>> 3D EFFECTS >>> INNER BEVEL

DESELECT

ACTIVATE RASTER 1
With your MAGIC WAND.... Same settings.
Select the centre of your image
SELECTIONS >>> MODIFY >>> EXPAND = 3
ACTIVATE RASTER 2
Hit your DELETE key
ACTIVATE RASTER 3
Hit your DELETE key
SELECTIONS >>> INVERT
EFFECTS >>> PLUGINS >>> EYE CANDY 3 >>> DROP SHADOW
Same settings
EDIT >>> Repeat Drop Shadow.. change DIRECTION to 315
DESELECT

ACTIVATE NY wordart layer
SELECTIONS >>> SELECT ALL
SELECTIONS >>> FLOAT
SELECTIONS >>> DEFLOAT
SELECTIONS >>> MODIFY >>> CONTRACT = 1
EFFECTS >>> TEXTURE EFFECTS >>> SCULPTURE
COLOUR = #c0c0c0
PATTERN = bhw30

EFFECTS >>> 3D EFFECTS >>> DROP SHADOW
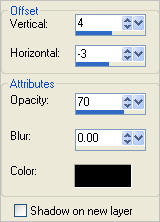
DESELECT
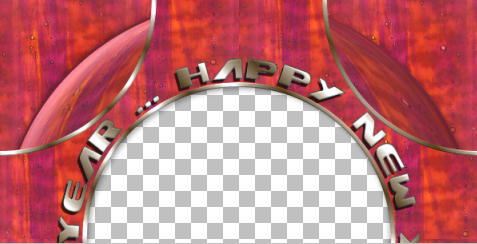
CLOSE the NY wordart layer
ACTIVATE RASTER 1
LAYERS >>> MERGE >>> MERGE VISIBLE
OPEN and activate the NY wordart layer
NOTE: This is so you can use the frame without the word art at any time.
Open up the accents_LH image in your PSP workspace
Activate Raster 5
Right click on the Title Bar and select COPY from the options
.
Right click on the Title Bar of your frame image
and select PASTE AS NEW LAYER from the options.
IMAGE >>> FLIP
IMAGE >>> MIRROR
IMAGE >>> RESIZE = 85%
Ensure "Resize all layers" is UNCHECKED
Resample using WEIGHTED AVERAGE
ADJUST >>> SHARPNESS >>> SHARPEN MORE
Reposition with your MOVER tool

EFFECTS >>> PLUGINS >>> SIMPLE >>> TOP LEFT MIRROR
EFFECTS >>> PLUGINS >>> EYE CANDY 3 >>> DROP SHADOW
Same settings
LAYERS >>> NEW RASTER LAYER
Flood fill with WHITE
EFFECTS >>> TEXTURE EFFECTS >>> SCULPTURE
Same settings
SELECTIONS >>> SELECT ALL
SELECTIONS >>> MODIFY >>> CONTRACT = 4
EDIT >>> CLEAR
DESELECT
EFFECTS >>> 3D EFFECTS >>> INNER BEVEL
Same settings
EFFECTS >>> 3D EFFECTS >>> DROP SHADOW
Vertical & Horizontal offsets = 1
Colour = Black
Opacity = 70
Blur = 0
Repeat Drop Shadow effect changing
Vertical & Horizontal Offsets to - ( minus ) 1
Click OK
CLOSE the NY wordart layer
ACTIVATE RASTER 2
LAYERS >>> MERGE >>> MERGE VISIBLE
LAYERS >>> ARRANGE >>> MOVE DOWN
OPEN the NY wordart layer
Save as .psp image
LAYERS >>> NEW RASTER LAYER
LAYERS >>> ARRANGE >>> SEND TO BOTTOM
Flood fill with WHITE
Open up the swanja_couple08_1 image in your PSP workspace
Right click on the Title Bar and select COPY from the options
Right click on the Title Bar of your frame image
and select PASTE AS NEW LAYER from the options.
IMAGE >>> RESIZE = 80%
Ensure "Resize all layers" is UNCHECKED
Resample using WEIGHTED AVERAGE
ADJUST >>> SHARPNESS >>> SHARPEN
Reposition with your MOVER tool so the time on the clock is showing.

LAYERS >>> MERGE >>> MERGE ALL (Flatten)
Save as .jpg image
Testers Results
Page designed by

for

http://www.artistrypsp.com/
Copyright ©
2000-2011 Artistry In PSP / PSP Artistry
All rights reserved.
Unless specifically made available for
download,
no graphics or text may be removed from
this site for any reason
without written permission from Artistry
In PSP / PSP Artistry
|