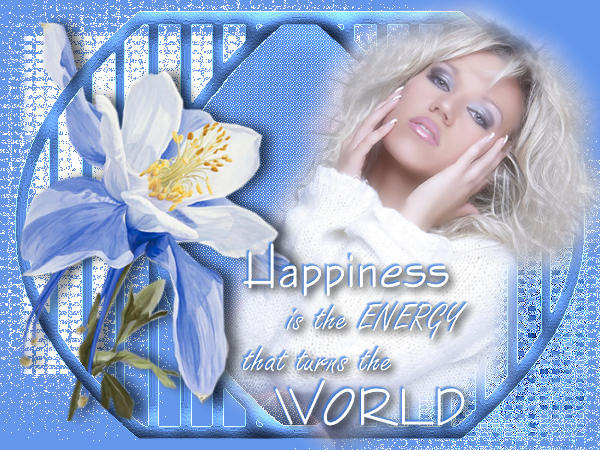
ICE BLUE
PSP8 to X2
This tutorial was
written by Jemima ~ 2007
Copyright © 2007 ~ Jemima
~ All rights reserved
********************************
This was created using PSP9 but can be adapted for other versions of PSP.
You will need the
following to complete this tutorial
Materials
RIGHT CLICK >>> SAVE TARGET AS
JF_Image2.psp
JF_Blonde39.psp
JF_Air_Spirit.psp
JF_WA_28.psp
Save to a folder on your computer
Plugins
** EYE CANDY3 **
http://www.pircnet.com/downloads.html
********************************
Open your images in PSP and minimize
Open a new image 600 x 450
Transparent background
PSPX: Colour Depth = 8bits/channel
Flood fill with BLUE " #6496eb "
LAYERS >>> NEW RASTER LAYER
Choose your SELECTION TOOL then click on the CUSTOM SELECTION
symbol
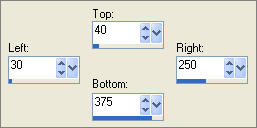
Flood fill with WHITE
ADJUST >>> ADD/REMOVE NOISE >>> ADD NOISE
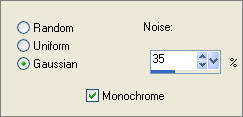
DESELECT
EFFECTS >>> DISTORTION EFFECTS >>> TWIRL
DEGREES = 500

EFFECTS >>> TEXTURE EFFECTS >>> MOSAIC - ANTIQUE
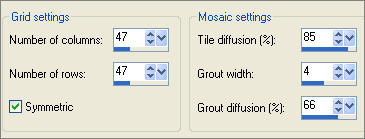
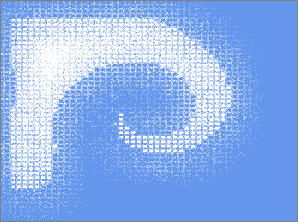
LAYERS >>> NEW RASTER LAYER
Choose your SELECTION TOOL then click on the CUSTOM SELECTION symbol
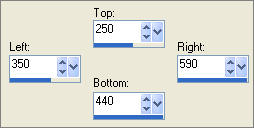
Flood fill with BLUE
ADJUST >>> ADD/REMOVE NOISE >>> ADD NOISE
Same settings
DESELECT
EFFECTS >>> DISTORTION EFFECTS >>> TWIRL
DEGREES = - (minus) 500
EFFECTS >>> TEXTURE EFFECTS >>> MOSAIC-ANTIQUE
Same settings
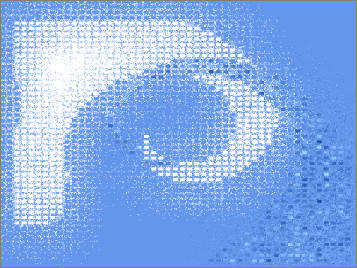
EFFECTS >>> EDGE EFFECTS >>> ENHANCE
Open up the JF_Image2.psp image in your PSP workspace
Right click on the Title Bar and select COPY from the options
Right click on the Title Bar of your new tag image
and select PASTE AS NEW LAYER from the options.
IMAGE >>> RESIZE = 118%
Ensure "Resize all layers" is UNCHECKED
SELECTIONS >>> SELECT ALL
SELECTIONS >>> FLOAT
SELECTIONS >>> DEFLOAT
SELECTIONS >>> MODIFY >>> EXPAND = 1
Flood fill with BLUE
EFFECTS >>> 3D EFFECTS >>> INNER BEVEL
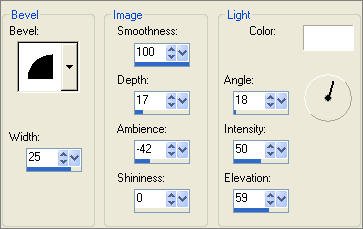
EDIT >>> Repeat Inner Bevel ( 3 times )
DESELECT
EFFECTS >>> EDGE EFFECTS >>> ENHANCE
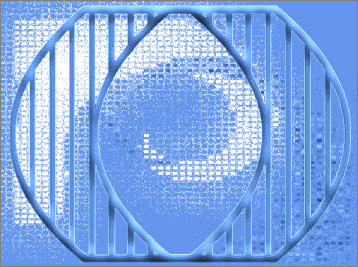
With your MAGIC WAND
Mode = Replace
Match Mode = RGB Value
Tolerance = 0
Feather = 0
Antialias = UNchecked
Sample Merged = UNCHECKED
PSP9 - X2: Check CONTIGUOUS
PSPX - X2: There is no " Sample Merged"
PSPX - X2: Use all layers = UNChecked
Select the transparent centre of the shape
SELECTIONS >>> MODIFY >>> EXPAND = 3
ACTIVATE RASTER 3 ... EDIT >>> CLEAR
ACTIVATE RASTER 2 ... EDIT >>> CLEAR
ACTIVATE RASTER 1
EFFECTS >>> TEXTURE EFFECTS >>> WEAVE
GAP COLOUR = Same BLUE you have been using " #6496eb "
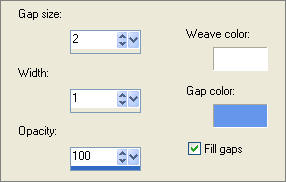
EFFECTS >>> 3D EFFECTS >>> INNER BEVEL
Same settings
ADJUST >>> SHARPNESS >>> SHARPEN
DESELECT
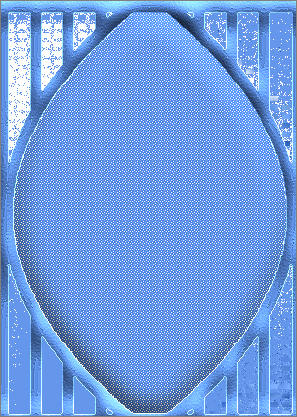
ACTIVATE RASTER 4
Open up the JF_Blonde39.psp image in your PSP workspace
Right click on the Title Bar and select COPY from the options
Right click on the Title Bar of your new tag image
and select PASTE AS NEW LAYER from the options.
IMAGE >>> RESIZE = 80%
Ensure "Resize all layers" is UNCHECKED
Reposition with your MOVER tool

Open up the JF_Air_Spirit.psp image in your PSP workspace
Right click on the Title Bar and select COPY from the options
Right click on the Title Bar of your new tag image
and select PASTE AS NEW LAYER from the options.
IMAGE >>> RESIZE = 90%
Ensure "Resize all layers" is UNCHECKED
ADJUST >>> SHARPNESS >>> SHARPEN
Reposition with your MOVER tool
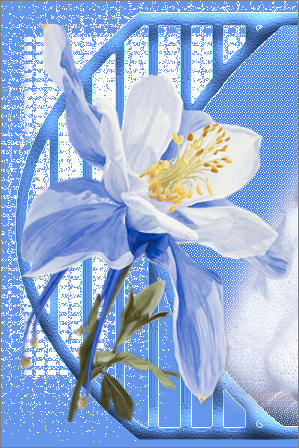
Choose your FREEHAND SELECTION TOOL
Selection Type = Point to Point
Mode = Replace
Feather = 0
Antialias = Checked
Select the area shown
in the example on the LEFT...
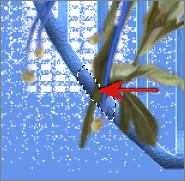
Then depress your SHIFT KEY and
select the area shown
in the example on the RIGHT
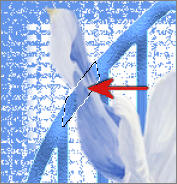 . . 
EDIT >>> CLEAR
DESELECT
EFFECTS >>> PLUGINS >>> EYE CANDY 3 >>> DROP SHADOW
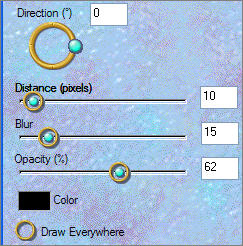
LAYERS >>> NEW RASTER LAYER
Open up the JF_WA_28.psp image in your PSP workspace
Right click on the Title Bar and select COPY from the options
Right click on the Title Bar of your new tag image
and select PASTE AS NEW SELECTION from the options.
IMAGE >>> RESIZE = 85%
Ensure "Resize all layers" is UNCHECKED
Reposition with your MOVER tool

ADJUST >>> COLOUR BALANCE >>> NEGATIVE IMAGE
PSPX - X2: IMAGE >>> NEGATIVE IMAGE
EFFECTS >>> 3D EFFECTS >>> DROP SHADOW
Vertical & Horizontal offsets = 1
Colour = DARK BLUE " #3479e0 "
Opacity = 75
Blur = 0
REPEAT the above Drop Shadow... same settings
EFFECTS >>> PLUGINS >>> EYE CANDY 3 >>> DROP SHADOW
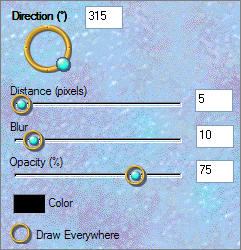
DESELECT
ADJUST >>> SHARPNESS >>> SHARPEN
LAYERS >>> MERGE >>> MERGE ALL (Flatten)
Save as .jpg image
TESTERS RESULTS
Page designed by

for
http://www.artistrypsp.com/
Copyright ©
2000-2010 Artistry In PSP / PSP Artistry
All rights reserved.
Unless specifically made available for
download,
no graphics or text may be removed from
this site for any reason
without written permission from Artistry
In PSP / PSP Artistry
|