FASHIONISTA
PSP8 to PSPX2
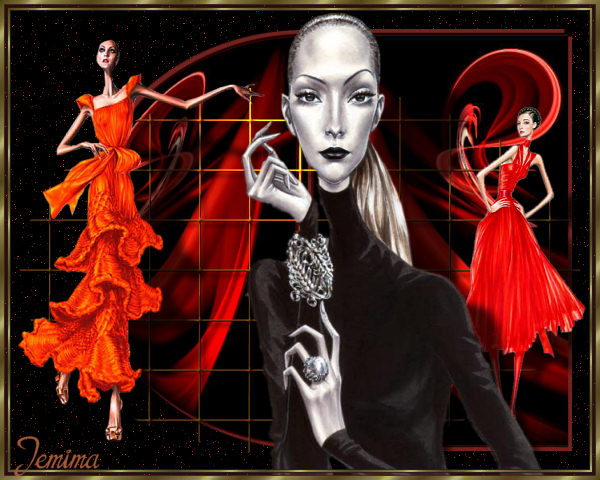
This tutorial was written by Jemima ~ April 2010
Copyright © 2010 ~ Jemima ~ All rights reserved
********************************
This was created using PSP9 but can be adapted for other versions of PSP.
You will need the
following to complete this tutorial
Materials
RedPassion1.jpg
JF_wiregrid2.psp
JF_ArturoElena4.psp
JF_ArturoElena5.psp
JF_ArturoElena22.pspimage
Save to a folder on your computer
t094.gif
Save to your PSP Textures folder
PSP8: C:\Program Files\Jasc Software\Paint Shop Pro 8\Textures
PSP9: C:\Program Files\Jasc Software\Paint Shop Pro 9\Textures
PSPX: C:\Program Files\Corel\Corel Paint Shop Pro X\Textures
PSPXI / X2: C:\Program Files\Corel\Corel Paint Shop Pro Photo X2\Corel_15
goldfill1.bmp
Save to your PSP Patterns folder
PSP8: C:\Program Files\Jasc Software\Paint Shop Pro 8\Patterns
PSP9: C:\Program Files\Jasc Software\Paint Shop Pro 9\Patterns
PSPX: C:\Program Files\Corel\Corel Paint Shop Pro X\Patterns
PSPXI / X2: C:\Program Files\Corel\Corel Paint Shop Pro Photo X2\Corel_08
Plugins
** EYE CANDY3 **
http://www.pircnet.com/downloads.html
********************************
Open a new image 640 x 480
Transparent background
PSPX - X2: Colour Depth = 8bits/channel
Flood fill with BLACK
LAYERS >>> NEW RASTER LAYER
Flood fill with RED #902a26
EFFECTS >>> TEXTURE EFFECTS >>> TEXTURE
COLOUR = #c0c0c0
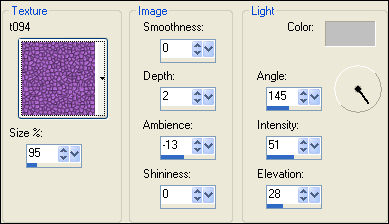
In your LAYER PALETTE change the OPACITY to 2%
Change the BLEND MODE to DISSOLVE
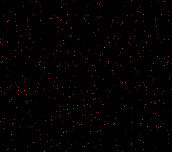
Save as .psp image and minimize...this will be for your tag image.
This next section is fiddly, so take your time. *S*
Open up the RedPassion1 image in your PSP workspace
Choose your SELECTION TOOL then click on the CUSTOM SELECTION
symbol
and enter these coordinates.
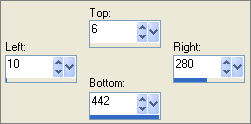
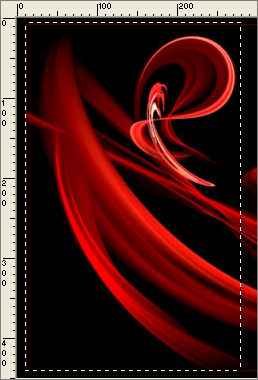
Right click on the Title Bar and select COPY from the options
Open a new image 640 x 480
Transparent background
PSPX - X2: Colour Depth = 8bits/channel
Right click on the Title Bar of your tag image
and select PASTE AS NEW LAYER from the options.
LAYERS >>> DUPLICATE
IMAGE >>> MIRROR
Reposition both layers with your MOVER tool
Move Raster 2 to the left and Copy of Raster 2 to the right.
(Don't worry about the distance between them.. we'll sort that out later)
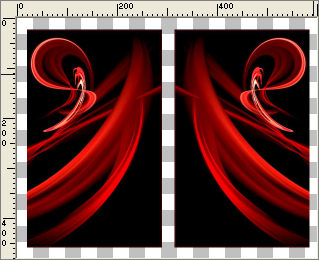
ACTIVATE Copy of Raster 2 (The image on the left)
EFFECTS >>> DISTORTION EFFECTS >>> PUNCH

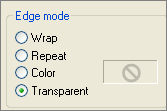
EFFECTS>>> GEOMETRIC EFFECTS >>> CIRCLE
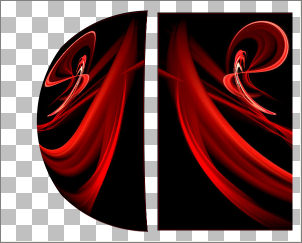
Select your DEFORMATION tool
Mode = SCALE
use default settings
PSPX - X2:Select your PICK tool
Drag the centre TOP node DOWN level with the top of the right image
AND
Drag the centre BOTTOM node UP level with the bottom of the right image
EFFECTS >>> 3D EFFECTS >>> DROP SHADOW
Vertical & Horizontal offsets = 4
Colour = RED #902a26
Opacity = 80
Blur = 0
CHECK "Shadow on a new layer"
ACTIVATE Raster 2
EFFECTS >>> 3D EFFECTS >>> DROP SHADOW
Vertical & Horizontal offsets = - ( minus ) 4
Colour = RED #902a26
Opacity = 80
Blur = 0
CHECK "Shadow on a new layer"

ACTIVATE Copy of RASTER 2
EFFECTS >>> 3D EFFECTS >>> DROP SHADOW
Vertical & Horizontal offsets = - ( minus ) 4
Colour = RED #902a26
Opacity = 80
Blur = 0
CHECK "Shadow on a new layer"
ACTIVATE Copy of RASTER 2
EFFECTS >>> 3D EFFECTS >>> DROP SHADOW
Vertical & Horizontal offsets = 4
Colour = RED #902a26
Opacity = 80
Blur = 0
CHECK "Shadow on a new layer"

Close the bottom 4 layers
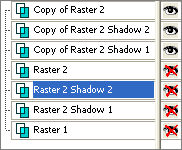
ACTIVATE Copy of Raster 2
LAYERS >>> MERGE >>> MERGE VISIBLE
Close the MERGED layer
Open all other layers
ACTIVATE RASTER 2
LAYERS >>> MERGE >>> MERGE VISIBLE
OPEN & ACTIVATE the top Merged layer
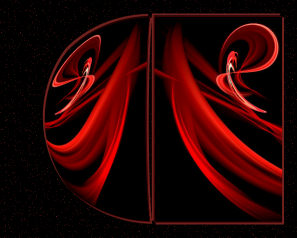
Reposition with your MOVER tool next to the right image
TOP

BOTTOM

LAYERS >>> MERGE >>> MERGE VISIBLE
IMAGE >>> RESIZE = 95%
Ensure "Resize all layers" is UNCHECKED
Resample using WEIGHTED AVERAGE
Right click on the Title Bar and select COPY from the options
Maximize your Tag image (with the black background)
Right click on the Title Bar of your tag image
and select PASTE AS NEW LAYER from the options.
Reposition with your MOVER tool so the right side of your shape
is level with the 570 pixel mark on the top ruler

Open up the JF_wiregrid2 image in your PSP workspace
Right click on the Title Bar and select COPY from the options
Right click on the Title Bar of your tag image
and select PASTE AS NEW LAYER from the options.
Reposition with your MOVER tool
so the bottom of the 'mesh' is level with the 465 pixel mark on the left ruler

Choose your SELECTION TOOL
Selection Type = ELLIPSE
Mode = Replace
Feather = 0
Antialias = Checked
Starting at 300 pixels across and 270 pixels down
drag your cursor to 580 pixels across and 450 pixels down and release
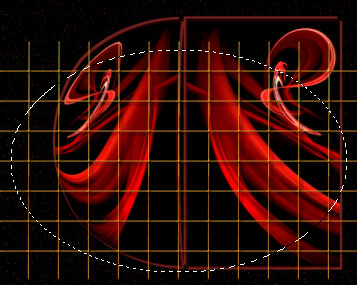
SELECTIONS >>> INVERT
EDIT >>> CLEAR
DESELECT
EFFECTS >>> ILLUMINATION EFFECTS >>> LIGHTS
Click on Light Sources 1 to 4 and make sure the "ON" setting is UNCHECKED
 . . 
Then click on Light Source 5 and enter the following settings.
COLOUR = #ff9703

Open up the JF_ArturoElena4 image in your PSP workspace
Right click on the Title Bar and select COPY from the options
Right click on the Title Bar of your tag image
and select PASTE AS NEW LAYER from the options.
IMAGE >>> RESIZE = 70%
Ensure "Resize all layers" is UNCHECKED
Resample using WEIGHTED AVERAGE
ADJUST >>> SHARPNESS >>> SHARPEN
Reposition with your MOVER tool
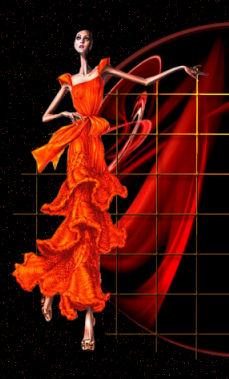
Open up the JF_ArturoElena5 image in your PSP workspace
Right click on the Title Bar and select COPY from the options
Right click on the Title Bar of your tag image
and select PASTE AS NEW LAYER from the options.
IMAGE >>> RESIZE = 60%
Ensure "Resize all layers" is UNCHECKED
Resample using WEIGHTED AVERAGE
ADJUST >>> SHARPNESS >>> SHARPEN
Reposition with your MOVER tool

Open up the JF_ArturoElena22 image in your PSP workspace
Right click on the Title Bar and select COPY from the options
Right click on the Title Bar of your tag image
and select PASTE AS NEW LAYER from the options.
IMAGE >>> RESIZE = 80%
Ensure "Resize all layers" is UNCHECKED
Resample using WEIGHTED AVERAGE
ADJUST >>> BRIGHTNESS and CONTRAST >>> CLARIFY

Reposition with your MOVER tool

EFFECTS >>> PLUGINS >>> EYE CANDY 3 >>> PERSPECTIVE SHADOW
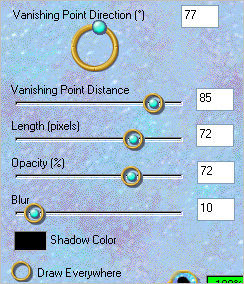
ACTIVATE RASTER 6
EDIT >>> Repeat Perspective Shadow
ACTIVATE RASTER 5
EDIT >>> Repeat Perspective Shadow

LAYERS >>> MERGE >>> MERGE VISIBLE
SAVE
In your MATERIALS PALETTE
Load the ' goldfill1 ' pattern in your foreground
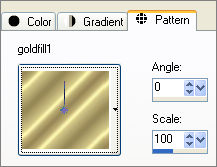
LAYERS >>> NEW RASTER LAYER
SELECTIONS >>> SELECT ALL
Flood fill with goldfill1 pattern
SELECTIONS >>> MODIFY >>> CONTRACT = 4
EDIT >>> CLEAR
SELECTIONS >>> INVERT
ADJUST >>> BRIGHTNESS and CONTRAST >>> BRIGHTNESS/CONTRAST

EFFECTS >>> 3D EFFECTS >>> DROP SHADOW
Vertical & Horizontal offsets = 1
Colour = Black
Opacity = 80
Blur = 0
Repeat Drop Shadow effect changing
Vertical & Horizontal Offsets to - ( minus ) 1
Click OK
SELECTIONS >>> INVERT

LAYERS >>> NEW RASTER LAYER
Flood fill with RED #902a26
SELECTIONS >>> MODIFY >>> CONTRACT = 4
EDIT >>> CLEAR
In your LAYER PALETTE change the OPACITY to 30%
Change the BLEND MODE to SCREEN

LAYERS >>> NEW RASTER LAYER
Flood fill with goldfill1 pattern
SELECTIONS >>> MODIFY >>> CONTRACT = 2
EDIT >>> CLEAR
DESELECT
ADJUST >>> BRIGHTNESS and CONTRAST >>> BRIGHTNESS/CONTRAST
Same settings
EFFECTS >>> 3D EFFECTS >>> DROP SHADOW
Vertical & Horizontal offsets = 1
Colour = Black
Opacity = 80
Blur = 0
Repeat Drop Shadow effect changing
Vertical & Horizontal Offsets to - ( minus ) 1
Click OK
LAYERS >>> MERGE >>> MERGE ALL (Flatten)
Save as .jpg image
TESTERS RESULTS
Page designed by

for
http://www.artistrypsp.com/
Copyright ©
2000-2010 Artistry In PSP / PSP Artistry
All rights reserved.
Unless specifically made available for
download,
no graphics or text may be removed from
this site for any reason
without written permission from Artistry
In PSP / PSP Artistry
|