FISH FRAME 2
PAGE 2
This tutorial was
created by Jemima using PSP9 ~ November 2009
BUT should be creatable using all versions of PSP
Copyright © 2010 ~ Jemima
~ All rights reserved
********************************
Maximize the BlueGreenFish02sm~RM image in your PSP workspace
Right click on the Title Bar and select COPY from the options
Right click on the Title Bar of your frame image
and select PASTE AS NEW LAYER from the options.
LAYERS >>> ARRANGE >>> BRING TO TOP
IMAGE >>> RESIZE = 20%
Ensure "Resize all layers" is UNCHECKED
Resample using WEIGHTED AVERAGE
Select your DEFORMATION tool
Mode = SCALE
use default settings
PSPX/XI/XII:Select your PICK tool
Move the Rotation Handle down slightly and
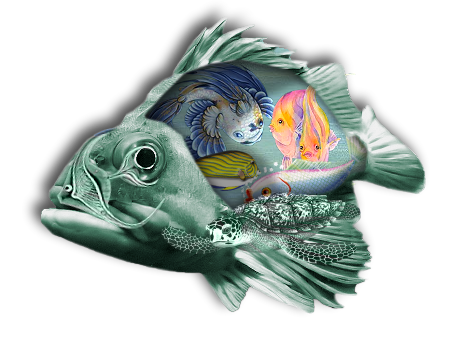
reposition as shown below.
Click the RESET RECTANGLE arrow

LAYERS >>> ARRANGE >>> MOVE DOWN
EDIT >>> Repeat >>> Move layer down
ACTIVATE RASTER 1
Maximize the ExoticFish_Janet image in your PSP workspace
Select the Purple layer
Right click on the Title Bar and select COPY from the options
Right click on the Title Bar of your frame image
and select PASTE AS NEW LAYER from the options.
IMAGE >>> RESIZE = 80%
Ensure "Resize all layers" is UNCHECKED
Resample using WEIGHTED AVERAGE
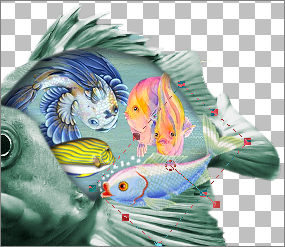
Reposition with your MOVER tool as shown below
Select your DEFORMATION tool
Mode = SCALE
use default settings
PSPX/XI/XII:Select your PICK tool
Move the Rotation Handle up slightly
Click the RESET RECTANGLE arrow
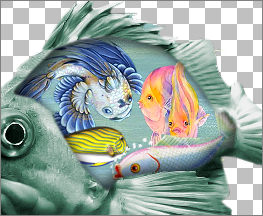
In your LAYER PALETTE
Change the BLEND MODE to LUMINANCE (L)
ADJUST >>> SHARPNESS >>> SHARPEN
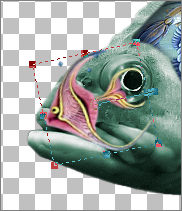
Choose your SELECTION TOOL
Selection Type = Rectangle
Mode = Replace
Feather = 0
Antialias = UNChecked
Select the blue dot

EDIT >>> CLEAR
DESELECT
Open the DEA 080307 SeaTurtleWP image
(from the Fish1_Materials zip) in your PSP workspace
Right click on the Title Bar and select COPY from the options
Right click on the Title Bar of your frame image
and select PASTE AS NEW LAYER from the options.
IMAGE >>> RESIZE = 50%
Ensure "Resize all layers" is UNCHECKED
Resample using WEIGHTED AVERAGE
Reposition with your MOVER tool as shown below
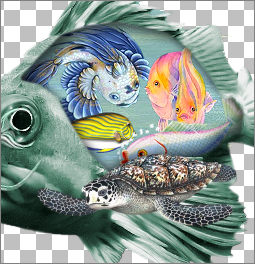
In your LAYER PALETTE
Change the BLEND MODE to LUMINANCE (L)
ACTIVATE RASTER 1
With your MAGIC WAND.... Same settings.
Select the CENTRE of the image
SELECTIONS >>> MODIFY >>> EXPAND = 4
LAYERS >>> NEW RASTER LAYER
LAYERS >>> ARRANGE >>> MOVE DOWN
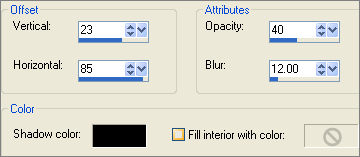
EFFECTS >>> 3D EFFECTS >>> CUTOUT
DESELECT
LAYERS >>> MERGE >>> MERGE VISIBLE
Again... you have a choice as to how to save this...
If you want to use it in combination with another image at a later date..
then save as a .pspimage (.psp)
Or you can save it as a .png image (Which is what I did)

or a .png with a drop shadow...
Page designed by

for

http://www.artistrypsp.com/
Copyright ©
2000-2010 Artistry In PSP / PSP Artistry
All rights reserved.
Unless specifically made available for
download,
no graphics or text may be removed from
this site for any reason
without written permission from Artistry
In PSP / PSP Artistry
|