UP A TREE
PSP8 - PSPX3
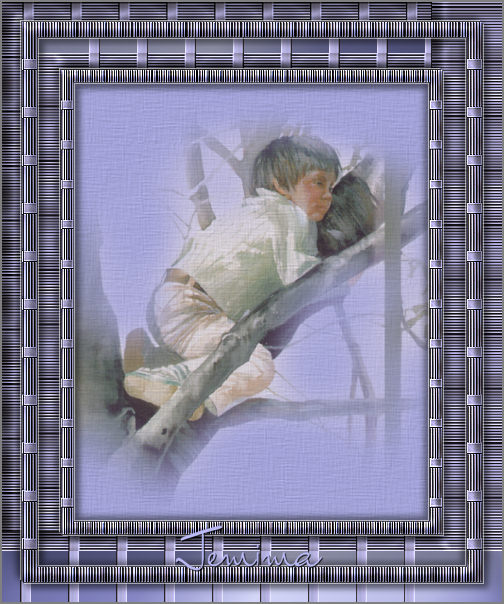
This tutorial was
created by Jemima using PSP9 ~ September 2010
BUT should be creatable using all versions of PSP
Copyright © 2010 ~ Jemima
~ All rights reserved
********************************
You will need the
following to complete this tutorial
Materials
lush39.jpg
up-a-tree_lizztish.psp
Save to a folder on your computer
linenPOP.bmp
Save to your PSP Textures folder
PSP8: C:\Program Files\Jasc Software\Paint Shop Pro 8\Textures
PSP9: C:\Program Files\Jasc Software\Paint Shop Pro 9\Textures
PSPX: C:\Program Files\Corel\Corel Paint Shop Pro X\Textures
PSPXI / X2: C:\Program Files\Corel\Corel Paint Shop Pro Photo X2\Corel_15
PSPX3: C:\Program Files\Corel\X3\PSPClassic\Corel_15
JCountryBlues.jgd
Save to your PSP Gradients folder
PSP8: C:\Program Files\Jasc Software\Paint Shop Pro 8\Gradients
PSP9: C:\Program Files\Jasc Software\Paint Shop Pro 9\Gradients
PSPX: C:\Program Files\Corel\Corel Paint Shop Pro X\Gradients
PSPXI / X2: C:\Program Files\Corel\Corel Paint Shop Pro Photo X2\Corel_06
PSPX3: C:\Program Files\Corel\X3\PSPClassic\Corel_06
Plugins
** EYE CANDY3 **
http://www.pircnet.com/downloads.html
********************************
Open up both downloaded images in your PSP workspace
and minimize.
In your MATERIALS PALETTE
Load the ' lush39 ' pattern in your foreground
(it should be up the top of your pattern selection window)
using the settings below.

Open a new image 500 x 600
Transparent background
PSPX - X2: Colour Depth = 8bits/channel
PSPX3: Colour Depth RGB = 8bits/channel
Flood fill with the pattern
ADJUST >>> SHARPNESS >>> SHARPEN MORE
Choose your SELECTION TOOL then click on the CUSTOM SELECTION
symbol
and enter these coordinates.
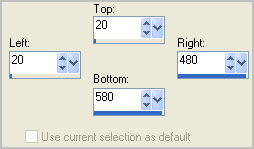
EDIT >>> CLEAR
SELECTIONS >>> INVERT
EFFECTS >>> 3D EFFECTS >>> INNER BEVEL
COLOUR = #c0c0ff
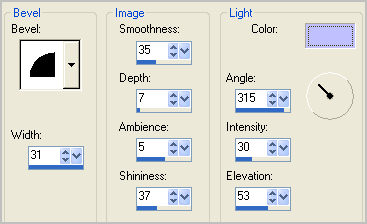
EFFECTS >>> 3D EFFECTS >>> DROP SHADOW
Vertical & Horizontal offsets = 1
Colour = Black
Opacity = 80
Blur = 0
Repeat Drop Shadow effect changing
Vertical & Horizontal Offsets to - ( minus ) 1
Click OK
SELECTIONS >>> INVERT

LAYERS >>> NEW RASTER LAYER
In your MATERIALS PALETTE change the ANGLE to 90
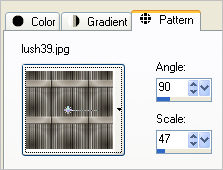
Flood fill with the pattern
SELECTIONS >>> MODIFY >>> CONTRACT = 15
EDIT >>> CLEAR
DESELECT
EFFECTS >>> EDGE EFFECTS >>> ENHANCE
EFFECTS >>> 3D EFFECTS >>> INNER BEVEL
Same settings
EFFECTS >>> 3D EFFECTS >>> DROP SHADOW
Vertical & Horizontal offsets = 1
Colour = Black
Opacity = 80
Blur = 0
Repeat Drop Shadow effect changing
Vertical & Horizontal Offsets to - ( minus ) 1
Click OK

ACTIVATE RASTER 1
LAYERS >>> DUPLICATE
EFFECTS >>> IMAGE EFFECTS >>> OFFSET
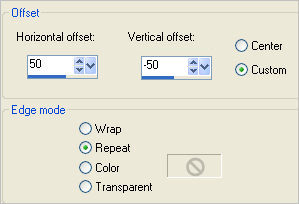
CLOSE RASTER 2
In your MATERIALS PALETTE load
JCountryBlues Gradient in the background using these settings
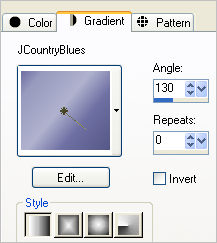
With Copy of Raster 1 still active
With your MAGIC WAND
Mode = Replace
Match Mode = COLOR
Tolerance = 25
PSPX3: Tolerance = 20
Feather = 0
Antialias = UNchecked
Sample Merged = UNCHECKED
PSP9 - X3: Check CONTIGUOUS
PSPX - X3: There is no " Sample Merged"
PSPX - X3: Use all layers = UNChecked
and while depressing your SHIFT KEY
select the black areas shown below
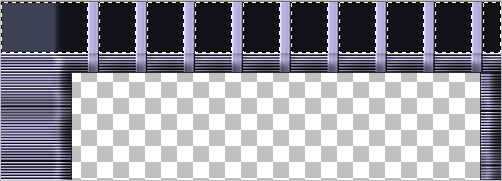
EDIT >>> CLEAR
DESELECT
NOTE for PSPX to PSPX3 users:
If you are left with a black line in the left hand area or any of the areas selected,
select it/them with your MAGIC WAND
and DELETE it/them.... then DESELECT

LAYERS >>> NEW RASTER LAYER
LAYERS >>> ARRANGE >>> MOVE DOWN
Choose your SELECTION TOOL then click on the CUSTOM SELECTION
symbol
and enter these coordinates.
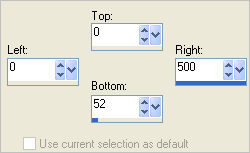
Flood fill with the gradient
EFFECTS >>> 3D EFFECTS >>> INNER BEVEL
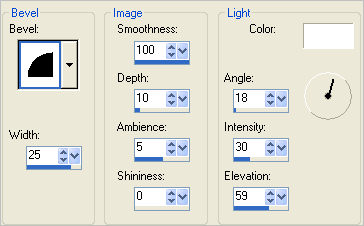
DESELECT

LAYERS >>> MERGE >>> MERGE VISIBLE
LAYERS >>> DUPLICATE
IMAGE >>> MIRROR
IMAGE >>> FLIP
OPEN RASTER 2
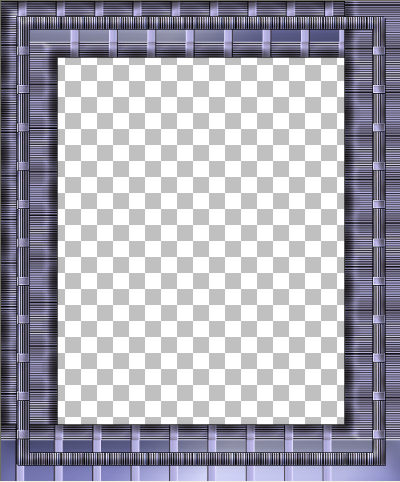
ACTIVATE RASTER 2
LAYERS >>> DUPLICATE
IMAGE >>> RESIZE = 83%
Ensure "Resize all layers" is UNCHECKED
Resample using WEIGHTED AVERAGE
ADJUST >>> SHARPNESS >>> SHARPEN MORE
EFFECTS >>> 3D EFFECTS >>> DROP SHADOW
Vertical & Horizontal offsets = 1
Colour = WHITE
Opacity = 80
Blur = 0
Repeat Drop Shadow effect changing
Vertical & Horizontal Offsets to - ( minus ) 1
Click OK
ACTIVATE RASTER 2
EFFECTS >>> 3D EFFECTS >>> DROP SHADOW
Vertical & Horizontal offsets = 1
Colour = WHITE
Opacity = 80
Blur = 0
Repeat Drop Shadow effect changing
Vertical & Horizontal Offsets to - ( minus ) 1
Click OK

EFFECTS >>> PLUGINS >>> EYE CANDY 3 >>> DROP SHADOW
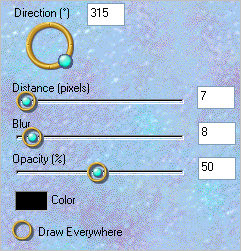
ACTIVATE Copy of RASTER 2
EDIT >>> Repeat Drop Shadow
EDIT >>> Repeat Drop Shadow.. change DIRECTION to 135
ACTIVATE RASTER 2
EDIT >>> Repeat Drop Shadow
LAYERS >>> MERGE >>> MERGE VISIBLE
This is your frame.
Save as .psp image
LAYERS >>> NEW RASTER LAYER
LAYERS >>> ARRANGE >>> MOVE DOWN
Flood fill with PURPLE #babaf7
EFFECTS >>> TEXTURE EFFECTS >>> TEXTURE
COLOUR = #c0c0c0
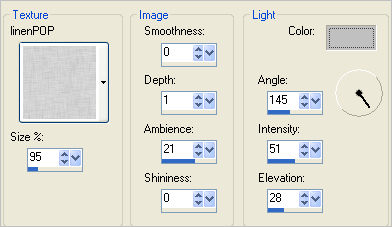
Maximize the up-a-tree_lizztish.psp image in your PSP workspace
Right click on the Title Bar and select COPY from the options
Right click on the Title Bar of your frame image
and select PASTE AS NEW LAYER from the options.
IMAGE >>> RESIZE = 85%
Ensure "Resize all layers" is UNCHECKED
Resample using WEIGHTED AVERAGE
In your LAYER PALETTE change the OPACITY to 85%
EFFECTS >>> TEXTURE EFFECTS >>> TEXTURE
Same settings
LAYERS >>> MERGE >>> MERGE ALL (Flatten)
IMAGE >>> ADD BORDERS = 2 (Symmetric)
COLOUR = #808080
Save as .jpg image
Testers Results
Page designed by

for

http://www.artistrypsp.com/
Copyright ©
2000-2010 Artistry In PSP / PSP Artistry
All rights reserved.
Unless specifically made available for
download,
no graphics or text may be removed from
this site for any reason
without written permission from Artistry
In PSP / PSP Artistry
|