OCEAN
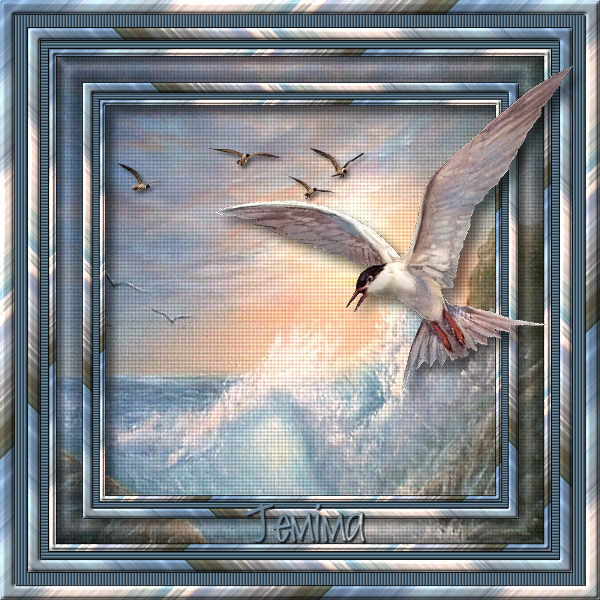
This tutorial was
created by Jemima using PSP9 ~ April 2010
BUT should be creatable using all versions of PSP
Copyright © 2010 ~ Jemima
~ All rights reserved
********************************
You will need the
following to complete this tutorial
Materials
Ocean.jpg
SEAGULLS 3895 PJW.psp
bird_1.tub
Save to a folder on your computer
Fine canvas.bmp
Save to your PSP Textures folder
PSP8: C:\Program Files\Jasc Software\Paint Shop Pro 8\Textures
PSP9: C:\Program Files\Jasc Software\Paint Shop Pro 9\Textures
PSPX: C:\Program Files\Corel\Corel Paint Shop Pro X\Textures
PSPXI / X2: C:\Program Files\Corel\Corel Paint Shop Pro Photo X2\Corel_15
Plugins
** EYE CANDY3 **
http://www.pircnet.com/downloads.html
********************************
In this tutorial we are going to create the pattern for the frame from the image we're going to use.
Open up the downloaded images in your PSP workspace
and minimize all but the OCEAN image
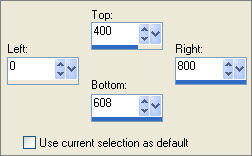
Choose your SELECTION TOOL then click on the CUSTOM SELECTION
symbol
and enter these coordinates.
 . . 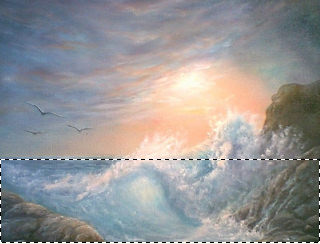
Right click on the Title Bar and select COPY from the options
Right click in the PSP Workspace
and select PASTE AS NEW IMAGE from the options.
IMAGE >>> FLIP

LAYERS >>> MERGE >>> MERGE ALL (Flatten)
IMAGE >>> DECREASE COLOUR DEPTH >>> 256 COLOURS (8 Bit)
PSPX - PSPXII: 256 COLOURS

IMAGE >>> INCREASE COLOUR DEPTH >>> 16 MILLION COLOURS (24Bit)
PSPX - PSPXII: 16 bits/channel
EFFECTS >>> IMAGE EFFECTS >>> OFFSET
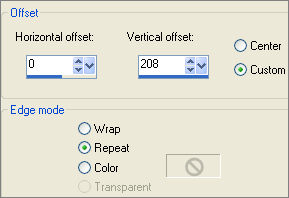
(When using other images to create a pattern make sure the "Vertical Offset"
is set to the maximum)
IMAGE >>> RESIZE
Width = 500 PIXELS
Height = 150
PIXELS
"Lock aspect ratio" = UNCHECKED
"Resize all layers" is CHECKED
Resample using WEIGHTED AVERAGE

Save as oceanpattern.jpg image
On the original OCEAN image
SELECTIONS >>> SELECT NONE
Minimize the original image
In your MATERIALS PALETTE load
oceanpattern in the foreground using these settings
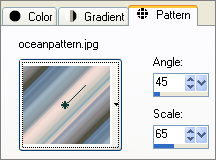
Load BLUE " #6a889e" in your background
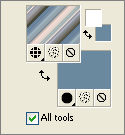
Open a new image 600 x 600
Transparent background
PSPX - X2: Colour Depth = 8bits/channel
Flood fill with the foreground pattern
SELECTIONS >>> SELECT ALL
SELECTIONS >>> MODIFY >>> CONTRACT = 15
EDIT >>> CLEAR
SELECTIONS >>> INVERT
EFFECTS >>> 3D EFFECTS >>> DROP SHADOW
Vertical & Horizontal offsets = 1
Colour = Black
Opacity = 75
Blur = 0
Repeat Drop Shadow effect changing
Vertical & Horizontal Offsets to - ( minus ) 1
Click OK
EFFECTS >>> 3D EFFECTS >>> INNER BEVEL
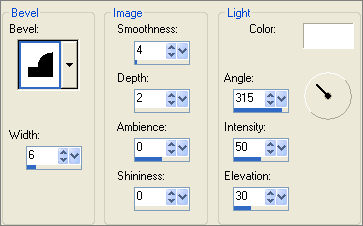
SELECTIONS >>> INVERT

LAYERS >>> NEW RASTER LAYER
Flood fill with BLUE
SELECTIONS >>> MODIFY >>> CONTRACT = 12
EDIT >>> CLEAR
SELECTIONS >>> SELECT NONE
EFFECTS >>> 3D EFFECTS >>> DROP SHADOW
Vertical & Horizontal offsets = 1
Colour = Black
Opacity = 75
Blur = 0
Repeat Drop Shadow effect changing
Vertical & Horizontal Offsets to - ( minus ) 1
Click OK
EFFECTS >>> TEXTURE EFFECTS >>> BLINDS
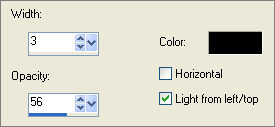

With your MAGIC WAND
Mode = Replace
Match Mode = RGB Value
Tolerance = 0
Feather = 0
Antialias = UNchecked
Sample Merged = UNCHECKED
PSP9 - X2: Check CONTIGUOUS
PSPX - X2: There is no " Sample Merged"
PSPX - X2: Use all layers = UNChecked
Select the CENTRE transparent area
LAYERS >>> NEW RASTER LAYER
Flood fill with the foreground pattern
IMAGE >>> MIRROR
SELECTIONS >>> DEFLOAT
SELECTIONS >>> MODIFY >>> CONTRACT = 12
EDIT >>> CLEAR
DESELECT
Repeat BOTH Drop Shadows
EFFECTS >>> 3D EFFECTS >>> INNER BEVEL
Same settings

With your MAGIC WAND ... same settings
Select the CENTRE transparent area
LAYERS >>> NEW RASTER LAYER
Flood fill with BLUE
SELECTIONS >>> MODIFY >>> CONTRACT = 7
EDIT >>> CLEAR
DESELECT
EFFECTS >>> TEXTURE EFFECTS >>> BLINDS
Same settings BUT this time check the HORIZONTAL option
Repeat BOTH Drop Shadows

With your MAGIC WAND ... same settings
Select the CENTRE transparent area
LAYERS >>> NEW RASTER LAYER
In your MATERIALS PALETTE
change the SCALE of the PATTERN to 45
Flood fill with the foreground pattern
SELECTIONS >>> MODIFY >>> CONTRACT = 7
EDIT >>> CLEAR
DESELECT
EFFECTS >>> 3D EFFECTS >>> INNER BEVEL
Same settings
Repeat BOTH Drop Shadows

In your LAYER PALETTE
Close the bottom 2 layers
LAYERS >>> MERGE >>> MERGE VISIBLE
LAYERS >>> DUPLICATE
IMAGE >>> RESIZE = 80%
Ensure "Resize all layers" is UNCHECKED
Resample using WEIGHTED AVERAGE
ADJUST >>> SHARPNESS >>> SHARPEN
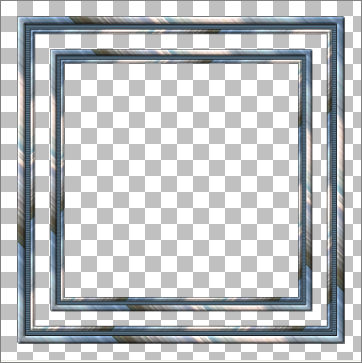
In your LAYER PALETTE
OPEN ALL LAYERS
LAYERS >>> MERGE >>> MERGE VISIBLE
Save as .psp image
LAYERS >>> NEW RASTER LAYER
LAYERS >>> ARRANGE >>> MOVE DOWN
SELECTIONS >>> SELECT ALL
SELECTIONS >>> MODIFY >>> CONTRACT = 45
Maximize the OCEAN image in your PSP workspace
Right click on the Title Bar and select COPY from the options
Right click on the Title Bar of your frame image
and select PASTE INTO SELECTION from the options.
PSPXII Users see notes below before doing this next instruction
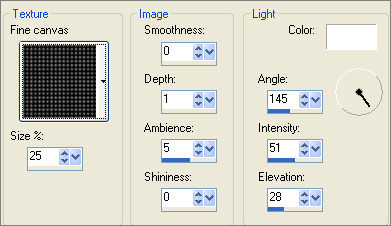
EFFECTS >>> TEXTURE EFFECTS >>> TEXTURE
COLOUR = #c0c0c0
TEXTURE = Fine Canvas
PSPXII Users
I found doing this effect in PSPXII produced a slightly different texture result...
you have 2 options...
don't worry about it..
OR
you could do the following.....
EFFECTS >>> TEXTURE EFFECTS >>> TEXTURE
COLOUR = #c0c0c0
TEXTURE = Canvas simple ( Corel_15_015)
(This texture comes with PSPXII)
Use same settings as above
EXCEPT...
Change the DEPTH TO 3
|
DESELECT
ACTIVATE THE MERGED LAYER
With your MAGIC WAND....
Same settings.
Select the area between the 2 borders
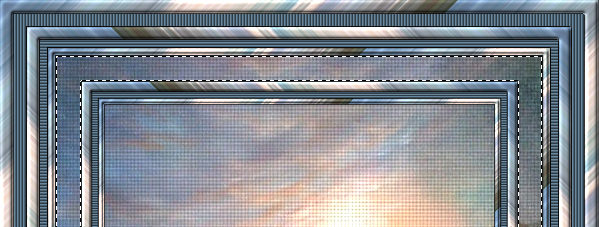
ACTIVATE RASTER 1
EFFECTS >>> 3D EFFECTS >>> INNER BEVEL
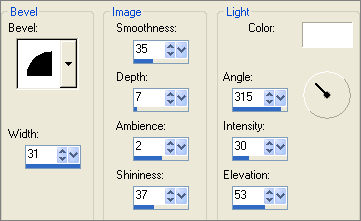
DESELECT

ACTIVATE THE MERGED LAYER
EFFECTS >>> PLUGINS >>> EYE CANDY 3 >>> DROP SHADOW
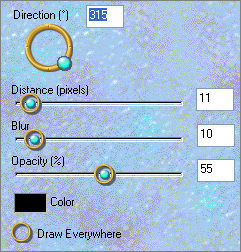
ACTIVATE RASTER 1
Maximize the SEAGULLS 3895 PJW image in your PSP workspace
Right click on the Title Bar and select COPY from the options
Right click on the Title Bar of your frame image
and select PASTE AS NEW LAYER from the options.
Reposition with your MOVER tool
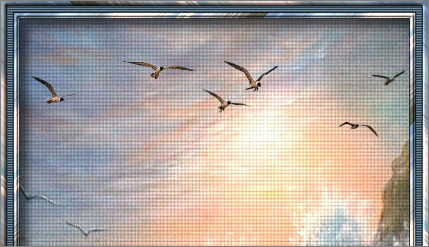
EFFECTS >>> PLUGINS >>> EYE CANDY 3 >>> DROP SHADOW
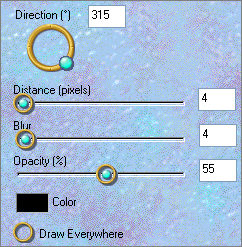
ACTIVATE THE MERGED LAYER
Maximize the bird_1 image in your PSP workspace
Right click on the Title Bar and select COPY from the options
Right click on the Title Bar of your frame image
and select PASTE AS NEW LAYER from the options.
Reposition with your MOVER tool
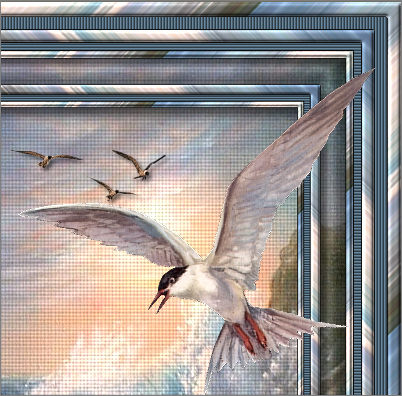
SELECTIONS >>> SELECT ALL
SELECTIONS >>> FLOAT
SELECTIONS >>> DEFLOAT
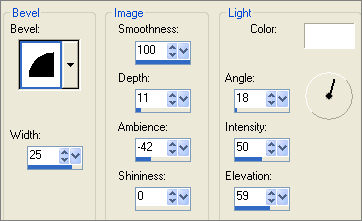
EFFECTS >>> 3D EFFECTS >>> INNER BEVEL
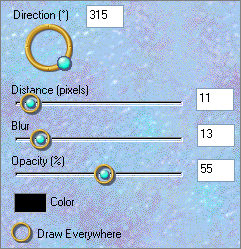
EFFECTS >>> PLUGINS >>> EYE CANDY 3 >>> DROP SHADOW
DESELECT
LAYERS >>> MERGE >>> MERGE ALL (Flatten)
Save as .jpg image
Testers Results
Page designed by

for

http://www.artistrypsp.com/
Copyright ©
2000-2010 Artistry In PSP / PSP Artistry
All rights reserved.
Unless specifically made available for
download,
no graphics or text may be removed from
this site for any reason
without written permission from Artistry
In PSP / PSP Artistry
|