BRAG BOOK
Page 3
This tutorial was
created by Jemima using PSP9 ~ November 2009
BUT should be creatable using all versions of PSP
Copyright © 2010 ~ Jemima
~ All rights reserved
********************************
LAYERS >>> NEW RASTER LAYER
LAYERS >>> ARRANGE >>> MOVE DOWN
Flood fill with PINK
DESELECT

ACTIVATE THE MERGED LAYER
LAYERS >>> NEW RASTER LAYER
In your MATERIALS PALETTE
Load the "bhw22 "Gradient in your BACKground
ANGLE = 130
REPEAT = 0
Load GOLD " #c29d3d" in your FOREground

Select your TEXT tool

Enter " Brag Book"

Click APPLY
Reposition with your MOVER tool

SELECTIONS >>> SELECT NONE
In your MATERIALS PALETTE
Click the 'arrow' shown below so that the selections are reversed

Select your TEXT tool... same settings
Enter " Brag Book" text again
(It should still be loaded if you checked the "Remember Text" box)
Click APPLY
ZOOM IN and
Reposition with your MOVER tool
so that the second lot of text is slightly to the left of the previous text.
SELECTIONS >>> SELECT NONE

EFFECTS >>> PLUGINS >>> EYE CANDY 3 >>> DROP SHADOW


CLOSE RASTER 1
LAYERS >>> MERGE >>> MERGE VISIBLE
LAYERS >>> NEW RASTER LAYER
Open up the jcw_bugs image in your PSP workspace
Choose your FREEHAND SELECTION TOOL
Selection Type = Point to Point
Mode = Replace
Feather = 0
Antialias = UNChecked
Carefully section off the Grasshopper

Right click on the Title Bar and select COPY from the options
Right click on the Title Bar of your frame image
and select PASTE AS NEW SELECTION from the options.
IMAGE >>> RESIZE = 80%
Ensure "Resize all layers" is UNCHECKED
Resample using WEIGHTED AVERAGE
Position as shown below

DESELECT
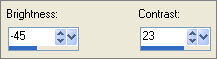
ADJUST >>> BRIGHTNESS and CONTRAST >>> BRIGHTNESS/CONTRAST
EFFECTS >>> PLUGINS >>> EYE CANDY 3 >>> DROP SHADOW

LAYERS >>> NEW RASTER LAYER
Go back to the jcw_bugs image in your PSP workspace
Choose your FREEHAND SELECTION TOOL
Selection Type = Point to Point
Mode = Replace
Feather = 0
Antialias = UNChecked
Carefully section off the Butterfly

Right click on the Title Bar and select COPY from the options
Right click on the Title Bar of your frame image
and select PASTE AS NEW SELECTION from the options.
IMAGE >>> RESIZE = 80%
Ensure "Resize all layers" is UNCHECKED
Resample using WEIGHTED AVERAGE
Position as shown below

DESELECT
EFFECTS >>> PLUGINS >>> EYE CANDY 3 >>> DROP SHADOW
Same settings

LAYERS >>> MERGE >>> MERGE VISIBLE
EFFECTS >>> PLUGINS >>> EYE CANDY 3 >>> DROP SHADOW
Same settings
OPEN & ACTIVATE Raster 5
EFFECTS >>> PLUGINS >>> EYE CANDY 3 >>> DROP SHADOW
Same settings
OPEN & ACTIVATE Raster 1

Open up the Misted By Sorensen_Designs - Blonde Girl SD Tube image in your PSP workspace
(Or an image of your choice)
Right click on the Title Bar and select COPY from the options
Right click on the Title Bar of your frame image
and select PASTE AS NEW LAYER from the options.
Reposition with your MOVER tool

LAYERS >>> MERGE >>> MERGE VISIBLE
Save as .gif image
Page designed by

for

http://www.artistrypsp.com/
Copyright ©
2000-2010 Artistry In PSP / PSP Artistry
All rights reserved.
Unless specifically made available for
download,
no graphics or text may be removed from
this site for any reason
without written permission from Artistry
In PSP / PSP Artistry
|