EYELETS
PSP8/9/X
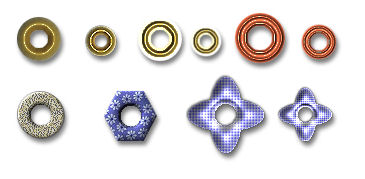
This tutorial was
written by Jemima ~ 2008
Copyright © 2008 ~ Jemima
~ All rights reserved
********************************
This was created using PSP9 but can be adapted for other versions of PSP.
You will need the
following to complete this tutorial
Materials
RIGHT CLICK >>> SAVE TARGET AS
56.bmp
an653lfblue.jpg
Save to your PSP Patterns folder
********************************
Open a new image 400 x 400
Transparent background
PSPX: Colour Depth = 8bits/channel
Flood fill with WHITE
In your MATERIALS PALETTE
Load a GRADIENT of your choice in your foreground and
use these settings
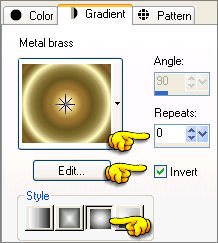
LAYERS >>> NEW RASTER LAYER
Choose your SELECTION TOOL
Selection Type = CIRCLE
Mode = Replace
Feather = 1
Antialias = Checked
Create a circle and Flood fill with the gradient

SELECTIONS >>> MODIFY >>> CONTRACT = 13
(This is what I used to get this...)

depending on the size of your circle you may need to adjust the
CONTRACT number.
EDIT >>> CLEAR
DESELECT
EFFECTS >>> 3D EFFECTS >>> INNER BEVEL
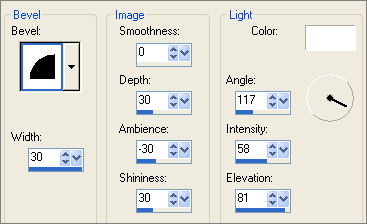

Rename this layer "eyelet 1"
Reposition with your MOVER tool to the top left of your image
Save as eyelets.psp image
************************************************************
LAYERS >>> DUPLICATE
Reposition with your MOVER tool to the centre of your image
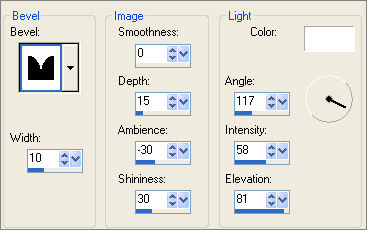
EFFECTS >>> 3D EFFECTS >>> INNER BEVEL
Same settings
BUT
Change the BEVEL to....


Rename this layer "eyelet 2 "
Reposition with your MOVER tool to the top left of your image
SAVE YOUR IMAGE
**********************************************************
LAYERS >>> NEW RASTER LAYER
Choose your SELECTION TOOL
Selection Type = CIRCLE
Mode = Replace
Feather = 1
Antialias = Checked
Create a circle and Flood fill with " #c05838 "
SELECTIONS >>> MODIFY >>> CONTRACT = 13
EDIT >>> CLEAR
EFFECTS >>> 3D EFFECTS >>> INNER BEVEL

Rename this layer "eyelet 3 "
Reposition with your MOVER tool to the top left of your image
SAVE YOUR IMAGE
* *************************************************** *
ACTIVATE "eyelet 1" layer
LAYERS >>> DUPLICATE
IMAGE >>> RESIZE = 70%
Ensure "Resize all layers" is UNCHECKED
EFFECTS >>> EDGE EFFECTS >>> ENHANCE

Rename this layer "eyelet 1b "
***********************************************************
ACTIVATE "eyelet 2 " layer
LAYERS >>> DUPLICATE
IMAGE >>> RESIZE = 70%
Ensure "Resize all layers" is UNCHECKED
 . . 
(These results show this eyelet on a white and dark background)
Rename this layer "eyelet 2b "
***********************************************************
ACTIVATE "eyelet 3 " layer
LAYERS >>> DUPLICATE
IMAGE >>> RESIZE = 70%
Ensure "Resize all layers" is UNCHECKED
ADJUST >>> SHARPNESS >>> SHARPEN MORE
Rename this layer "eyelet 3b "

***********************************************************

***********************************************************
LAYERS >>> NEW RASTER LAYER
In your MATERIALS PALETTE
Load the ' 56 ' pattern in your foreground
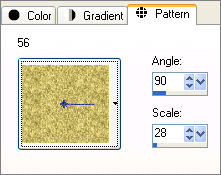
Choose your SELECTION TOOL
Selection Type = CIRCLE
Mode = Replace
Feather = 1
Antialias = Checked
Create a circle and Flood fill with the pattern
EFFECTS >>> EDGE EFFECTS >>> ENHANCE

EFFECTS >>> 3D EFFECTS >>> DROP SHADOW
Vertical & Horizontal offsets = 1
Colour = Black
Opacity = 60
Blur = 0
Repeat Drop Shadow effect changing
Vertical & Horizontal Offsets to - ( minus ) 1
Click OK
SELECTIONS >>> MODIFY >>> CONTRACT = 13
EDIT >>> CLEAR
DESELECT

EFFECTS >>> 3D EFFECTS >>> INNER BEVEL
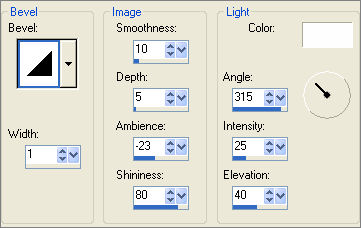

With your MAGIC WAND
Mode = Replace
Match Mode = RGB Value
Tolerance = 0
Feather = 1
Antialias = UNchecked
Sample Merged = CHECKED
PSP9/X: Check CONTIGUOUS
PSPX: There is no " Sample Merged"
PSPX: Use all layers = UNChecked
PSP9/X: ANTIALIAS = Inside
Select the CENTRE transparent area
EFFECTS >>> 3D EFFECTS >>>OUTER BEVEL
COLOUR = LIGHT GREY
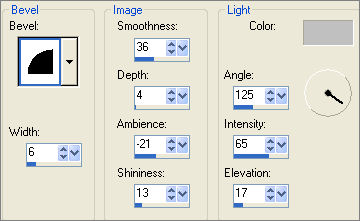

DESELECT
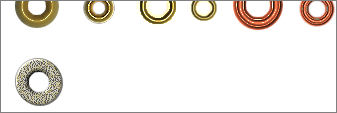
Rename this layer "eyelet 4 "
Reposition with your MOVER tool to the top left of your image ...
start a second row..
SAVE YOUR IMAGE
***********************************************************
In your MATERIALS PALETTE
Load the ' an653lfblue ' pattern in your foreground
using the settings below.
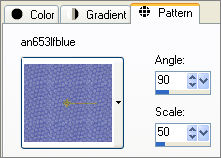
LAYERS >>> NEW RASTER LAYER
Choose your SELECTION TOOL
Selection Type = Hexagon
Mode = Replace
Feather = 1
Antialias = Checked
Draw a small hexagon shape

DESELECT
Right click on the Title Bar and select CUT from the options
Right click on the Title Bar of your image
and select PASTE AS NEW LAYER from the options.
CLOSE RASTER 2
LAYERS >>> NEW RASTER LAYER
Choose your SELECTION TOOL
Selection Type = CIRCLE
Mode = Replace
Feather = 1
Antialias = Checked
Draw a small circle shape and flood fill with black

DESELECT
Right click on the Title Bar and select CUT from the options
Right click on the Title Bar of your image and select PASTE AS NEW LAYER from the options.
With your MAGIC WAND ... Same settings
Select the CENTRE black circle

CLOSE RASTER 4
ACTIVATE RASTER 3
SELECTIONS >>> MODIFY >>> EXPAND = 2
EDIT >>> CLEAR
CLOSE RASTER 5

EFFECTS >>> 3D EFFECTS >>>OUTER BEVEL
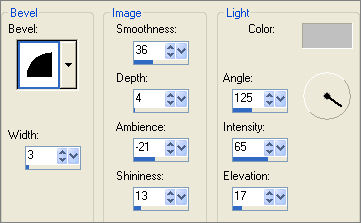
DESELECT
EFFECTS >>> 3D EFFECTS >>> INNER BEVEL
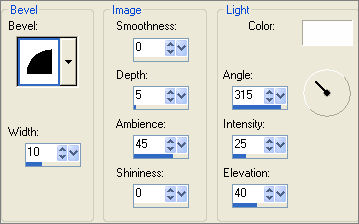

ADJUST >>> SHARPNESS >>> SHARPEN
Rename this layer "eyelet 5 "
Reposition with your MOVER tool to the top left second row of your image ...
DELETE RASTER LAYERS 2.4 AND 5
SAVE YOUR IMAGE
***********************************************************
LAYERS >>> NEW RASTER LAYER
Choose your SELECTION TOOL
Selection Type = ELLIPSE
Mode = Replace
Feather = 1
Antialias = Checked
Draw a small ellipse shape and flood fill with LIGHT GREY

LAYERS >>> DUPLICATE
IMAGE >>> ROTATE >>> FREE ROTATE = ROGHT 90
Ensure "All layers" is UNCHECKED

CLOSE ALL LAYERS EXCEPT THE TOP 2
LAYERS >>> MERGE >>> MERGE VISIBLE
Right click on the Title Bar and select CUT from the options
Right click on the Title Bar of your image and select PASTE AS NEW LAYER from the options.
DELETE THE MERGED LAYER
OPEN RASTER 1
ACTIVATE RASTER 2
LAYERS >>> NEW RASTER LAYER
Choose your SELECTION TOOL
Selection Type = CIRCLE
Mode = Replace
Feather = 1
Antialias = Checked
Draw a small circle shape and flood fill with black
DESELECT

Right click on the Title Bar and select CUT from the options
Right click on the Title Bar of your image and select PASTE AS NEW LAYER from the options.
DELETE RASTER 3
With RASTER 4 active
With your MAGIC WAND ... Same settings
Select the CENTRE black circle
ACTIVATE RASTER 2
EDIT >>> CLEAR
DESELECT

DELETE RASTER 4
Rename this layer "eyelet 6"
With your MAGIC WAND ... Same settings
Select the grey shape and flood fill with #8080ff
EFFECTS >>> TEXTURE EFFECTS >>> BLINDS
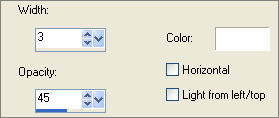
EFFECTS >>> TEXTURE EFFECTS >>> BLINDS
Same settings BUT this time check HORIZONTAL
With your MAGIC WAND ... Same settings
Select the CENTRE transparent circle

SELECTIONS >>> MODIFY >>> EXPAND = 2
EFFECTS >>> 3D EFFECTS >>>OUTER BEVEL

DESELECT
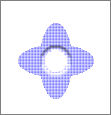
EFFECTS >>> 3D EFFECTS >>> INNER BEVEL
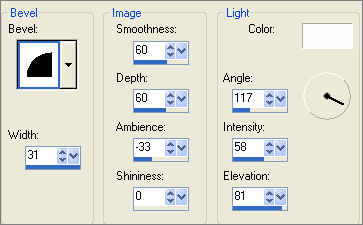

EFFECTS >>> 3D EFFECTS >>> DROP SHADOW
Vertical & Horizontal offsets = 1
Colour = Black
Opacity = 60
Blur = 3.00
Repeat
Drop Shadow effect changing
Vertical & Horizontal Offsets to - ( minus ) 1
Click OK
ADJUST >>> SHARPNESS >>> SHARPEN
OPEN ALL LAYERS
Reposition with your MOVER tool to the top left second row of your image ...
SAVE YOUR IMAGE
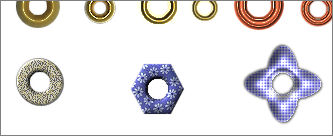
Page designed by

for
http://www.artistrypsp.com/
Copyright ©
2000-2008 Artistry In PSP / PSP Artistry
All rights reserved.
Unless specifically made available for
download,
no graphics or text may be removed from
this site for any reason
without written permission from Artistry
In PSP / PSP Artistry
|