WINGS
PSP8/9/X
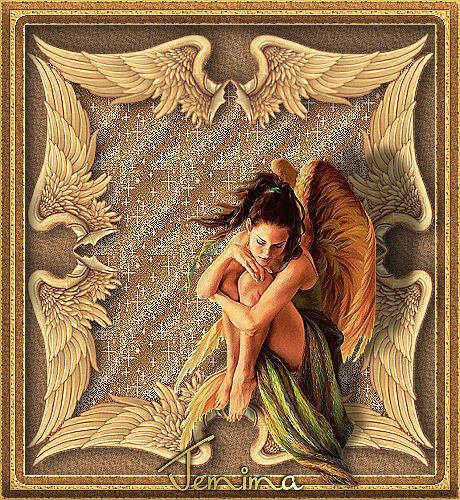
This tutorial was written by Jemima ~ April 2007
Copyright © 2007/8 ~ Jemima ~ All rights reserved
********************************
You will need the
following to complete this tutorial
Materials
Right click and SAVE TARGET AS
a-dozi's-winges-34b.psp
CINDA~DEBRASIEVERS~THESHEPHERDESS.psp
Save to a folder on your computer
Sidewalk.bmp (This comes with PSPX)
Save to your PSP Textures folder
07TCM.gif
Save to your PSP Patterns folder
Plugins
** EYE CANDY3 **
http://www.pircnet.com/downloads.html
********************************
REMEMBER TO SAVE YOUR WORK OFTEN
********************************
Open a new image 500 x 500
Transparent background
PSPX: Colour Depth = 8bits/channel
Open up the " a-dozi's-winges-34b.psp " in your PSP workspace
Right click on the Title Bar and select COPY from the options
Go to your new blank image ...
Right click on the Title Bar
and select PASTE AS NEW LAYER from the options.
IMAGE >>> RESIZE = 80%
Ensure "Resize all layers" is UNCHECKED
ADJUST >>> SHARPNESS >>> SHARPEN MORE
With your MOVER tool reposition the wings so that the centre is at
the 250 pixel mark on your horizontal ruler
and the wing tip is at the 35 pixel mark on your vertical ruler.

LAYERS >>> DUPLICATE
IMAGE >>> FLIP
ADJUST >>> SHARPNESS >>> SHARPEN
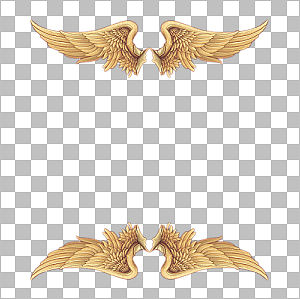
ACTIVATE RASTER 2
LAYERS >>> DUPLICATE
IMAGE >>> ROTATE >>> FREE ROTATE = RIGHT 90
Ensure "All layers" is UNCHECKED
ADJUST >>> SHARPNESS >>> SHARPEN
With your MOVER tool reposition the wings so they are
touching the top and bottom sets of wings
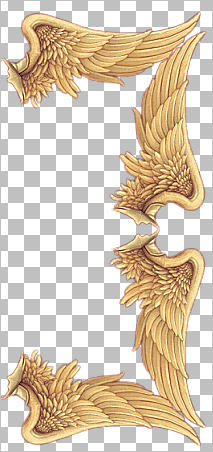
LAYERS >>> DUPLICATE
IMAGE >>> MIRROR
ADJUST >>> SHARPNESS >>> SHARPEN
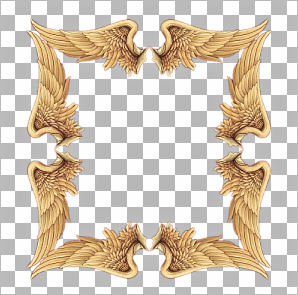
LAYERS >>> MERGE >>> MERGE VISIBLE
With your MAGIC WAND
Mode = Replace
Match Mode = RGB Value
Tolerance = 0
Feather = 0
Antialias = UNchecked
Sample Merged = UNCHECKED
PSP9/X: Check CONTIGUOUS
PSPX: There is no " Sample Merged"
PSPX: Use all layers = UNChecked
Select the OUTER transparent area
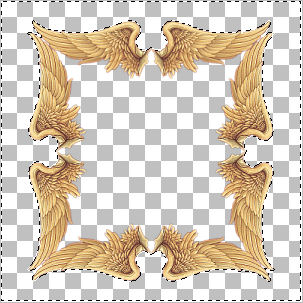
SELECTIONS >>> MODIFY >>> EXPAND = 3
LAYERS >>> NEW RASTER LAYER
LAYERS >>> ARRANGE >>> SEND TO BOTTOM
Flood fill with " #e5ba70 "
ADJUST >>> ADD/REMOVE NOISE >>> ADD NOISE
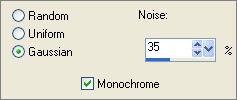
EFFECTS >>> TEXTURE EFFECTS >>> EMBOSS
ADJUST >>> HUE & SATURATION >>> COLORIZE

EFFECTS >>> 3D EFFECTS >>> INNER BEVEL
COLOUR = " #ffedcf "
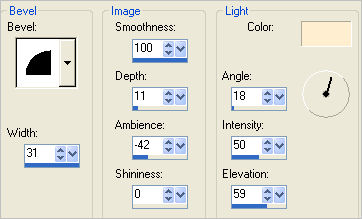 .. ..
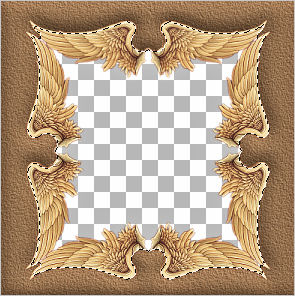
SELECTIONS >>> INVERT
SELECTIONS >>> MODIFY >>> EXPAND = 3
EFFECTS >>> PLUGINS >>> EYE CANDY 3 >>> DROP SHADOW
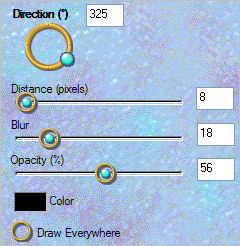 .. ..
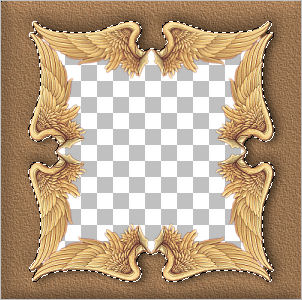
DESELECT
ACTIVATE THE MERGED LAYER
With your MAGIC WAND
Same settings
Select the CENTRE transparent area
SELECTIONS >>> MODIFY >>> EXPAND = 3
SELECTIONS >>> INVERT
LAYERS >>> NEW RASTER LAYER
LAYERS >>> ARRANGE >>> SEND TO BOTTOM
EFFECTS >>> PLUGINS >>> EYE CANDY 3 >>> DROP SHADOW
CHANGE 'OPACITY' TO 70%
DESELECT
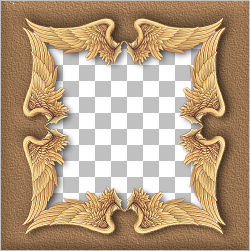
Choose your SELECTION TOOL then click on the CUSTOM SELECTION symbol
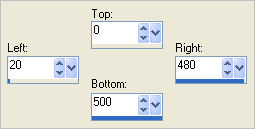
IMAGE >>> CROP TO SELECTION
LAYERS >>> MERGE >>> MERGE VISIBLE
LAYERS >>> NEW RASTER LAYER
SELECTIONS >>> SELECT ALL
SELECTIONS >>> MODIFY >>> CONTRACT = 25
SELECTIONS >>> INVERT
Flood fill with " #e5ba70 "
EFFECTS >>> TEXTURE EFFECTS >>> TEXTURE
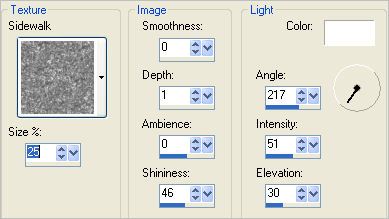
EFFECTS >>> EDGE EFFECTS >>> ENHANCE
SELECTIONS >>> MODIFY >>> CONTRACT = 3
EDIT >>> CLEAR
EFFECTS >>> 3D EFFECTS >>> DROP SHADOW
Vertical & Horizontal offsets = 1
Colour = Black
Opacity = 50
Blur = 0
Repeat Drop Shadow effect changing
Vertical & Horizontal Offsets to - ( minus ) 1
Click OK
Activate the MERGED layer
EFFECTS >>> 3D EFFECTS >>> INNER BEVEL
Same settings
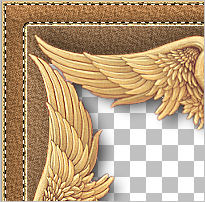
SELECTIONS >>> MODIFY >>> CONTRACT = 7
Flood fill with " #e5ba70 "
EFFECTS >>> TEXTURE EFFECTS >>> TEXTURE
Same settings
EFFECTS >>> EDGE EFFECTS >>> ENHANCE
EFFECTS >>> 3D EFFECTS >>> DROP SHADOW
Use the same settings
Click OK
Repeat Drop Shadow effect changing
Vertical & Horizontal Offsets to 1
Click OK
DESELECT
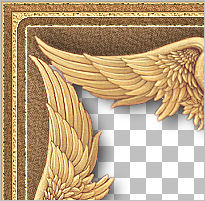
ACTIVATE RASTER 1
With your MAGIC WAND
Same settings
Select the CENTRE transparent area
SELECTIONS >>> INVERT
LAYERS >>> MERGE >>> MERGE VISIBLE
EFFECTS >>> 3D EFFECTS >>> INNER BEVEL
Same settings
EFFECTS >>> PLUGINS >>> EYE CANDY 3 >>> DROP SHADOW
Same settings
DESELECT
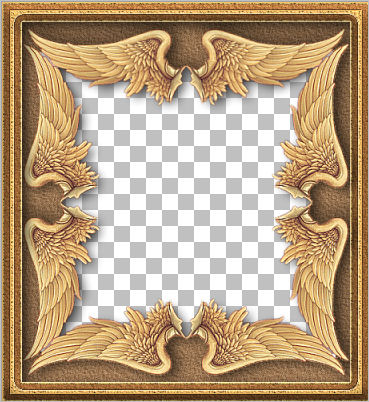
Save as .psp image
LAYERS >>> NEW RASTER LAYER
LAYERS >>> ARRANGE >>> SEND TO BOTTOM
Flood fill with " #e5ba70 "
EFFECTS >>> TEXTURE EFFECTS >>> SCULPTURE
COLOUR = " #f8c2b1"
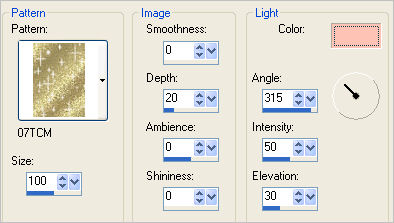
EFFECTS >>> EDGE EFFECTS >>> ENHANCE
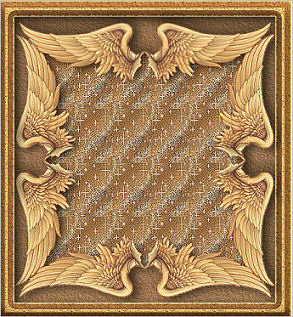
Activate the MERGED layer
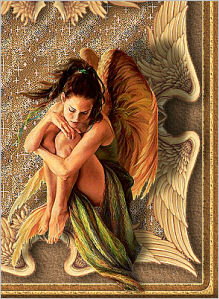
Open up your "CINDA~DEBRASIEVERS~THESHEPHERDESS.psp"image
in your PSP workspace
Right click on the Title Bar and select COPY from the options
Go to your frame image ...
Right click on the Title Bar
and select PASTE AS NEW LAYER from the options.
IMAGE >>> RESIZE = 55%
Ensure "Resize all layers" is UNCHECKED
Reposition as shown below.

EFFECTS >>> EDGE EFFECTS >>> ENHANCE
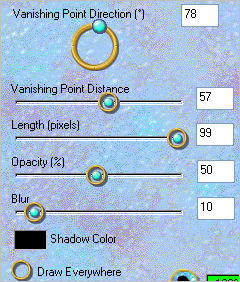
EFFECTS >>> PLUGINS >>> EYE CANDY 3 >>> PERSPECTIVE SHADOW
LAYERS >>> MERGE >>> MERGE ALL (Flatten)
Save as .jpg image
TESTERS RESULTS
Page designed by

for
http://www.artistrypsp.com/
Copyright ©
2000-2008 Artistry In PSP / PSP Artistry
All rights reserved.
Unless specifically made available for
download,
no graphics or text may be removed from
this site for any reason
without written permission from Artistry
In PSP / PSP Artistry
|