WARP FRAME
PSP8/9/X
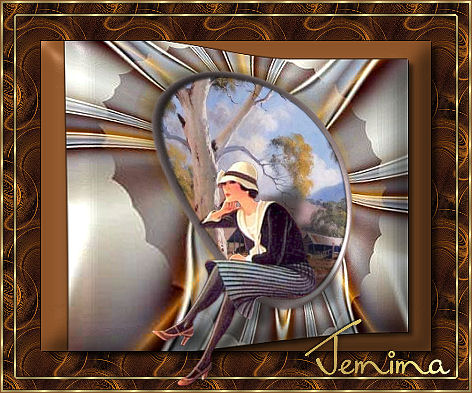
This tutorial was written by Jemima ~ July 2007
Copyright © 2007/8 ~ Jemima ~ All rights reserved
********************************
You will need the
following to complete this tutorial
Materials
Right click and SAVE TARGET AS
goldfill1.bmp
NikSeamless.jpg
Save to your PSP Patterns folder
abstract1.jpg
gumtrees.jpg
wilkinsonlady_mc.psp
Save to a folder on your computer
Plugins
** EYE CANDY3 **
http://www.pircnet.com/downloads.html
********************************
REMEMBER TO SAVE YOUR WORK OFTEN
********************************
Open up the " abstract1 " image in your PSP workspace
WINDOW >>> DUPLICATE
Close the original Image
LAYERS >>> Promote background layer
Choose your SELECTION TOOL
Selection Type = Ellipse
Mode = Replace
Feather = 2
Antialias = Checked
PSPX: Antialias = Checked (Inside)
With your cursor at 235 pixels across and 195 pixels down
drag your cursor down and to the right
ending at 360 pixels across and 320 pixels down
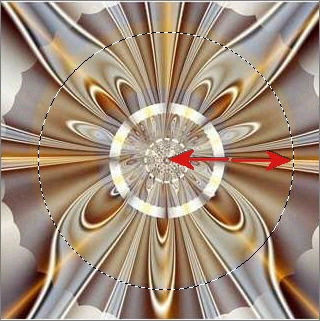
EDIT >>> CLEAR
SELECTIONS >>> MODIFY >>> EXPAND = 6
LAYERS >>> NEW RASTER LAYER
LAYERS >>> ARRANGE >>> MOVE DOWN
Flood fill with MAUVE " #988787 "
SELECTIONS >>> MODIFY >>> CONTRACT = 15
EDIT >>> CLEAR
DESELECT
EFFECTS >>> 3D EFFECTS >>> INNER BEVEL
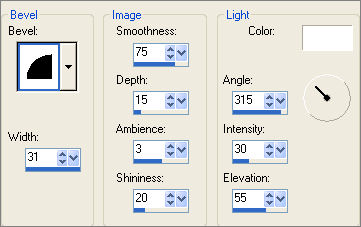
EDIT >>> Repeat Inner Bevel
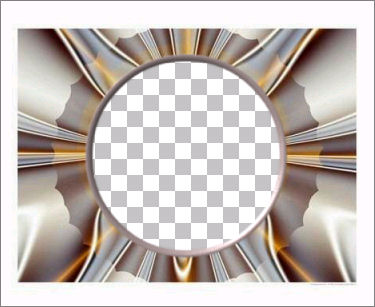
ACTIVATE RASTER 1
Choose your SELECTION TOOL then click on the CUSTOM SELECTION
symbol
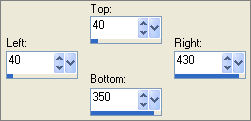
SELECTIONS >>> INVERT
EDIT >>> CLEAR
DESELECT
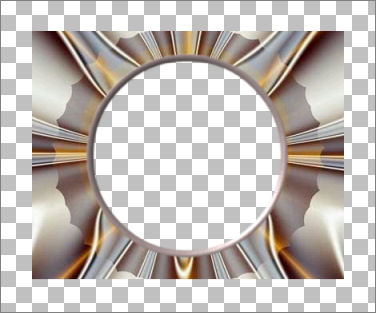
EFFECTS >>> DISTORTION EFFECTS >>> WARP

ACTIVATE RASTER 2
Repeat : EFFECTS >>> DISTORTION EFFECTS >>> WARP
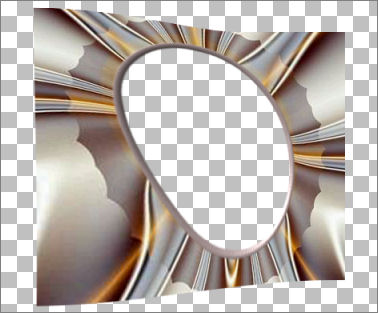
LAYERS >>> MERGE >>> MERGE VISIBLE
IMAGE >>> RESIZE = 88%
Ensure "Resize all layers" is UNCHECKED
EFFECTS >>> 3D EFFECTS >>> INNER BEVEL
Same settings
ADJUST >>> SHARPNESS >>> SHARPEN
Choose your SELECTION TOOL then click on the CUSTOM SELECTION
symbol

SELECTIONS >>> INVERT
EDIT >>> CLEAR
SELECTIONS >>> INVERT
LAYERS >>> NEW RASTER LAYER
LAYERS >>> ARRANGE >>> MOVE DOWN
Flood fill selected area with Dark Brown " #814d26 "
EFFECTS >>> 3D EFFECTS >>> INNER BEVEL
Same settings
EFFECTS >>> 3D EFFECTS >>> DROP SHADOW
Vertical & Horizontal offsets = 1
Colour = Black
Opacity = 60
Blur = 0
Repeat Drop Shadow effect changing
Vertical & Horizontal Offsets to - ( minus ) 1
Click OK
EFFECTS >>> 3D EFFECTS >>> DROP SHADOW
Vertical = 4
Horizontal = 6
Colour = Black
Opacity = 60
Blur = 6.00
DESELECT
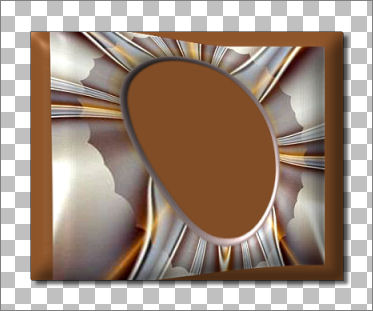
ACTIVATE the MERGED layer
With your MAGIC WAND
Mode = Replace
Match Mode = RGB Value
Tolerance = 0
Feather = 0
Antialias = UNchecked
Sample Merged = UNCHECKED
PSP9/X: Check CONTIGUOUS
PSPX: There is no " Sample Merged"
PSPX: Use all layers = UNChecked
Select the CENTRE area of the image
SELECTIONS >>> MODIFY >>> EXPAND = 6
ACTIVATE RASTER 1
EDIT >>> CLEAR
DESELECT
ACTIVATE the MERGED layer
With your MAGIC WAND
Same settings
Select the OUTER transparent area
SELECTIONS >>> INVERT
EFFECTS >>> 3D EFFECTS >>> DROP SHADOW
Vertical & Horizontal offsets = 1
Colour = Black
Opacity = 60
Blur = 0
Repeat Drop Shadow effect changing
Vertical & Horizontal Offsets to - ( minus ) 1
Click OK
LAYERS >>> NEW RASTER LAYER
LAYERS >>> ARRANGE >>> MOVE DOWN
SELECTIONS >>> MODIFY >>> CONTRACT = 2
EFFECTS >>> 3D EFFECTS >>> DROP SHADOW
Vertical = 4
Horizontal = 6
Colour = Black
Opacity = 60
Blur = 6.00
DESELECT
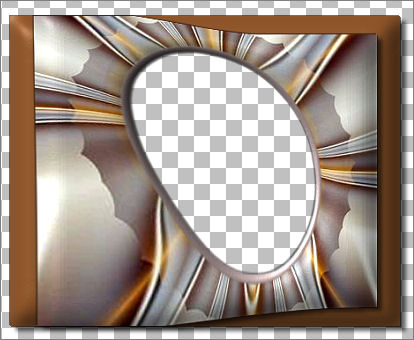
LAYERS >>> NEW RASTER LAYER
LAYERS >>> ARRANGE >>> SEND TO BOTTOM
Flood fill with MAUVE "
#988787 "
EFFECTS >>> TEXTURE EFFECTS >>> SCULPTURE
COLOUR = " #814d26 "
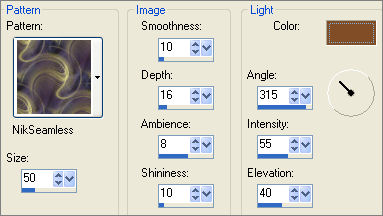
ADJUST >>> SHARPNESS >>> SHARPEN MORE
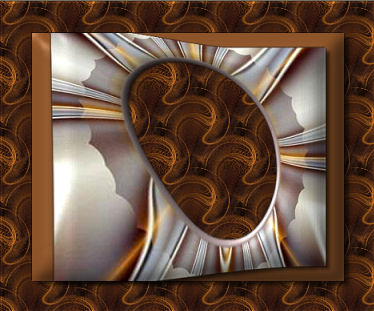
ACTIVATE RASTER 1
With your MAGIC WAND
Same settings
Select the CENTRE area of the image
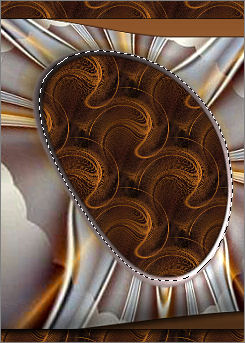
ACTIVATE RASTER 3
EDIT >>> CLEAR
DESELECT
LAYERS >>> MERGE >>> MERGE VISIBLE
ADJUST >>> SHARPNESS >>> SHARPEN
In your MATERIALS PALETTE
Load the "goldfill" pattern in the foreground
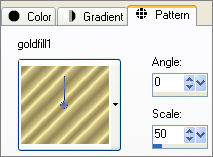
LAYERS >>> NEW RASTER LAYER
SELECTIONS >>> SELECT ALL
SELECTIONS >>> MODIFY >>> CONTRACT = 15
SELECTIONS >>> INVERT
Flood fill with GOLD pattern
SELECTIONS >>> MODIFY >>> CONTRACT = 2
EDIT >>> CLEAR
DESELECT
EFFECTS >>> 3D EFFECTS >>> DROP SHADOW
Vertical & Horizontal offsets = 1
Colour = Black
Opacity = 60
Blur = 0
Repeat Drop Shadow effect changing
Vertical & Horizontal Offsets to - ( minus ) 1
Click OK
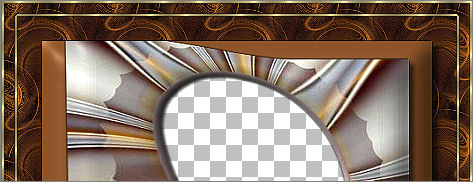
LAYERS >>> MERGE >>> MERGE VISIBLE
Save as .psp image
*/*/*/*/*
Open up the " gumtrees.jpg " image in your PSP workspace
WINDOW >>> DUPLICATE
Close the original Image
IMAGE >>> RESIZE = 75%
Ensure "Resize all layers" is UNCHECKED
Right click on the Title Bar and select COPY from the options
Go to your frame image ...
Right click on the Title Bar
and select PASTE AS NEW LAYER from the options.
LAYERS >>> ARRANGE >>> SEND TO BOTTOM
Reposition to suit with your MOVER tool
ADJUST >>> SHARPNESS >>> SHARPEN
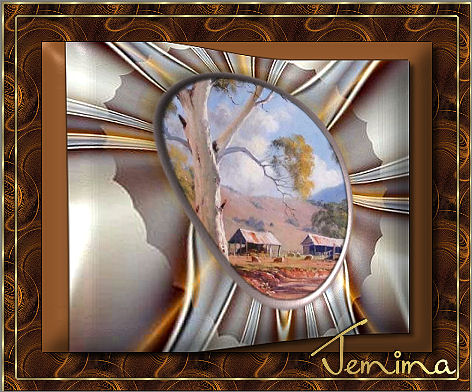
ACTIVATE the MERGED layer
Open up the " wilkinsonlady_mc.psp " image in your PSP workspace
Right click on the Title Bar and select COPY from the options
Go to your frame image ... Right click on the Title Bar
and select PASTE AS NEW LAYER from the options.
IMAGE >>> RESIZE = 70%
Ensure "Resize all layers" is UNCHECKED
Reposition with your MOVER tool
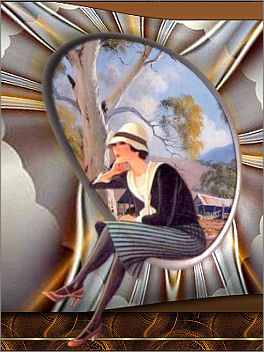
EFFECTS >>> PLUGINS >>> EYE CANDY 3 >>> PERSPECTIVE SHADOW
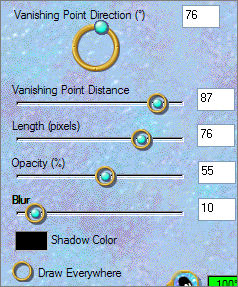
ADJUST >>> SHARPNESS >>> SHARPEN
LAYERS >>> MERGE >>> MERGE ALL (Flatten)
Save as .jpg image
TESTERS RESULTS
Page designed by

for
http://www.artistrypsp.com/
Copyright ©
2000-2008 Artistry In PSP / PSP Artistry
All rights reserved.
Unless specifically made available for
download,
no graphics or text may be removed from
this site for any reason
without written permission from Artistry
In PSP / PSP Artistry
|