THANKSGIVING FRAME
PSP8/9/X

This tutorial was written by Jemima ~ July 2007
Copyright © 2007/8 ~ Jemima ~ All rights reserved
********************************
You will need the
following to complete this tutorial
Materials
Right click and SAVE TARGET AS
D_wwoodbrder.msk
Save to a folder on your computer
E-7023-C2.jpg
Save to your PSP Patterns folder
Plugins
** EYE CANDY3 **
http://www.pircnet.com/downloads.html
********************************
REMEMBER TO SAVE YOUR WORK OFTEN
********************************
Open up the " D_wwoodbrder.msk " in your PSP workspace
Open a new image 625 x 525
Transparent background
PSPX: Colour Depth = 8bits/channel
Flood fill with BLACK
LAYERS >>> NEW RASTER LAYER
Flood fill with " #ff4f56 "
LAYERS >>> NEW MASK LAYER >>> FROM IMAGE
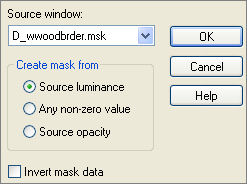
LAYERS >>> DELETE

YES
LAYERS >>> MERGE >>> MERGE GROUP
With your MAGIC WAND
Mode = Replace
Match Mode = RGB Value
Tolerance = 35
Feather = 0
Antialias = UNchecked
Sample Merged = UNCHECKED
PSP9/X: Check CONTIGUOUS
PSPX: There is no " Sample Merged"
PSPX: Use all layers = UNChecked
Select the leaf frame
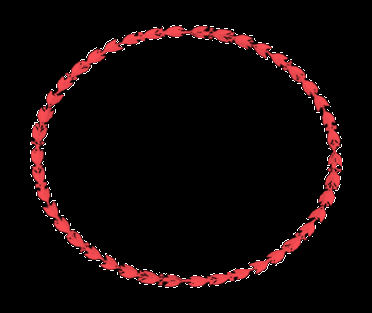
EFFECTS >>> EDGE EFFECTS >>> ENHANCE MORE
DESELECT
IMAGE >>> RESIZE = 80%
Ensure "Resize all layers" is UNCHECKED
EFFECTS >>> 3D EFFECTS >>> DROP SHADOW
Vertical & Horizontal offsets = 1
Colour = " #bf7065 "
Opacity = 60
Blur = 0
Repeat Drop Shadow effect changing
Vertical & Horizontal Offsets to - ( minus ) 1
Click OK
EFFECTS >>> 3D EFFECTS >>> DROP SHADOW
Vertical & Horizontal offsets = 1
Colour = BLACK
Opacity = 60
Blur = 0
Repeat Drop Shadow effect changing
Vertical & Horizontal Offsets to - ( minus ) 1
Click OK
ADJUST >>> SHARPNESS >>> SHARPEN
With your MAGIC WAND
Same settings
Select the CENTRE BLACK area
SELECTIONS >>> MODIFY >>> EXPAND = 4
ACTIVATE RASTER 1
EDIT >>> CLEAR
DESELECT
LAYERS >>> NEW RASTER LAYER
Choose your SELECTION TOOL then click on the CUSTOM SELECTION
symbol
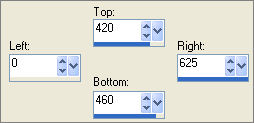
Flood fill with " #ff4f56 "
EFFECTS >>> TEXTURE EFFECTS >>> SCULPTURE
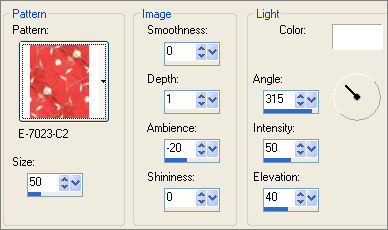
EFFECTS >>> 3D EFFECTS >>> DROP SHADOW
Vertical & Horizontal offsets = 1
Colour = Black
Opacity = 60
Blur = 0
Repeat Drop Shadow effect changing
Vertical & Horizontal Offsets to - ( minus ) 1
Click OK
EFFECTS >>> 3D EFFECTS >>> INNER BEVEL
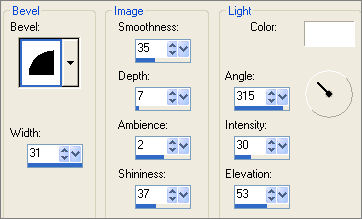
Choose your SELECTION TOOL then click on the CUSTOM SELECTION symbol
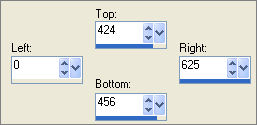
EFFECTS >>> 3D EFFECTS >>> DROP SHADOW
Use the same settings
Click OK
Repeat Drop Shadow effect changing
Vertical & Horizontal Offsets to 1
Click OK
EFFECTS >>> 3D EFFECTS >>> INNER BEVEL
Same settings
Choose your SELECTION TOOL then click on the CUSTOM SELECTION symbol
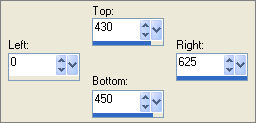
EFFECTS >>> 3D EFFECTS >>> DROP SHADOW
Use the same settings
Click OK
Repeat Drop Shadow effect changing
Vertical & Horizontal Offsets to 1
Click OK
EFFECTS >>> 3D EFFECTS >>> INNER BEVEL
CHANGE AMBIENCE to - (minus) 6
Choose your SELECTION TOOL then click on the CUSTOM SELECTION symbol
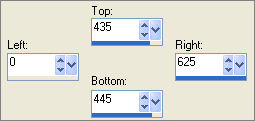
EFFECTS >>> 3D EFFECTS >>> DROP SHADOW
Use the same settings
Click OK
Repeat Drop Shadow effect changing
Vertical & Horizontal Offsets to 1
Click OK
DESELECT
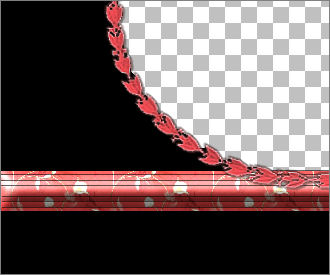
LAYERS >>> DUPLICATE
Using your MOVER tool, hover your cursor at the top edge of the border
lining your cursor up with the 300 pixel mark on the top ruler ...

... drag the image downwards so that the top edge is around the 510 pixel mark on the left ruler..
ensure your cursor is still level with the 300 pixel mark on the top ruler
before releasing the mouse button.
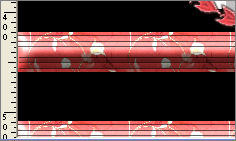
CLOSE " Group - Raster 2" and "Raster 1"
LAYERS >>> MERGE >>> MERGE VISIBLE

LAYERS >>> NEW RASTER LAYER
LAYERS >>> ARRANGE >>> MOVE DOWN
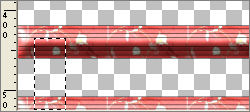
Choose your SELECTION TOOL then click on the CUSTOM SELECTION symbol
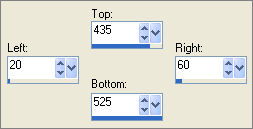 . . 
Flood fill with " #ff4f56 "
EFFECTS >>> TEXTURE EFFECTS >>> SCULPTURE
Same settings
EFFECTS >>> 3D EFFECTS >>> DROP SHADOW
Use the same settings
Click OK
Repeat Drop Shadow effect changing
Vertical & Horizontal Offsets to 1
Click OK
EFFECTS >>> 3D EFFECTS >>> INNER BEVEL

SELECTIONS >>> MODIFY >>> CONTRACT = 4
EFFECTS >>> 3D EFFECTS >>> DROP SHADOW
Use the same settings
Click OK
Repeat Drop Shadow effect changing
Vertical & Horizontal Offsets to 1
Click OK
EFFECTS >>> 3D EFFECTS >>> INNER BEVEL
Same settings
SELECTIONS >>> MODIFY >>> CONTRACT = 4
EFFECTS >>> 3D EFFECTS >>> DROP SHADOW
Use the same settings
Click OK
Repeat Drop Shadow effect changing
Vertical & Horizontal Offsets to 1
Click OK
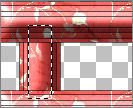
SELECTIONS >>> MODIFY >>> CONTRACT = 6
EFFECTS >>> 3D EFFECTS >>> DROP SHADOW
Use the same settings
Click OK
Repeat Drop Shadow effect changing
Vertical & Horizontal Offsets to 1
Click OK
EFFECTS >>> 3D EFFECTS >>> INNER BEVEL
CHANGE AMBIENCE to - (minus) 6
DESELECT
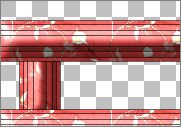
LAYERS >>> DUPLICATE
IMAGE >>> MIRROR
LAYERS >>> MERGE >>> MERGE VISIBLE
With your MAGIC WAND
Same settings
Select the 3 transparent sections shown below

SELECTIONS >>> MODIFY >>> EXPAND = 3
LAYERS >>> NEW RASTER LAYER
LAYERS >>> ARRANGE >>> MOVE DOWN
Flood fill with " #ff4f56 "
EFFECTS >>> TEXTURE EFFECTS >>> SCULPTURE
Same settings
LAYERS >>> NEW RASTER LAYER
SELECTIONS >>>INVERT
EFFECTS >>> PLUGINS >>> EYE CANDY 3 >>> DROP SHADOW
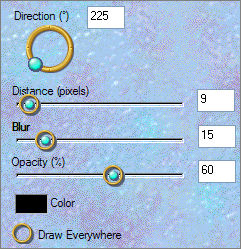
EFFECTS >>> PLUGINS >>> EYE CANDY 3 >>> DROP SHADOW
Change the DIRECTION to 315
DESELECT

LAYERS >>> MERGE >>> MERGE VISIBLE
OPEN ALL LAYERS
ACTIVATE " Group - Raster 2 "
With your MAGIC WAND
Same settings
Select the CENTRE transparent area
SELECTIONS >>> MODIFY >>> EXPAND = 4
SELECTIONS >>> INVERT
LAYERS >>> NEW RASTER LAYER
LAYERS >>> ARRANGE >>> MOVE DOWN
EFFECTS >>> PLUGINS >>> EYE CANDY 3 >>> DROP SHADOW
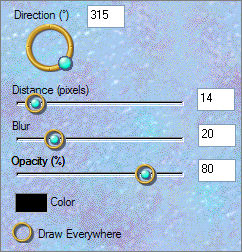
DESELECT
ACTIVATE THE MERGED LAYER
LAYERS >>> NEW RASTER LAYER
Choose your SELECTION TOOL then click on the CUSTOM SELECTION symbol
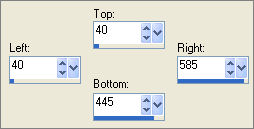
SELECTIONS >>> INVERT
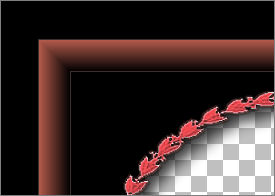
EFFECTS >>> 3D EFFECTS >>> CHISEL
COLOUR = " #b75c4d "

DESELECT
EFFECTS >>> 3D EFFECTS >>> DROP SHADOW
Vertical & Horizontal offsets = 1
Colour = #684e4e
Opacity = 60
Blur = 0
Repeat Drop Shadow effect changing
Vertical & Horizontal Offsets to - ( minus ) 1
Click OK
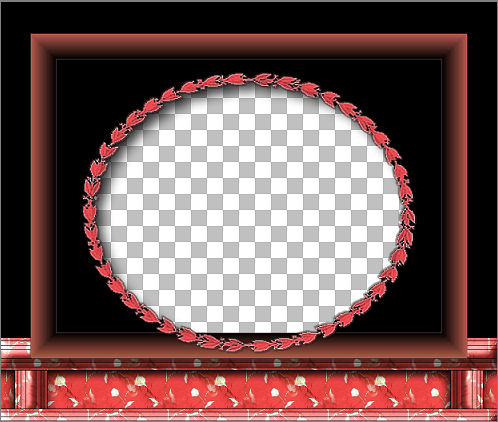
ACTIVATE " Group - Raster 2 "
With your MAGIC WAND
Same settings
Select the CENTRE transparent area
SELECTIONS >>> MODIFY >>> EXPAND = 5
ACTIVATE " Raster 3 "
EDIT >>> CLEAR
DESELECT
LAYERS >>> MERGE >>> MERGE VISIBLE
With your MAGIC WAND
Same settings
Select the area shown below
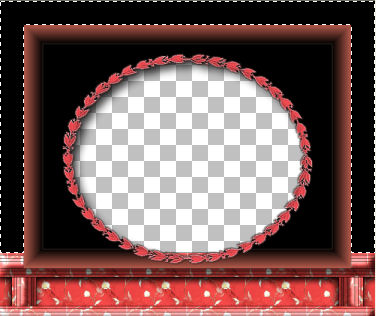
LAYERS >>> NEW RASTER LAYER
Flood fill with " #ff4f56 "
EFFECTS >>> TEXTURE EFFECTS >>> SCULPTURE
Same settings
SELECTIONS >>> MODIFY >>> CONTRACT = 3
EDIT >>> CLEAR
DESELECT
EFFECTS >>> 3D EFFECTS >>> DROP SHADOW
Vertical & Horizontal offsets = 1
Colour = Black
Opacity = 60
Blur = 0
Repeat Drop Shadow effect changing
Vertical & Horizontal Offsets to - ( minus ) 1
Click OK
ADJUST >>> SHARPNESS >>> SHARPEN
LAYERS >>> MERGE >>> MERGE VISIBLE
Save as .psp image
The frame is now ready for an image of your choice.
If you wish to use the images I used... you can get them at the following links.
Right click and SAVE TARGET AS
chili_Chestnuts01.psp
BKFallWagonWelcome.psp
TESTERS RESULTS
Page designed by

for
http://www.artistrypsp.com/
Copyright © 2000-2008 Artistry In PSP / PSP Artistry
All rights reserved.
Unless specifically made available for
download,
no graphics or text may be removed from
this site for any reason
without written permission from Artistry
In PSP / PSP Artistry
|